
User`s guide

Section II: Local and Telnet Management
138
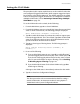
12. Press Esc or type R to return to the Configure VLANS menu. To verify
that the VLAN was created correctly, complete steps 13 through 14.
Otherwise, you can repeat this procedure to create additional VLANs.
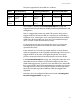
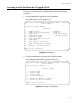
13. Type 7 to select Show VLANs.
14. Check to see that the VLAN was created correctly and that it contains
the appropriate ports. If you need to modify the VLAN, go to
Modifying a VLAN on page 141.
Note
Ports designated as untagged ports of the new VLAN are
automatically removed from their current untagged VLAN
assignment. For example, if you are creating a new VLAN on a switch
that contains only the Default_VLAN, the ports that you specify as
untagged ports of the new VLAN are automatically removed from
the Default_VLAN.
Tagged ports are not removed from any current VLAN assignments
because tagged ports can belong to more than one VLAN at a time.