
Installation guide


Installation
6
Placing the Hub
You can wall mount a single LanEdge product, place it on a desktop, or
interlock two or more to form a single unit that occupies only one footprint on
the desktop.
Caution
Air vents must not be blocked and must have free access to the room
ambient air for cooling.
To place your LanEdge product, see the steps that follow:
❑
“To Place a Single LanEdge Product on a Desktop” on page 6.
❑
“To Wall Mount a LanEdge Product” on page 6.
❑
“To Interlock a Group of LanEdge Products on a Desktop” on page 7.
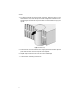
To Place a Single LanEdge Product on a Desktop
1. Place the unit up-side down.
2. Locate the rubber feet and bumpers from the accessory bag. Remove the
paper cover from the adhesive and press a rubber foot into each round
receptacle on the bottom of the unit. Remove the paper cover from the
adhesive and press a rubber bumper into each square receptacle on the
bottom of the unit.
3. Put the unit on the desktop. Skip to “Powering on the Hub” on page 9.
To Wall Mount a LanEdge Product
1. Do not install the rubber feet or bumpers if you are wall mounting the
product. If you previously installed the square rubber bumpers, remove
them using the following step. (The round rubber feet need not be
removed.)
❑
To remove the square rubber bumper from the unit:
Place the unit upside down. For each bumper, insert the tip of a small
straight-slot screwdriver between the rubber bumper and the unit
casing. Press down on the screwdriver to pry the bumper off.
2. Prepare the wall by installing two screws (provided) at 9 1/4-inch (23.5 cm)
apart on center.
3. Position the unit onto the screws. Skip to “Powering on the Hub” on page 9.