Model #835534 AIR COMPRESSOR 19 Gallon / 3 Peak HP 0000000 If you encounter any problems or difficulties, Do not return your compressor to the store! Please contact our toll-free customer service department at: 1-800-423-3598 • 1-310-522-9008 (California Only) • www.alltradetools.
It is the owner and/or operator’s responsibility to study all WARNINGS, operating, and maintenance instructions contained on the product label and instruction manual prior to operation of this unit. The owner/operator shall retain product instructions for future reference. The owner and/or operator is responsible for maintenance, maintaining all decals or warning labels and while in use, maintaining the unit in good working order.
SPECIFICATIONS Two Pole Induction Motor 3450 RPM Power 115V, 60 Hz, 15 Amps Air Delivery 4.9 SCFM output @ 40 PSI 3.8 SCFM output @ 90 PSI Maximum Pressure 125 PSI Duty Cycle 75% 3.0 Peak HP / 2.0 Running HP 19 Gallon Tank Oil Lubricated Direct Drive Pump Cast Iron Cylinder Thermal Overload Protection for Safety High Flow Regulator for Precision Air Flow Control Tank and Outlet Pressure Gauges Duty Cycle: This air compressor pump is capable of running continuously.
INTRODUCTION This oil lubricated air compressor is designed for Household Use Only and is not intended for commercial applications. It is well suited for do-ityourselfers with a variety of automotive and home uses. This instruction manual is intended for your benefit. Please read and follow the safety, installation, maintenance and troubleshooting steps described within to ensure your safety and satisfaction.
SAFETY WARNINGS READ ALL SAFETY WARNINGS BEFORE USING AIR COMPRESSOR. GENERAL SAFETY WARNINGS: • Keep work area clean. Messy areas and cluttered workbenches invite personal injury and/or property damage. • Keep children and visitors away. All children should be kept away from the work area. DO NOT let children handle the compressor or extension cord. Maintain a safe distance for any person near the work area.
DRAIN LIQUID FROM AIR TANK DAILY • Use the drain valve located on the bottom of the lower air tank to drain. Failure to properly drain liquid from the tank will cause rust from moisture buildup, which weakens the tank and could lead to a violent tank explosion. Periodically inspect the tanks for unsafe conditions such as corrosion, cracked welds, and leaks. • Release air slowly when draining moisture or depressurizing the air compressor.
RISK OF FALLING Portable air compressors can fall from a table, workbench, or roof causing damage to the compressor and could result in serious injury or death to the operator. Always operate air compressor in a stable and secure position to prevent accidental movement of the unit. Never operate air compressor on a roof or other elevated position. Use additional air hose to reach high locations.
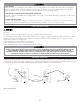
DANGER IMPROPER INSTALLATION OF THE GROUNDING PLUG CAN RESULT IN A RISK OF ELECTRIC SHOCK. IF REPAIR OR REPLACEMENT OF THE CORD IS NECESSARY, DO NOT CONNECT THE GROUNDING WIRE TO EITHER FLAT BLADE TERMINAL. THE WIRE WITH GREEN INSULATION WITH OR WITHOUT YELLOW STRIPES IS THE GROUNDING WIRE. THIS PRODUCT IS FOR USE ON A NOMINAL 120-VOLT CIRCUIT AND HAS A THREE-PRONG GROUNDING PLUG THAT LOOKS LIKE THE PLUG ILLUSTRATED IN FIGURE 1.
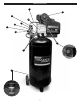
COMPRESSOR FEATURES 11 9 6 1 4 3 5 7 10 2 8 7
COMPRESSOR FEATURES 1 OIL LUBRICATION: Oil lubricated direct drive pump with cast-iron cylinder for durability. 2 OIL FILL SIGHT GLASS: Located on the face of the crankcase, the oil fill sight glass provides a convenient way to check the oil fill level within the pump. The oil level must be checked prior to each use to ensure proper fill level. DO NOT OPERATE THE COMPRESSOR WITHOUT LUBRICANT, OR WITH LOW LUBRICATION LEVEL.
ASSEMBLY INSTRUCTIONS THE COMPRESSOR IS SHIPPED WITHOUT OIL IN THE CRANKCASE. ADD OIL AS INDICATED BELOW. STEP 1 – PUMP LUBRICATION This air compressor features an oil lubricated pump that requires the use of SAE 30 weight non-detergent air compressor oil. Adding Compressor Oil: 1. Place air compressor on a flat, level surface. 2. Remove plastic oil fill breather plug (see Fig. 1). Fig. 1 3.
OPERATION INITIAL SETUP / BREAK-IN PROCEDURE: Do not attach air hose, air tools or other air accessories to the air outlet until break-in procedure has been successfully completed. 1. 2. 3. 4. Read and understand the entire instruction manual, including all safety warnings before setting up air compressor. Place air compressor on a flat, level surface. Check oil fill level in crankcase and add oil as needed. Turn the pressure regulator knob fully clockwise to open airflow from air outlet port.
SHUTDOWN AND STORAGE: NOTE: NEVER stop the air compressor by unplugging it from the power outlet as this may result in damage to the compressor. 1. Turn the switch to the OFF position 2. Disconnect the power cord from the power outlet by grabbing the plug (not the cord). Loop around handle for storage. 3. Turn the pressure regulator knob fully counterclockwise to close airflow from air outlet port. Check the outlet pressure gauge to ensure that it reads 0 PSI. 4. Remove the air hose and any air accessories.
CHECKING SAFETY RELIEF VALVE: SAFETY RELIEF VALVE MUST BE REPLACED IF IT CANNOT BE ACTUATED OR IT LEAKS AIR AFTER THE RING IS RELEASED. 1. 2. 3. 4. 5. 6. The air compressor must be turned OFF. Disconnect compressor from the power source. Open tank drain to bleed off all air pressure before attempting any maintenance or repair. Allow compressor to fully cool before attempting any maintenance or repair. Grasp the wire ring on the safety relief valve.
TROUBLESHOOTING GUIDE Problem Encountered Possible Cause Possible Solution The compressor does not start or restart: Power cord not plugged in. Motor/Pressure switch in OFF position Plug cord into grounded outlet. Move switch to AUTO position. Motor thermal overload switch has tripped. Turn air compressor off, wait until the motor is cool, then press motor thermal overload (red) button firmly until click is heard. Fuse blown or circuit breaker has tripped. Replace fuse or reset circuit breaker.
TROUBLESHOOTING GUIDE Problem Encountered Possible Cause Possible Solution Air continues to leak at motor/pressure switch release valve while motor is running: Defective motor/pressure switch. Check valve stuck in open position. Replace. Replace check valve. DANGER — Do not disassemble the check valve with tank pressurized. Open tank petcock valve to allow air to escape from tank prior to servicing. Air leaks from safety relief valve: Possible defective safety relief valve.
PARTS LIST NO. PART NO.
PARTS DIAGRAM 16
ONE YEAR LIMITED WARRANTY ALLTRADE TOOLS LLC AIR COMPRESSORS Express and Exclusive Limited Warranty to Original Retail Buyer Alltrade Tools LLC (hereinafter “Alltrade”) expressly warrants to the original retail purchaser of the accompanying air compressor and no one else all parts of the product (except those parts referred to below which are specifically excluded from such warranty (see Exclusions) ) to be free from defects in materials and workmanship during the following periods from the original date of
Alltrade will not be liable for the following: labor charges, loss or damage resulting from improper operation, maintenance or repairs made by other persons; pre-delivery services such as assembly, oil or lubricants, and adjustment; maintenance services that are normally required to maintain the air compressor. The use of other than genuine Alltrade Repair Parts will void warranty. Warranty Disclaimers EXCLUSION AND DISCLAIMER OF ALL OTHER EXPRESS WARRANTIES, GUARANTIES AND/OR REPRESENTATIONS.
ALLTRADE TOOLS LLC 1431 VIA PLATA LONG BEACH, CA 90810-1462 www.alltradetools.com ©COPYRIGHT 2006, ALLTRADE TOOLS LLC REV.