
Instructions / Assembly

Installation Instructions:
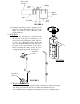
FIGURE 2
POST DEPTH
HEIGHT DEPTH
4 1/2’ fence ≅ 18”
Set concrete 4” below
ground surface to allow
grass to grow over
See chart at
right
2” – 3” recommended for
easy lawn maintenance. 2”
maximum for pool fence.
Pack concrete 2”
below post or below
frost line whichever
is greater.
6” hole
diamete
r
Post Cap
FIGURE 3
CAUTION: In areas where ground frost
occurs extend the concrete footing below
the frost line.
NOTE: Local municipalities may require
different hole depths than those shown
below. You must verify that these depths
meet all local building codes.
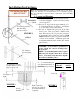
2. Post Installation
1/8” between
post and string
Note: Local municipalities may require a setback from property line to
fence line, otherwise, it is recommended to be 2” inside the property
line. It is important to find out all the requirements before installing
y
our fence.
2”
STRING
FIGURE 1
2” between property
line and string
(See note above)
PROPERTY
LINE
1. Layout and Planning
1.1. First stake out the area and run strings around
as shown in Figure 1. Gates need to be located
on level ground.
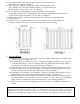
1.2. Proceed to dig post holes approximately 3” to
4” wider than the gate on centers See Figure
2 (on next page) for post hole depth.
1.3. Be sure to separate the gate posts from other
fence posts. Gate posts have a thicker wall
than other fence posts. To prevent your fence
from running short of the next gate post DO
NOT install more than one gate for each line
of fence to be installed. Additional gates will
be installed when the fence reaches the desired
gate location.
Call before you dig:
1 800 272 1000