Allworx® Phone Guide 9224
No part of this publication may be reproduced, stored in a retrieval system, or transmitted in any form or by any means, electronic, mechanical, photocopy, recording, or otherwise without the prior written permission of Allworx Corp. © 2012 Allworx Corp, a Windstream company. All rights reserved. All other names may be trademarks or registered trademarks of their respective owners.
Phone Guide – 9224 Table of Contents 1 GETTING STARTED .................................................................................................................................................... 1 1.1 1.2 1.3 2 W HAT IS IN THE BOX? ............................................................................................................................................. 1 CONNECTING THE PHONE ......................................................................................................
Phone Guide – 9224 8 ADDITIONAL INFORMATION .................................................................................................................................... 20 9 WALL MOUNTING (OPTIONAL) ............................................................................................................................... 21 10 REGULATORY NOTICES ..........................................................................................................................................
Phone Guide – 9224 1 Getting Started 1.1 What is in the box? Check the contents of the box your phone came in.
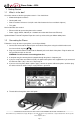
Phone Guide – 9224 7. After applying power, the phone will initialize itself. You can watch its progress on the phone’s screen. A normal sequence would include: a. Allworx Logo. b. Configuring Network c. Starting network. d. Loading configuration files. e. Station Init complete. f. After successful startup, the phone will display date, time, your presence, your name, and extension. g. If the phone does not follow this sequence or displays an error, contact your System Administrator. 1.
Phone Guide – 9224 2 Adjusting Your Phone 2.1 Base Assembly and Adjusting the Angle of the Phone You can adjust the Allworx 9224 phone on its base so that it is easy to use and easy to read the screen. 1. Lay the phone face down on a soft surface with top of the phone pointed away from you. 2. The base will connect to the back of the phone in one of three positions, thus allowing the phone to be adjusted at different angles when sitting on a desktop. The nearest set of holes provides the steepest angle.
Phone Guide – 9224 3 Introduction to your Allworx Phone Your new Allworx phone supports two modes of operation: PBX (Private Branch Exchange) Mode and Key System Mode. Your System Administrator has pre-configured the phone for one of these two modes. Each programmable button on the phone will function differently depending on the mode of the phone.
Phone Guide – 9224 4 Button Operation Button KEYPAD Light None Purpose Use the keypad to dial numbers in order to place a call. MESSAGES Solid red if new messages are present. Access the Message Center. INTERCOM Solid green when in use. Use the phone as an intercom. CONF Blinking green while (Conference) making connections Solid red when in use. Talk to two parties at a time using the 3-Way Conference functionality. Will indicate when Call Assistant - Call Recording is in progress.
Phone Guide – 9224 If your Allworx server is running software release 7.3 or higher, pressing the button once will open the Visual Message Center. Pressing the MESSAGES button twice will access the Audio Message Center. You will use your phone keys and display to log in. Once logged in, a list of your messages will be displayed on the phone. You will be able to use soft keys to play and manage your messages.
Phone Guide – 9224 Announced (Attended) Transfer To talk to the recipient of the transfer before the transfer goes through: 1. Press the TRANSFER button. 2. Select an unused Call or Line Appearance PFK. 3. Dial the number of the recipient of the transfer. 4. Talk to the recipient. 5. Press the TRANSFER button again then press the PFK of the original call. The two parties will now be connected. 6. If you want to cancel the transfer, press the RELEASE button.
Phone Guide – 9224 4.6 Park PBX Behavior on a call appearance • To park an active call, press the PARK button. • The phone briefly displays the parking orbit 1extension on which the call is parked. Key System Behavior on an outside line • 4.7 To place an active call in a “system-wide hold”, press the PARK button. Any phone with a PFK for this outside line will be able to retrieve the call. Info The INFO button is used to get information regarding the other buttons on your phone.
Phone Guide – 9224 1. Pick up the handset. If more than one call is on hold, the most recent call is connected. 2. Press the SPEAKER button (for hands-free). 3. The caller ID of the call picked up will appear on the display. To pick up a different call on hold, press the flashing PFK for that call or use the Up / Down navigation arrows to display the call on the screen, and then pick up the handset. If you have a call on hold and a new call comes in, lift the handset to answer the new call.
Phone Guide – 9224 5 Phone Operation 5.1 • 5.2 • Placing a Call Outbound calls can be placed by pressing the following PFKs: o Call Appearance: can be used to place extension-to-extension calls or to obtain an outside line (must dial 9† first). o Line Appearance: seizes the outside line without dialing 9†2 first.
Phone Guide – 9224 3. Press the Select button 5.6 to dial the number. Redial a Number • You can automatically dial the last number called by selecting the REDIAL soft key on the phone’s display screen. • Select the CALLS soft key. Us the Up / Down navigation arrows to highlight the desired call. Press the Select button . • A PFK can be programmed by your System Administrator to redial the last number called. 5.7 Missed Calls If a call is missed, a message will appear on the phone’s display.
Phone Guide – 9224 • Headset • Park • Personal Speed Dial • Redial • Hot Desk • Line Appearance • Messages • Parking Orbit • Push to Talk • Queue Alarm • Queue Appearance • Schedule • Speed Dial ___________________________________________________________________________________________________________________ 300 Main Street • East Rochester, NY 14445 • Toll Free 1-866-ALLWORX • 585-421-3850 • www.allworx.com © 2012 Allworx Corp, a Windstream company. All rights reserved.
Phone Guide – 9224 6 System Features 6.1 Operator Dialing (or transferring to) 0† from any phone will initiate a call to the company operator. 6.2 User / Resource Extensions Dialing (or transferring to) any extension between the range of 100 – 299†3 (3 digit mode) or 1000 – 2999† (4 digit mode) will connect a call to another user or to a call route (set up by the System Administrator) assigned to the extension. 6.
Phone Guide – 9224 2. The button will light solid red. If Music on Hold is enabled for the queue, queued callers will hear music. 6.8.2 ACD Queuing If your site is using ACD Queuing, log into and out of queues using the following procedures: The ACD Appearance PFK LED is solid red when you are logged out of all ACD queues. 1. Press and hold the PFK for five seconds. The login prompt will appear. Release the button. 2.
Phone Guide – 9224 Note: Your System Administrator may have changed the function of the Messages button so that pressing it immediately calls the Audio Message Center. If so, the Visual Message Center operation is not available. You can also access the Audio Message Center by dialing 6† + your extension from any office phone or from the company Auto Attendant. The Visual Message Center allows you to: • Listen to new and saved voicemails. • Send a message to another user.
Phone Guide – 9224 • Slow flashing green means a call has been parked using this handset for more than five seconds. • Slow flashing red means a call has been parked on this Parking Orbit, but not by this handset. When the Parking Orbit PFK light is flashing, you will be able to pick up a call in the Parking Orbit by pressing the PFK. If Music on Hold is enabled for your call appearance, the parked caller will hear music. 5 6.
Phone Guide – 9224 7 Advanced Topics 7.1 Phone Configuration Menu The following can be viewed by selecting the CONFIG soft key: • Personal Speed Dial • Preferences • Reboot Phone • Hot Desk Login (with Allworx server software release 7.3 or higher) • Clear Call History • Network Settings (for System Administrators, only) • Network Profiles (Allworx server software release 7.
Phone Guide – 9224 a. LCD Settings – Controls the LCD display settings. Use the Volume bar or Up / Down navigation arrows to adjust. b. Call History Size – Number of calls kept in History. 0 – 99 (Default: 99). c. Clock Mode – Time Display for LCD Screen. d. Hold Reminder Mode – How the hold reminder behaves. e. Redial Memory – To have the last number dialed stored in the phone. f. Audible Dialing – Tones are heard when a key is pressed. g. Call Timer Display – Displays the length of time during a call.
Phone Guide – 9224 7.4 Reboot the Phone On occasion, rebooting the phone may be required. For example, when the Allworx server System Administrator makes changes to the phone’s configuration, it must be rebooted. Do not reboot the phone unless you are instructed to do so by your system administrator. 1. Select the CONFIG soft key. 2. Highlight Reboot Phone. 3. Press the Select button . 4. If you have any unsaved changes, you’ll be asked if you want to save them before rebooting.
Phone Guide – 9224 8 Additional Information Your business directory, including the conference scheduling page, company phone list, distribution lists, phone features chart, and shared folders are available by entering your My Allworx Manager address into a web browser (e.g. Internet Explorer). Your system administrator will provide the address which will be in the format: http://ServersLANSideAddress , where ServersLANSideAddress is the IP address or domain name of your server.
Phone Guide – 9224 9 Wall Mounting (Optional) The Allworx 9224 can be mounted on a wall. This requires a wall mounting plate. Mounting plates should meet the requirements of standard TIA-570-B, Section 5. The mounting plates are available from your local telephone company or your local retailer. Caution: If using a standard telephone wall mounting plate, DO NOT make any connection to the RJ 11 jack.
Phone Guide – 9224 10 Regulatory Notices This equipment has been tested and found to comply with the limits for a Class B digital device, pursuant to Part 15 of the FCC rules. These limits are designed to provide reasonable protection against harmful interference in a residential installation. This equipment generates, uses, and can radiate radio frequency energy and, if not installed and used in accordance with the instructions, may cause harmful interference to radio communications.
Phone Guide – 9224 Abbreviations PoE – Power over Ethernet VoIP – Voice over Internet Protocol PBX – Private Branch Exchange PFK – Programmable Function Key DND – Do Not Disturb BLF – Busy Lamp Field ___________________________________________________________________________________________________________________ 300 Main Street • East Rochester, NY 14445 • Toll Free 1-866-ALLWORX • 585-421-3850 • www.allworx.com © 2012 Allworx Corp, a Windstream company. All rights reserved.