
Owner's Manual
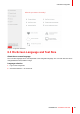
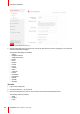
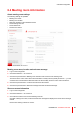
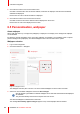
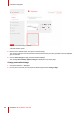
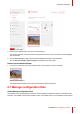
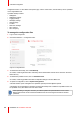

Table Of Contents
- User Guide
- Installation Manual
- 1 Introduction to the Installation Guide
- 2 CSE-200 Specifications
- 3 Getting started
- 4 CSE-200 Installation
- 4.1 Installation methods for the Base Unit
- 4.2 Table mounting
- 4.3 Wall mounting
- 4.4 Recommendations about antenna placement and orientation
- 4.5 Video signal connections to the Base Unit
- 4.6 Audio connection
- 4.7 LAN connection
- 4.8 Out-of-the-box use
- 4.9 Out-of-the-box use with Ethernet link
- 4.10 Integration in the Enterprise network
- 4.11 Integration in a dedicated Enterprise network
- 4.12 Power connection
- 5 Preparing the Buttons
- 6 CSE-200 Configurator
- 6.1 Accessing the Configurator
- 6.2 ClickShare Configuration Wizard
- 6.3 On-Screen Language and Text Size
- 6.4 Meeting room information
- 6.5 Personalisation, wallpaper
- 6.6 Personalisation, Personalized wallpaper
- 6.7 Manage configuration files
- 6.8 Display setup
- 6.9 Audio settings
- 6.10 Wi-Fi settings
- 6.11 LAN settings
- 6.12 LAN Settings, Wired Authentication
- 6.13 LAN Settings, EAP-TLS security mode
- 6.14 LAN Settings, EAP-TTLS security mode
- 6.15 Services, mobile devices
- 6.16 Service, ClickShare API, remote control via API
- 6.17 XMS Server Integration
- 6.18 Services, SNMP
- 6.19 Services, Remote Button Pairing
- 6.20 Security, security level
- 6.21 Security, passwords
- 6.22 Security, HTTP Encryption
- 6.23 Status information Base Unit
- 6.24 Date & Time setup, manually
- 6.25 Date & Time setup, time server
- 6.26 Energy savers
- 6.27 Buttons
- 6.28 Buttons, External access point
- 6.29 Buttons, External access point, mode EAP-TLS
- 6.30 Buttons, External access point, mode EAP-TTLS
- 6.31 Buttons, External access point, mode PEAP
- 6.32 Buttons, External access point, mode WPA2-PSK
- 6.33 Firmware Update
- 6.34 Support & Updates, Troubleshoot, log settings
- 6.35 Factory defaults
- 7 Firmware updates
- 8 Troubleshooting
- 9 Environmental information

67R5900023 /16 ClickShare CSE-200
Image 6–12 Change image
3. Browse for the desired image, click Open to load the image.
The content of the file is checked and when valid (format and size), the file is uploaded. The new wallpaper
gets a red border.
4. Click on Save changes to apply the personalized wallpaper and replace the previous file.
The message Successfully applied changes is displayed on top of the page.
Remove personalized wallpaper
1. Hoover your mouse over the current image and click on the trash bin to remove the image.
Image 6–13 Remove wallpaper
The personalized wallpaper is removed and the default wall paper is activated.
6.7 Manage configuration files
About Manage configuration files
A full backup can be downloaded but cannot be used to duplicate configuration settings to other Base Units.
Therefore, it is possible to download a Portable version. This portable version can be uploaded via the upload
CSE-200 Configurator