
Owner's Manual


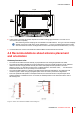


Table Of Contents
- User Guide
- Installation Manual
- 1 Introduction to the Installation Guide
- 2 CSE-200 Specifications
- 3 Getting started
- 4 CSE-200 Installation
- 4.1 Installation methods for the Base Unit
- 4.2 Table mounting
- 4.3 Wall mounting
- 4.4 Recommendations about antenna placement and orientation
- 4.5 Video signal connections to the Base Unit
- 4.6 Audio connection
- 4.7 LAN connection
- 4.8 Out-of-the-box use
- 4.9 Out-of-the-box use with Ethernet link
- 4.10 Integration in the Enterprise network
- 4.11 Integration in a dedicated Enterprise network
- 4.12 Power connection
- 5 Preparing the Buttons
- 6 CSE-200 Configurator
- 6.1 Accessing the Configurator
- 6.2 ClickShare Configuration Wizard
- 6.3 On-Screen Language and Text Size
- 6.4 Meeting room information
- 6.5 Personalisation, wallpaper
- 6.6 Personalisation, Personalized wallpaper
- 6.7 Manage configuration files
- 6.8 Display setup
- 6.9 Audio settings
- 6.10 Wi-Fi settings
- 6.11 LAN settings
- 6.12 LAN Settings, Wired Authentication
- 6.13 LAN Settings, EAP-TLS security mode
- 6.14 LAN Settings, EAP-TTLS security mode
- 6.15 Services, mobile devices
- 6.16 Service, ClickShare API, remote control via API
- 6.17 XMS Server Integration
- 6.18 Services, SNMP
- 6.19 Services, Remote Button Pairing
- 6.20 Security, security level
- 6.21 Security, passwords
- 6.22 Security, HTTP Encryption
- 6.23 Status information Base Unit
- 6.24 Date & Time setup, manually
- 6.25 Date & Time setup, time server
- 6.26 Energy savers
- 6.27 Buttons
- 6.28 Buttons, External access point
- 6.29 Buttons, External access point, mode EAP-TLS
- 6.30 Buttons, External access point, mode EAP-TTLS
- 6.31 Buttons, External access point, mode PEAP
- 6.32 Buttons, External access point, mode WPA2-PSK
- 6.33 Firmware Update
- 6.34 Support & Updates, Troubleshoot, log settings
- 6.35 Factory defaults
- 7 Firmware updates
- 8 Troubleshooting
- 9 Environmental information

R5900023 /16 ClickShare CSE-20038
4.5 Video signal connections to the Base Unit
About Video signal connection
A single screen can be connected to the Base Unit.
To connect a display, an HDMI connection should be made between the Base Unit and the display.
To connect
1. Connect the Base Unit to the display using a display cable.
Note: No display cables are included in the ClickShare box at purchase.
When setting up a display configuration, connect the HDMI cable to the display. When necessary, use an
adapter piece to connect to a display port or a DVI port on the display side.
HDMI
Image 4–3 Display connection
4.6 Audio connection
About audio
The ClickShare Button captures the audio output of the user’s laptop and sends it to the Base Unit together
with the video signal. The audio will be output at line levels from the mini jack socket (3.5mm), TOSLINK
socket and via the HDMI connector.
It is up to the user to decide whether or not to send the audio signal together with the video signal. The user
can decide this by using the same tools as he would to control the laptop’s speakers or a headphone: the
audio controls of the operating system (eg for Windows: Control Panel > Sounds and audio devices) or the
physical buttons on the keyboard of their laptop (mute/unmute, lower volume, higher volume).
There will be synchronization between the audio and video signal.
Audio via HDMI
When your display is connected via HDMI and it supports audio, a separate audio connection is not
necessary. The audio signal is sent together with the video signal to the display.
How to connect separate audio
1. When using the analog output, connect an audio cable with mini jack (3.5mm) into the analog audio output
of the Base Unit.
When using the digital output, connect an fibre optical cable with TOSLINK connector into the digital audio
output of the Base Unit.
2. Connect the other side to the meeting room's sound system.
Audio output needs to be selected in the Configurator, for more info, see “Audio settings”, page 69.
CSE-200 Installation