Owner’s/Operator’s Manual Manuel de l’utilisateur/opérateur Sauna heater installation, wiring, operating instructions, troubleshooting, maintenance and guarantee. Instructions d’installation, de câblage et d’utilisation, dépannage, entretien et garantie du poêle de sauna.
CONTENTS WARNINGS..........................................................................3 TABLE DES MATIÉRS Avertissements..................................................................12 1. INSTRUCTIONS FOR USE............................................4 1.1. Piling of the Sauna Stones...........................................4 1.1.1. Maintenance.........................................................4 1.2. Heating of the Sauna....................................................4 1.2.1.
EN PLEASE READ THE INSTRUCTIONS FOR USE CAREFULLY BEFORE USING THE HEATER. WARNINGS • • • • • • • • • • • • • Keep away from the heater when it is hot. The stones and outer surface of the heater may burn your skin. Do not throw too much water on the stones. The evaporating water is boiling hot. Do not let young, handicapped or ill people bathe in the sauna on their own.
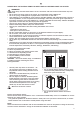
EN 1. INSTRUCTIONS FOR USE 1.1. Piling of the Sauna Stones The piling of the sauna stones has a great effect on the functioning of the heater (figure 1). Important information on sauna stones: • The stones should be 2-4’’ (5–10 cm) in diameter. • Use solely angular split-face sauna stones that are intended for use in a heater. Peridotite, olivine-dolerite and olivine are suitable stone types. • Neither light, porous ceramic “stones“ nor soft soapstones should be used in the heater.
EN Water property Effect Recommendation Humus concentration Colour, taste, precipitates <12 mg/l Iron concentration Colour, odour, taste, precipitates <0,2 mg/l Hardness: most important substances are Precipitates manganese (Mn) and lime, i.e. calcium (Ca) Mn: <0,05 mg/l Ca: <100 mg/l Chlorinated water Health risk Forbidden to use Seawater Rapid corrosion Forbidden to use Table 1. Water quality requirements 1.3. Instructions for Bathing • • • • • • • • Begin by washing yourself.
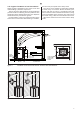
EN 2. THE SAUNA ROOM 2.1. Insulation and Wall Materials of the Sauna Room In an electrically heated sauna, all the massive wall surfaces which store plenty of heat (such as bricks, glass blocks, plaster etc.), must be sufficiently insulated in order to keep the heater output at a reasonably low level. A wall and ceiling construction can be considered to have efficient thermal insulation if: • the thickness of carefully fitted insulating wool inside the structure is 4” (100 mm) minimum 2” (50 mm).
EN 2.5. Hygienic Conditions of the Sauna Room the floor may be wiped with a damp cloth. The sauna room should be thoroughly washed at least every six months. Brush the walls, platforms and floor by using a scrubbing-brush and sauna cleanser. Then rinse the saunaroom by using clean household water. Remove lime stains from the heater using a 10% citric acid solution and rinse. Wipe dust and dirt from the heater with a damp cloth.
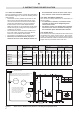
EN 3. INSTRUCTIONS FOR INSTALLATION 3.1. Prior to Installation be installed and used in the sauna room only if they share the same control unit (Multidrive) Prior to installing the heater, read all the instructions for installation (figure 7), as well as checking the following points: • The heater volume should be suitable for the sauna room volume. Table 2 shows the minimum and maximum volumes for each heater output. A precondition for the given values is that the sauna room is well heatinsulated.
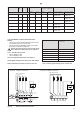
EN Heater model Input kW Voltage Ph Amperage Min. 90 °C Copper supply wire AWG No.
EN 3.5. Electrical Connections The heater may only be connected to the electrical network in accordance with the current regulations by an authorised, licensed professional electrician. The wiring diagrams are included in the control unit’s installation instruction. Further instructions concerning exceptional installations can be obtained from local electrical authorities. 1. Remove heater from carton and place in proper location in sauna room. Observe proper clearances as per figures 3 and 5. 2.
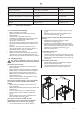
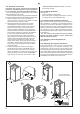
EN Figure 8. Replacing the Heating Elements Figure 9. Reset buttons for overheat protectors 4.
FR LIRE ATTENTIVEMENT LES CONSIGNES D’UTILISATION AVANT LA MISE EN SERVICE DE L’APPAREIL. Avertissements • • • • • • • • • • • • • Ne pas utiliser le sauna pour y faire sécher du linge sous peine de provoquer un incendie ou d’endommager les pièces électriques en raison de l’humidité excessive. Se tenir éloigné des pierres et des parties métalliques du poêle. Elles risquent de provoquer des brûlures.
FR 1. MODE D’EMPLOI 1.1. Mise en place des pierres du poêle L’empilement des pierres du poêle a un impact important sur le fonctionnement du poêle (figure 1). Informations importantes concernant les pierres du poêle : • Le diamètre des pierres doit se situer entre 2 et 4’’ (5 et 10 cm). • Utiliser uniquement des pierres angulaires fendues prévues pour être utilisées dans un poêle. La péridotite, l’olivine et la dolérite olivine sont des pierres adaptées.
FR Propriétés de l’eau Effets Recommandations Concentration d’humus Couleur, goût, précipite <12 mg/l Concentration en fer Couleur, odeur, goût, précipite <0,2 mg/l Précipite Dureté : Les substances les plus importantes sont le manganèse (Mn) et la chaux, c’est-à-dire du calcium (Ca). Mn: <0,05 mg/l Ca: <100 mg/l Eau chlorée Risques sanitaires Usage interdit Eau de mer Corrosion rapide Usage interdit Tableau 1.
FR 2. LE SAUNA 2.1. Isolation du sauna et matériaux muraux Dans un sauna chauffé électriquement, les surfaces murales massives qui accumulent la chaleur (brique, émail, crépi ou équivalent) doivent être suffisamment isolées pour permettre l’utilisation d’un poêle de puissance raisonnable. Un sauna est considéré bien isolé si la structure des murs et du plafond comporte : • Une couche de laine isolante soigneusement appliquée d’une épaisseur de 4’’ (100 mm) minimum 2’’ (50 mm).
FR située près du poêle à 4” (100 mm) du plancher et une bouche d’aération haute située sur la paroi opposée (si possible) à 6” (150 mm) du plafond ou à une hauteur minimale de 24” (600 mm) du plancher. Les bouches d’aération doivent être réglables et permettre de renouveler l’air 5 fois par heure. Le sauna doit être équipé du système d’aération requis par les autorités locales. Figure 4. 2.5. Hygiène du sauna Pour que les séances de sauna soient agréables, il convient de veiller à l’hygiène de la pièce.
FR 3. INSTRUCTIONS D’INSTALLATION 3.1. Avant l’installation 3.2. Emplacement et distances de sécurité Avant d’installer le poêle, lisez soigneusement les instructions d’installation (illustration 8), et vérifiez les points suivants : • Le volume du poêle doit être adapté pour le volume de la cabine. Le tableau 2 recense les volumes minimum et maximum indicatifs pour chaque puissance de poêle. Condition préalable aux valeurs données : la cabine doit être bien isolée contre la chaleur.
FR Modéle Consommation en kW Tension Ph Intensité de courant Min. 90ºC.
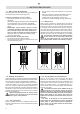
FR 3.4. Installation du centre de contrôle et du capteur • • Le centre de contrôle inclut des instructions détaillées pour fixer l’unité au mur. Installez le capteur (WX248), fourni avec le poêle comme indiqué dans figure 6. Ne pas placer la bouche d’arrivée d’air de sorte que le flux d’air refroidisse le capteur de température. Figure 3. 3.4.1. Centres de contrôle adaptés • Harvia CX30-U1-U3 • Harvia CX45-U1-U3 Pour en savoir plus, voir le tableau 3.
FR Figure 8. Remplacement des éléments de résistance. l’écriteau métallique « WARNING » à l’extérieur, sur la porte de la cabine. Vous trouverez les « INSTRUCTIONS D’ENTRETIEN » à la fin de ce manuel. 3.6. Installation du poêle Voir figure 7. • Brancher les câbles au poêle. • Mettre le poêle en place et le régler à la verticale à l’aide des pieds réglables. 3.7.
FR 4.
GUARANTEE The manufacturer gives a one year guarantee for this heater. The guarantee starts from the date of purchase and includes all the parts of the heater (heating elements, controls, contactors, etc.). The guarantee covers faults from the manufacture and material only. The guarantee includes a supply of spare parts by the manufacturer or importer after the faulty parts have been returned. Replacing any parts in the heater does not extend the original guarantee period of one year.
MAINTENANCE INSTRUCTIONS 1. Use only clean water on sauna stones. Do not use spa or pool water as it will destroy your heater. 2. Clean water should always be used in sauna buckets and water should be dumped out after every use. Scour buckets and dippers occasionally when film collects from usage. Use plastic bucket liner in bucket to prevent water leakage. 3.