ALNO Bedienungsund Einbauanleitung Einbau-Gefrierschrank AKE 8130 IW ® 2222 238-15 ...
Contents Warnings . . . . . . . . . . . . . . . . . . . . . . . . . page 59 Installation. . . . . . . . . . . . . . . . . . . . . . . . . page 61 Location . . . . . . . . . . . . . . . . . . . . . . . . . page 61 Electrical connection . . . . . . . . . . . . . . . . . . . . . page 61 Cleaning the appliance’s interior . . . . . . . . . . . . . . . . . page 61 Instructions for the installer . .
English Warnings It is most important that this instruction book should be retained with the appliance for future reference. Should the appliance be sold or transferred to another owner, or should you move house and leave the appliance, always ensure that the book is supplied with the appliance in order that the new owner can be acquainted with the functioning of the appliance and the relevant warnings. These warnings are provided in the interest of safety.
This appliance is heavy. Care should be taken when moving it. Ice lollies can cause frost burns if consumed straight from the appliance. This appliance contains hydrocarbons in its cooling unit; maintenance and recharging must therefore only be carried out by authorized technicians. Never use metal objects for cleaning your appliance as it may get damaged. Under no circumstances should you attempt to repair the appliance yourself.
If this appliance which features magnetic door seals is to replace an older appliance having a spring-lock on the door or lid, ensure that the spring lock is unusable before discarding the old appliance. This will prevent it from becoming a death-trap for a child. Installation Location Place the appliance as far away as possible from sources of heat, e.g. radiators, heaters, direct sunlight, etc.
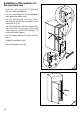
Instructions for the installer Door reversibility 1 Inner door reversal Using a screwdriver, release bracket (1). Unscrew the bracket support (2) and fit it on the opposite side. Remove the door. Unscrew the door stop (3) and screw it on the opposite side. Remove the upper bracket of the door (4) and insert it on the opposite side. 4 3 180° Turn the door through 180°, refit the door and the lower bracket.
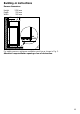
Building-in instructions Recess dimensions 2 50 mm min. 1780 mm 550 mm 560 mm 200 cm Height Depth Width min. cm 200 2 3 For safety reasons, minimum ventilation must be as shown in Fig. 3. Attention: keep ventilation openings clear of obstruction.
Installation of the appliance in the recessed area Ø 2,5 – Drill the unit using a Ø 2.5 mm drill (10 mm max. penetration); – Fix the square fitting (1) to the appliance and apply the rubber seal; – Fit the refrigerator into the space recessing it by 48 mm in relation to the unit base (Fig. 4); – Fix the refrigerator with the screws (2) to the upper and lower part of the unit, after having inserted the fittings (3) under the lower hinges; 13mm – Fix the square fitting (1) to the unit column.
Position the runners (C) on the inside of the kitchen unit as shown in Fig. 7 and mark the position of the external holes. After preparing the holes, screw the runners to the kitchen unit door using 3.5x16 mm screws. C 20m m 7 Open both the appliance door and that of the kitchen unit to approx. 90°. Place the little plates over the runners. Hold the doors of the appliance and the unit together and mark the holes. 8mm 8 Remove the little plates and drill Ø 3.2 mm holes.
Instructions for the user Refrigerator compartment description Start-up Insert the plug into an earthed socket. Temperature adjustment / Stop The temperature is adjusted by means of the knob placed inside the refrigerator. If the knob indicates «O», the appliance is switched off. By turning the adjusting knob clockwise, the temperature is reduced. A mid position is generally the best for normal use. 10 Defrosting Defrosting of the refrigerator compartment is completely automatic.
Food refrigeration Before loading the food, let the refrigerator run empty for about 4 hours, setting it on a very low temperature. Do not fill the shelves completely. Cool air must be allowed to circulate freely. Do not put warm or hot foods into the refrigerator. If the surrounding temperature is low and the thermostat knob is set on high numbers, the temperature in the refrigerator compartment could drop below zero. Warning: bottles can burst.
Cleaning and maintenance of the refrigerator compartment Before carrying out any cleaning or maintenance operations, unplug the appliance or turn the thermostat knob to position «O». We recommend using a normal domestic detergent for cleaning; remove all food, preferably when the refrigerator compartment is not very full, clean the compartment and reset the thermostat knot to the required position. Replacing the interior light bulb (Fig.
6) Do not place bottles in the freezer compartment, except for high alcoholic content liquids, because they can burst. 7) Do not use the freezer compartment to cool hot foods. This causes unnecessary frost formation. Warning! Defrosted foods cannot be refrozen. Prepare fresh food to be frozen in small portions suitable to be consumed in one meal. Also follow the same procedure for already cooked foods and consume them completely after defrosting. Salt reduces the storage life of all frozen foods.
Stopping, cleaning and maintenance Unplug the appliance before carrying out any maintenance operation. Warning This appliance contains hydrocarbons in its cooling unit; maintenance and recharging must therefore only be carried out by authorized technicians. Never use metal objects for cleaning your appliance as it may get damaged.
The appliance does not cool. a) Check whether the electric plug in inserted in the socket. b) Check current is present in the circuit by plugging in a table lamp. c) Check whether the fuse is damaged (switch on the light or connect another device). Traces of water found in the refrigerator compartment bottom. a) The defrost water drain hole (in the centre of the back of the compartment) is clogged. Remove the dirt using the special cleaner, if necessary.
® 2222 238-15 ET 1 2 3 4 5 6 7 8 9 10 11 12 / 1997