
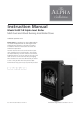
Instruction manual


ASSEMBLING THE STOVE
Your new inset boiler stove is extremely heavy. Always
handle with care and make sure that you have
additional strong help when you move it.
The door and door handle, should never be used to
grip the stove as they could be damaged from
supporting the stove’s weight. Items, such as the
fire grate and baffle plate can all be easily removed
to help reduce the weight. Under no circumstances
should the door be removed as this will invalidate your
Alpha Warranty.
Always lift the stove to finally position it. Alternatively
it may be possible to place the stove on heavy duty
plastic sheeting or thick floor covering to slide the
stove into position, being careful not to
damage any finished floor or decorative hearth
surfaces with trapped grit or building debris.
• Unpack Remove the stove from its recyclable
packaging. You must retain this until the stove is
installed and is fully operational. Unfasten retaining
wires and remove any components, including those
inside the ash pan, from inside the stove.
• Inspect Please inspect the stove to check that it
has not been damaged in transit – never attempt to
install a stove which has been damaged. If damage is
suspected then report this immediately to your stove
dealer.
• Check List Study the Packing List on page 8
and make sure that you have received all of the
components listed before proceeding. Some
components are contained within the ash pan or
will already be fitted to the stove.
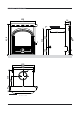
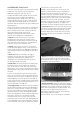
• Baffle Plate Check the position of the baffle plate
(sometimes known as the throat plate) inside the
‘roof’ of the stove to ensure that it has not moved
during transit. This is a heavy metal plate which directs
flames and helps retain heat inside the stove to warm
the water.
It is best to fully familiarise yourself with the baffle
plate’s correct location by practising removing it and
re-fitting it prior to the stove’s installation as you will
need to regularly check the top of this plate and the
access to the flue way to avoid potential soot build up
and blockages. Once you know how to do this it is a
very easy operation. See page 10
• Flue spigot plate To maximise efficiency and safety
the AL357i-B Inset Boiler stove has been designed to
work best in conjunction with a 150mm (6”) flexible
flue liner connected to the purpose-designed spigot
housed on top of the stove. To avoid soot build-up
on the stove bodywork, which could potentially ignite
and cause a chimney fire, we therefore strongly
recommend that a liner is always used. If you are
proposing to burn mineral fuels then 904L grade liner
is recommended as this will provide greater resistance
to the combined corrosive affects of moisture and the
acid content of certain mineral fuels.
Should it not be possible to fit a liner then in the
interests of safety another means of being able to
clean the flue system and top of the stove, for
example a soot box, should be created in the chimney.
The householder should ensure that the chimney is
regularly swept (at least twice a year when burning
wood) and at the same time if possible, the stove
removed so that the top can be thoroughly cleared
of any soot and debris build-up. See page 18 for
instructions on safely sealing the fireplace back plate.
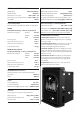
• System ports Each of the four water ports on your
inset boiler has been fitted with a bolt seal. To avoid
the internal threads being contaminated with grit
and other debris please ensure that these are only
removed when the system pipework is ready to be
connected.
• Ash Lip The ash lip is simply fitted to the installed
stove by positioning it at the front and pushing it
underneath to make a snug fit. It can then be easily
removed for cleaning the hearth.
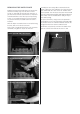
• Handle Assembly Thread the split washer along
the handle bolt. Feed the bolt and washer through the
handle grip. Use a Phillips crosshead screwdriver to
attach the assembled grip to the door handle clamp
mechanism on the door, being careful not to
over-tighten. Remember not to lift or position the
stove using the door or handle.
Your inset boiler stove is now ready for installation.
9