
Specifications


Page 5Installation Instructions: Roadrunner 030 and 040 AM-2000M Upgrade
5.0ROADRUNNER SCSI TAPE AND HARD DISK DRIVE REQUIREMENTS
Roadrunner has an on-board high performance SCSI interface incorporated into its
design. To insure a successful installation, you should carefully read the next few
sections dealing with SCSI peripherals and Roadrunner compatibility.
The Roadrunner’s on-board high performance SCSI interface supports both SCSI-1 and
SCSI-2 hard disk and magnetic tape devices. However, because of the potential
increase in performance, we highly recommend the use of SCSI peripherals that
support SCSI-2.
5.1Tandberg 1/4" Streaming Tape Drives
In order to warm boot from a Tandberg tape drive, it must be set to a higher numerical
SCSI ID (1 through 6) than any other tape device connected to the SCSI bus.
1.In order to be Roadrunner compatible, the AM-625 Tandberg 150MB tape drive
must have firmware at revision -06:00 or later. You can use the SCSI.LIT
program (included in AMOS 2.2C and 1.4C operating system releases) to
determine the firmware revision of your tape drive. Simply type in the command
SCSI at the AMOS prompt and the program will display a string of numbers which
includes the firmware revision. The AM-625 is a SCSI-1 device; it cannot be
upgraded to SCSI-2. AM-625 backups are not able to span tapes.
2.AM-626 525MB Tandberg SCSI tape drives can be upgraded to SCSI-2 by
installing updated firmware (part number PDB-00626-90), which is included with
the Roadrunner upgrade kit. If you do not upgrade the firmware, the drive can still
be used with Roadrunner hardware as a SCSI-1 device, but only if it has firmware
at revision -04:08 or later. You can use the SCSI.LIT program (included in
AMOS 2.2C and 1.4C operating system releases) to determine the firmware
revision of your tape drive. Simply type in the command SCSI at the AMOS
prompt and the program will display a string of numbers which includes the
firmware revision.
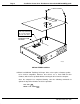
To install the firmware PROM, you simply remove the two TORX screws holding
the drive’s top cover in place; lift off the top cover; gently pry out the old PROM;
and install the new PROM. The illustration below shows the location of the
AM-626’s firmware PROM:
PDI-00172-40, Rev. A05