AM-65X High Capacity ¼” Streaming Tape Drive Installation Instructions PDI-00651-00, Rev A01
© 2004 ALPHA MICROSYSTEMS, INC. FIRST EDITION: AUGUST 2001 A01: February 2005 To re-order this document, request part number PDI-00651-00 FCC Notice This equipment is assembled from components that have been tested and found to comply with the limits for a Class B digital device, pursuant to Part 15 of the FCC Rules. These limits are designed to provide reasonable protection against harmful interference when the equipment is operated in a commercial environment.
Table of Contents INTRODUCTION PRODUCT DESCRIPTION TOOLS REQUIRED PREPARING THE AM-65X FOR INSTALLATION Setting the SCSI ID SCSI BUS TERMINATION External SCSI Bus Termination TERMINATION POWER INSTALLING THE AM-65X Pedestal and Rack Mount Computer Installation AM-990 Chassis Installation Eagle Deskside Chassis Installation SOFTWARE INFORMATION Copying the Device Driver Program Modifying the System Initialization Command File Testing the Initialization File Initial System Testing USING THE AM-65X Reading and
Installation Instructions: AM-65X 1/4" Streaming Tape Drive Page 1 INTRODUCTION This document describes the installation of the following Tandberg SCSI 1/4" magnetic streaming tape drives into an existing Alpha Micro computer system: AM-651 AM-652 AM-653 Tandberg SLR7 20 / 40 GB Streaming Tape Drive Tandberg SLR60 30 / 60 GB Streaming Tape Drive Tandberg SLR75 35 / 70 GB Streaming Tape Drive If you are installing an AM-65X tape drive into an external subsystem, use the installation instructions shipped
Page 2 Installation Instructions: AM-65X 1/4" Streaming Tape Drive See the section “Reading and Writing Different Tape Formats,” later in this document, for information on using different types of tape cartridges and setting data formats. The AM-651 and AM-652 tape drives may be installed on Eagle 250 and 450, AM6000, AM6060, AM7000 and later computer systems.
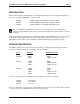
Installation Instructions: AM-65X 1/4" Streaming Tape Drive DC POWER Page 3 PIN #1 68-PIN SCSI CONNECTOR SERVICE CONNECTOR TERMPWR: Should not be installed. Termination power is provided by the SCSI controller. TERMPWR SEL 0 - 3: Select SCSI ID. See below.
Page 4 Installation Instructions: AM-65X 1/4" Streaming Tape Drive Setting the SCSI ID Each SCSI device attached to the SCSI bus must be set to a unique address. Two SCSI devices cannot share the same address. The AM-65X is a Wide SCSI-2 device, and can therefore be set to any SCSI ID from 0 through 15 (except 7, which is reserved for the SCSI controller). On the narrow SCSI bus supported on AMOS computers prior to the AM-6000 (and optionally on the AM-6000), you can use only IDs 0 through 6.
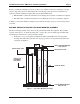
Installation Instructions: AM-65X 1/4" Streaming Tape Drive Page 5 BAIL LOCKS I S SC Figure 2a - External SCSI Terminator - Narrow PRA-00222-20 EXTERNAL SCSI BUS TERMINATOR SCSI CONNECTOR ON BACK PANEL Figure 2b - External SCSI Terminator - Wide The illustrations show two different types of external SCSI connectors: 1. The top picture shows an external narrow SCSI connector and bail locks for holding the terminator in place.
Page 6 Installation Instructions: AM-65X 1/4" Streaming Tape Drive TERMINATION POWER To control SCSI bus termination properly, a termination power source must be provided; this is especially important when using an external terminator. Why is Termination Power so important when using an external terminator? Any terminator must have a power source. Because an external terminator does not have its own source of power, it must get its termination power from the SCSI bus.
Installation Instructions: AM-65X 1/4" Streaming Tape Drive Page 7 Before you install the AM-65X, you need to modify your computer's front bezel, creating the necessary cutout to support the tape drive. The instructions for modifying your front bezel are contained in two separate documents, which are included with your product installation kit: • PDI-20135-00—contains the instructions for modifying the front bezel on rack mount computers.
Page 8 Installation Instructions: AM-65X 1/4" Streaming Tape Drive 2. The AM-65X has a number of mounting screw holes on its side. There are corresponding holes in the plastic mounting base. Align the screw holes on the drive with the designated holes in the mounting base (marked as A in Figure 4). Make sure the drive's front panel is pointed in the direction indicated by the large arrow. 3. Install the two screws (included in the mounting kit) that hold the plastic mounting base to the drive.
Installation Instructions: AM-65X 1/4" Streaming Tape Drive N T IO N T O EC FR IR 'S E D E IV H W R T O D IN RR E D A TH TE E E IN TH R O Y SUIS P D B E L E AK E T M AN ICA P D IN Page 9 DWF-20260-00 MOUNTING BRACKET AM-650 TAPE DRIVE MOUNTING HOLE DISKETTE DRIVE MOUNTING HOLES Figure 5 - Metal Support Bracket 6. Because the tape drive internally ties logic ground to its frame, you need to isolate the tape drive from the computer chassis.
Page 10 Installation Instructions: AM-65X 1/4" Streaming Tape Drive FRONT BEZEL NYLON SHOULDER WASHERS (HDW-10004-07) METAL SUPPORT BRACKET DWF-20260-00 AM-650 TAPE DRIVE Figure 6 - Attaching to Front Bezel 7. Before you tighten the screw holding the tape drive to the metal support bracket, make sure you are satisfied with the way the drive assembly is aligned with the cutout in your computer's front bezel.
Installation Instructions: AM-65X 1/4" Streaming Tape Drive Page 11 AM-990 Chassis Installation The AM-65X is installed in the AM-990's main drive bay using plastic mounting rails. You need two rails to mount the drive (or any peripheral device). The rails (DWF-20652-00) are included with the computer chassis and are universal; they can be mounted on either the right or left side of the drive.
Page 12 Installation Instructions: AM-65X 1/4" Streaming Tape Drive DWF-20652-00 MOUNTING RAIL Figure 8 - Attaching Mounting Rails to Peripheral Once the rails are installed, slide the tape drive into its mounting position in the chassis. Attach the power cable from the power supply to the four-pin connector on the drive. Attach the Wide SCSI cable to the 68-pin connector on the drive. The drive’s connector is keyed so the cable can only be attached correctly.
Installation Instructions: AM-65X 1/4" Streaming Tape Drive Page 13 Copying the Device Driver Program You need to copy the 625DVR.DVR streaming tape driver file to the file name STR.DVR, so AMOS can associate it with the device name (STR0:) you are going to put in your system initialization file. To do so, type: LOG DVR: RETURN COPY STR.DVR=625DVR.DVR RETURN Make sure you are using a compatible version of the 625DVR.DVR file. It must be version 4.1(140) or higher (released September, 2001).
Page 14 Installation Instructions: AM-65X 1/4" Streaming Tape Drive If you have two streaming tape drives, enter both device names after the slash, separated by a comma, like this: DEVTBL /STR0,STR1 The device driver program needs to be in system memory, so add the following line somewhere before the final SYSTEM command: SYSTEM STR.DVR[1,6] Since the MTUxxx programs spawn a separate job to communicate with the tape drive, you may need to increase the number of jobs allocated by the system at boot time.
Installation Instructions: AM-65X 1/4" Streaming Tape Drive Page 15 files stored on the tape cartridge. If you aren’t familiar with the MTUxxx commands, refer to your System Commands Reference Manual for instructions. USING THE AM-65X Use only the MTUSAV, MTURES, and MTUDIR commands to write to and read from the AM65X. Do not use the older STRxxx utilities, as these are no longer supported by Alpha Micro! The following sections discuss issues you should keep in mind while using your AM-65X.
Page 16 Installation Instructions: AM-65X 1/4" Streaming Tape Drive Warm Booting To warm boot from an AM-65X, access your computer’s CMOS configuration menu and make sure the alternate boot ID is set to the proper ID. See you computer Owner’s Manual for instructions on using the CMOS menu. For AM-7000 systems, warm booting from the AM-65X requires boot PROM revision level of C00 or later. AM-7000 CPU boards built prior to September 2001 will probably need this upgrade.
Installation Instructions: AM-65X 1/4" Streaming Tape Drive Page 17 Care of Streaming Tape Cartridges A cartridge tape can store all the data on your computer, so it is worth taking care of properly. In addition to the tips for diskettes, above, remember the following: • Store cartridges with the write-protect switch in the SAFE position. • Keep magnets away from your tapes. Even weak magnets such as those in paper clip holders can erase data on a cartridge tape.