
User guide


4.1 Install DeviceInstaller
1. Install DeviceInstaller from the CD-ROM. If the CD does not launch automatically browse the ‘Device
Installer’ folder and run the setup.EXE file
2. Respond to the installation wizard prompts. You may be prompted to install .NET frameworks
to bring your Windows installation up to date to be able to run DeviceInstaller. These are
provided on the CDROM but your PC may choose to (or already done so) download from
Microsoft.
Note: For more information about DeviceInstaller, see the DeviceInstaller help menus.
4.2 Running DeviceInstaller
1. Click Start\Programs\Lantronix\Devicelnstaller. If your PC has more than one network
adaptor, a message displays. Select the adaptor that the NetPort will be attached to and click
OK.
2. Press Search to detect NetPorts on the network. If the Search window reveals ‘No Devices
Found’, press Search again until your NetPort is shown. You may need to wait for up to 30
seconds for all NetPorts to be shown, keep pressing Search.
Note: If the unit cannot find a DHCP Server to obtain an address then it will default into AutoIP
mode, assuming an IP address in the region 169.254.xxx.xxx and show in DeviceInstaller in
red. In some cases re-applying power to the Netport will allow it to enumerate on your
network successfully. If the Network has no DHCP Server then you will have to set the IP
address manually. See section: 4.3 Assign IP Manually
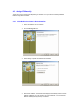
You should see something like this:
By selecting the relevant NetPort you are then able to change the configuration via 2 methods, choose
whichever suits you:
• Telnet (ASCII menus over the network)
• Web Config (via any web browser)
Note: It is also possible to configure NetPort via the RS232 port using an application such as
HyperTerminal. See section: 4.4.4 Via Serial Port (master config port)