WRG-N15 IEEE802.
Contents BEFORE YOU START ..................................................................................................................... IV Installation Overview ................................................................................................................ iv PACKING LIST ............................................................................................................................... IV Installation Notes ................................................................
DHCP .........................................................................................................................................47 ADVANCED DIRECTORY MENUS ...................................................................................................49 Virtual Server ...........................................................................................................................50 Applications ......................................................................................
Before You Start Please read and make sure you understand all the prerequisites for proper installation of your new Wireless Broadband Router. Have all the necessary information and equipment on hand before beginning the installation. Installation Overview NOTE: You must have an account setup with an ISP (Internet Service Provider) in order to use this device for Internet access. Contact your preferred broadband Internet service provider to set up an account.
Installation Notes In order to establish a connection to the Internet it will be necessary to provide information to the router that will be stored in its memory. For some users, only their account information (User Name and Password) is required. For others, various parameters that control and define the Internet connection will be required. Internet Connection The WL11N is intended for use with a broadband device such as an ADSL, xDSL or cable (CATV) modem.
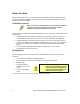
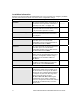
Installation Information Print this page and record the listed information here in case you have to re-configure your WAN (Internet) connection in the future or reset the device configuration settings. Information you will need from your Internet service provider: Username This is the Username that is used to log on to your Internet service provider’s network. It is commonly in the form user@isp.com.
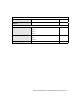
Information about your Wireless LAN: Record your info here. SSID Channel Authentication WEP (Hex/ASCII) Key 1: Record your info here. Key 2: Key 3: Key 4: WPA (802.
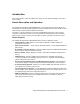
Introduction This section provides a brief description of the router, its associated technologies, and a list of router features. Router Description and Operation The LinkTek WL11N Wireless Broadband Router is designed to provide connectivity for your private Ethernet and 802.11g/802.11b/802.11n wireless network to the Internet via ADSL, xDSL, cable modem or other common broadband connection. The router is easy to install and use.
Front View The LED indicators on the Wireless Broadband Router are located on the front panel the device. Front of Wireless Broadband Router Place the router in a location where it is not exposed to heat and where the LED indicators are visible.
LED Display Place the router in a location that permits an easy view of the LED indicators on the front of the device. The LED indicators include the WPS, LAN, WLAN, WAN, Status and Power indicators. The WLAN and Ethernet indicators monitor link status and activity (Link/Act). WPS Blinks blue for 120 seconds while searching for WPS enabled station. See Wi-Fi Protected Setup (WPS) for more information. LAN (1-4) A solid green light indicates a valid link on startup.
Rear Panel Connections All cable connections to the router and the power adapter connect at the rear panel. Use the Reset button to restore the settings to the factory default values. See the next section for instructions to connect the power adapter and power on the router.
Connecting Devices to the Router The Wireless Broadband Router connects three separate networks, a private Ethernet LAN, Wireless LAN and the public Internet (WAN). Choose a location for the router where Ethernet devices can be connected to the LAN ports and the WAN port can be easily connected to the cable modem or DSL modem that provides the broadband Internet connection. Typically the broadband device is configured as a bridge, however some devices allow for more complex options.
broadcast range. Often a wireless access point such as the AP embedded in the LinkTek WL11N, will also provide a connection to a wired network - usually Ethernet - and ultimately an Internet connection. The IEEE 802.11 standard precisely defines the encoding techniques used to digitally used for data transmission. The embedded wireless access point can be used by IEEE 802.11g, 802.11b and 802.11n devices. These standards are compatible but use different algorithms for data transmission. 802.
Installation Considerations for Wireless LAN Many physical environmental factors can impact wireless networks. Radio waves are used to carry the encoded data between devices. These radio transmissions can become degraded due to signal attenuation, multi-path distortion and interference or noise. Attenuation simply means that the strength of the signal weakens with the distance it travels, even if the transmission path is unobstructed.
Power on Wireless Broadband Router CAUTION: The Wireless Broadband Router must be used with the power adapter included with the device. Using a power supply with a different voltage rating will damage and void the warranty for this product To power on the Wireless Broadband Router: 1. Insert the AC Power Adapter cord into the power receptacle located on the rear panel of the Wireless Broadband Router and plug the adapter into a suitable nearby power source.
Configuration All device configuration for the router is done through the web-based management software. Use a standard web browser with JavaScript enabled to connect to the web manager. Make sure the proxy settings for the browser do not require use of a proxy server. IP Settings on Your Computer In order to configure your system to receive IP settings from the router it must first have the TCP/IP protocol installed.
Login to Home Page To use the web-based management software, launch a suitable web browser and direct it to the IP address of the router. Type in http:// followed by the default IP address, 192.168.1.1 in the address bar of the browser. The URL in the address bar should read: http://192.168.1.1. Type in the default User Name admin and the default Password admin then click the Submit button to access the web-based manager.
Web Manager When you successfully connect to the web manager, the Device Information display in the Status menu directory is displayed. For quick configuration of the Internet connection, launch the Setup Wizard in the Home directory. Click on parent directory links to see available configuration menus. Clink on menu links to see menu. Web Manager – First Time Log On All configuration and management of the router is done using the web-based management interface.
Basic Configuration – Home Directory Menus The first time you setup the router it is recommended that you configure the WAN connection using a single computer making sure that both the computer and the router are not connected to the Ethernet LAN or other Ethernet devices. Once the Internet connection is configured and working, go ahead and connect other Ethernet and wireless devices. Home Directory Menus The Setup Wizard page is the first page to appear when clicking on the Home directory link.
Setup Wizard To use the Setup Wizard, click the Run Wizard button in the first browser window that appears in the Home directory and follow the instructions in the pop-up window that appears. Click the Run Wizard button to launch the Setup Wizard Launch Setup Wizard Follow the instruction below to the type of connection used for your broadband Internet connection.
Using the Setup Wizard The initial window summarizes the setup process. Click the Next button to proceed. You may stop using the Setup Wizard at any time by clicking the Exit button. If you exit the wizard you will return to the Setup Wizard window without saving any of the settings changed during the process. The first pop-up window of the Setup Wizard lists the basic steps in the process. These steps are as follows: 1. Set the system password 2. Set the system time. 3.
Using the Setup Wizard- Set System Password Change the password used for management access of the router. Type the new Password and Confirm it in the spaces provided. Click the Next button to proceed. NOTE: The System user name “admin” cannot be changed.
Using the Setup Wizard - Choose Time Zone Choose the time zone you are in from the pull-down menu and click Next. This sets the system time used for the router. If you wish to return to the previous window during the setup process, click the Back button. Select the Connection Type specific to your service and click Next to go to the next Setup Wizard window. Follow the instructions below for the type of connection you have selected.
Using the Setup Wizard - Choose Connection Type Now select the Connection Type used for the Internet connection. Your ISP has given this information to you. The connection types available for are Static IP, Dynamic IP, PPPoE, PPtP and L2tP. Each connection type has different settings that are configured in the next Setup Wizard window.
Using the Setup Wizard - For Dynamic IP Address connections: 1. Select the specific Connection Type from the drop-down menu. The available Dynamic IP Address connection and encapsulation types are 1483 Bridged IP LLC and 1483 Bridged IP VC-Mux. 2. If you are instructed to change the VPI or VCI number, type in the correct setting in the available entry fields. Most users will not need to change these settings. The Internet connection cannot function if these values are incorrect. 3.
Using the Setup Wizard - For Static IP Address connections: 1. Select the specific Connection Type from the drop-down menu. The available Static IP Address connection and encapsulation types are 1483 Bridged IP LLC, 1483 Bridged IP VC-Mux, 1483 Routed IP LLC, 1483 Routed IP VC-Mux and IPoA. 2. Change the IP Address, Subnet Mask, ISP Gateway Address, Primary DNS Address, and Secondary DNS Server IP Address as instructed by your ISP.
Using the Setup Wizard - For PPPoE connections: 1. Type in the Username and Password used to identify and verify your account to the ISP. Retype the password to make sure it is correct. 2. Click Next to go to the Set Wireless LAN Connection pop-up window.
Using the Setup Wizard – For PPTP Client connections: 1. Enter the appropriate PPTP Client information including PPTP Server IP, PPTP Account name, and the PPTP Password twice. 2. Click Next when you are ready to continue to the Set 802.11g Wireless LAN Configuration window.
Using the Setup Wizard – For L2TP Client connections: 1. Enter the appropriate L2TP Client information including L2TP Server IP, L2TP Account name, and the L2TP Password twice. 2. Click Next when you are ready to continue to the Set 802.11g Wireless LAN Configuration window.
Using the Setup Wizard - Wireless LAN connection: 1. The SSID identifies members of the Service Set. Accept the default name or change it to something else. If the default SSID is changed, all other devices on the wireless network must use the same SSID. 2. The wireless Channel number is available from your Internet Service Provider (ISP). What channels are available for use by the access point depends on the local regulatory environment.
Using the Setup Wizard - Wireless LAN security: Wireless LAN security supported includes WEP and WPA versions 1 and 2. Select the preferred method from the list and click on the Next button. You can choose to setup security later, in which case choose the Disabled option. If you choose to leave security disabled at this time, the next menu will be the Save and Take Effect wizard menu.
Using the Setup Wizard – WEP Configuration The Setup Wizard wireless LAN security configuration is limited to WEP; for WPA or WPA2 security, use the web-based manager Wireless Settings menu. To configure WEP in the Setup Wizard, select Open, Shared or Both for Authentication Type, use the Cipher: pull down menu to select the level of encryption or cipher rate, 64 bits or 128 bits and type in an encryption key of appropriate length.
Using the Setup Wizard - Finish and Restart Finally you can confirm that the setup process is completed. If you are satisfied that you have entered all the necessary information correctly, click the Restart button to save the new configuration settings and restart the router. If you need to change settings from a previous window, click the Back button. CAUTION: Do not turn the router off while it is restarting.
Basic Wireless Setup To configure the router’s basic wireless and wired network configuration settings without running the Setup Wizard, you can access the windows used to configure Wireless, WAN, LAN and DHCP settings directly from the Home directory. To access the Wireless Settings window, click on the Wireless link on the left side of the first window that appears when you successfully access the web manager.
Wireless Security In the Wireless Settings window, select the type of security you want to configure. The window will change to present the settings specific to the method being configured. The Wireless Broadband Router’s wireless security options include three levels of WEP encryption, WPA for IEEE 802.1x network authentication, and WPA with a user-configured Pre Shared Key (PSK) or RADIUS authentication.
Wi-Fi Protected Setup (WPS) WPS provides an easy way to configure a secure connection to your wireless LAN. This option can be used on wireless stations that support Wi-Fi Protected Setup or WPS. The Wireless Broadband Router supports push button and PIN methods of WPS. WPS cannot be used with WPA or WPA2. The WPS menu is located at the bottom of the Wireless menu. To use WPS click to select the Enabled radio button for Wi-Fi Protected Function.
The router will attempt to establish the WPS secure connection for 120 seconds. Now start the WPS connection process on the device attempting to make the connection. While the router is searching for the wireless station with the PIN just entered, a message informs you to start the WPS device.
WEP Encryption Use WEP encryption for basic wireless data encryption. Use WPA if wireless LANs that require a higher level of security. WEP (Wireless Encryption Protocol) encryption can be enabled for security and privacy. WEP encrypts the data portion of each frame transmitted from the wireless adapter using one of the predefined keys. The router offers 64 or 128-bit encryption with four keys available. Select the WEP option from the Security: pull-down menu to configure WEP encryption.
WPA (Wi-Fi Protected Access) Wi-Fi Protected Access was designed to provide improved data encryption, perceived as weak in WEP, and to provide user authentication, largely nonexistent in WEP. Wireless Settings menu – WPA2 EAP Enter the appropriate parameters for the type of security selected from this menu. For EAP authentication using WPA or WPA2, enter the following: x Cypher Type: Choose TKIP, AES or TKIP/AES. x RADIUS Server: The IP address of the RADIUS server.
Select the PSK authentication option to view the WPA passkey configuration menu. Wireless Settings menu – WPA-PSK Enter the appropriate parameters for the type of security from this menu. For PSK authentication using WPA or WPA2, enter the following: x Cypher Type: Choose TKIP, AES or TKIP/AES. x Key Type: Choose ASCII or Hexidecimal. x Passphrase: The password or character string used for wireless station authentication.
WAN Configuration To configure the router’s WAN configuration settings without running the Setup Wizard, you can access the windows used to configure WAN, LAN, DHCP, and DNS settings directly from the Home directory. To access the WAN Settings window, click on the WAN menu link on the left side of the first window that appears when you successfully access the web manager. Select Internet Connection Type The default Internet Connection menu displays the Dynamic IP (DHCP) Internet Connection Type menu.
Static IP Address Connection When the router is configured to use Static IP Address assignment for the WAN connection, you must manually assign a global IP Address, Subnet Mask and Gateway IP Address used for the WAN connection.
Configure the Static IP address connection and click the Apply button to put the new settings into effect. See the table below for a description of the parameters configured for the connection. Static IP Parameters Description IP Address This is the permanent global IP address for your account. This is the address that is visible outside your private network. Get this from your ISP. Subnet Mask This is the Subnet mask for the WAN interface. Get this from your ISP.
Dynamic IP Connection A Dynamic IP Address connection configures the router to automatically obtain its global IP address from a DHCP server on the ISP’s network. The service provider assigns a global IP address from a pool of addresses available to the service provider. Typically the IP address assigned has a long lease time, so it will likely be the same address each time the router requests an IP address.
Configure the Dynamic IP address connection and click the Apply button to put the new settings into effect. See the table below for a description of the parameters configured for the connection. Dynamic IP Parameters Description Host Name Enter the Host Name provided if necessary (optional). MAC Address/Clone MAC Address This field will instruct the user to enter the Media Access Control (MAC) address of the Ethernet Card of your computer, if instructed to do so by your ISP.
PPPoE Connection PPP or Point-to-Point protocol is a standard method of establishing a network connection/session between networked devices. PPPoE (PPP over Ethernet), as described in RFC 2516, is a method of using PPP through the Ethernet network. There are two ways to configure the PPoE connection on the router, one is for a Dynamic PPPoE configuration, which means the router will implement some settings automatically through DHCP, such as the router’s IP address and the default gateway.
Configure the PPPoE connection and click the Apply button to put the new settings into effect. See the table below for a description of the parameters configured for the connection. PPPoE Parameters Description User Name The user name supplied to you by your ISP. Password The password supplied to you by your ISP. Retype Password Retype the password entered in the Password feld. Service Name Enter the service name supplied to you by your ISP, if required.
Bridge Connection A Bridge connection does not require much configuration for the router, however most of the router functions are not available in bridge mode. WAN Settings menu – Bridge connection To configure the WL11N as a bridge for the WAN connection, select the Bridge WAN settings option and click Apply. Do this immediately change the IP settings status of the device to DHCP client. Be sure to have a DHCP server running and connected to the network if this option is to be used.
PPTP Connection If your ISP is using PPTP to provide your Internet connection, the ISP will give you the necessary information to configure the router. There are two ways to enable the router to become a PPTP client, one is through assigning the router an IP address dynamically, which means that the DHCP protocol will be implemented by the router to automatically configure the IP settings. The user may input the IP settings manually by choosing the Static IP option above the configuring area.