Alpha Networks H.
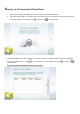
Starting the IP Camera with IPCam Wizard 1. Click the IP Cam Wizard and follow the on-screen steps to continue the installation. 2. Connect an RJ-45 cable from a switch/router to the Ehternet port on the back of the camera and connect the AC power adapter to the camera. Click to continue, and to exit the wizard. 3. This window displays the avaible cameras (ex: CS-3152). Select the camera you wish to configure. Click re-scan the available camera. Click exit the wizard.
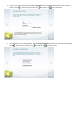
4. Login to your camera by entering the ID and Password. The original default password of the camera is “admin”. Click to go back to the previous step, to continue, or to exit the wizard. 5. This window is for reset the password. Tick the Change Password check box to enter the new password. Click to go back to the previous step, to continue, or to exit the wizard.
6. Enter a name for the camera in the Camera Name field. The name will be used to identify your camera on the network. Enter the correct time for the camera for the time zone it is in. If your camera is in the same time zone as the computer you are using, click the go back to the previous step, to continue, or icon to copy the computer’s time to the camera. Click to exit the wizard. 7. Select a connection option: For CS-3152 user, please select the option DHCP or Fixed IP.
PPPoE: Select this option if your camera is directly connected to a DSL modem and your ISP requires a PPPoE authentication to the Internet. DHCP: Select this option if your camera is connected to a router and DHCP is enabled. Continue on page 25 if you select this option. Fixed IP: Select this option if your camera is directly connected to a DSL modem and your ISP has supplied you with a fixed IP for your Internet connection. Continue on page 33 if you select this option.
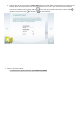
If Fixed IP is selected in the previous window, the window appears for you to configure the IP address, its subnet mask, default gateway, primary DNS and secondary DNS. Click to continue, or to go back to the previous step, to exit the wizard. 9. Selecte whether to have wireless setting of the camera. Click to go back to the previous step, to exit the wizard. For CS-3152 user, please select the setting : I want to use wireless for the camera .
10. When I want to use wireless for the camera. is selected in step 9, this window appears for you to configure the wirelss connection settings. Click to go back to the previous step, 11. This window displays the information you have configured. Click or to exit the wizard. to continue, or to exit the wizard.
12. After the IPCam Wizard configures the camera, the wizard starts to setup process. 13. If both wired and wireless is configured, the window appears asking which type of connection will be used. Click to continue, or to exit the wizard. For CS-3152 user, please select Wireless type.
14. If using wireless connection, the window appears asking to remove the physical cable from the camera. Click go back to the previous step, to continue, or to exit the wizard. for CS-3152 user, Please change your SSID of device the same with camera WiFi setting. 15. The window appears to inform you that the configuration is complete. You can begin to use the camera.
Using the web-based configuration interface After completing the IPCam Wizard, you are ready to use your camera. The camera’s built-in Web configuration utility is designed to allow you to easily access and configure the camera. Open a web browser such as Internet Explorer® and enter the IP address of your camera. To log in, use the User name admin and the password you created in the IPCam Wizard. If you did not create a password, the default password is admin. After entering your password, click OK.
An explanation of Live View Live view has many options. Lets take a closer look. Recording Indicator Motion/Sound Trigger Indicator Talk Recording Profiles Full Screen Listen Motion/Sound Trigger Indicator – Displays the status of motion and sound triggering Recording Indicator – Displays the status of recording Profiles – Shows different angles and resolutions Listen – Turns the audio feed, received from the camera to the PC, on or not.
Federal Communication Commission Interference Statement This device complies with Part 15 of the FCC Rules. Operation is subject to the following two conditions: (1) This device may not cause harmful interference, and (2) this device must accept any interference received, including interference that may cause undesired operation. This equipment has been tested and found to comply with the limits for a Class B digital device, pursuant to Part 15 of the FCC Rules.
Industry Canada statement: This device complies with RSS-210 of the Industry Canada Rules. Operation is subject to the following two conditions: (1) This device may not cause harmful interference, and (2) this device must accept any interference received, including interference that may cause undesired operation. Ce dispositif est conforme à la norme CNR-210 d'Industrie Canada applicable aux appareils radio exempts de licence.