
Manual


81
0700015-J0 Rev B
6.7.3 Data Logging (Web Interface Only)
6.7.3.1 Configure Data Logging
From the main menu, select Signals > Configure Data Logging.
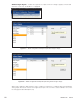
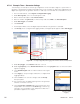
1. Click on a data logging signal filename, e.g., DATALOG_1, under Data Log Files.
2. Click Log Signals in the center of the screen.
3. In the Signal List window that appears, browse through the signals and alarms and enable data
logging by checking the Enable Logging checkbox.
4. Click Apply.
Figure 89 — Enable Signals for Data Logging web interface window
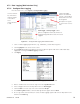
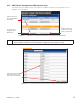
Figure 90 — Configure Data Logging web interface window
Scroll to view the
list of filenames
and the number
of records in
each.
Select filename
to edit.
Start/Stop trigger
buttons are found at
the top of this window.
Delete will remove the
file altogether.
Description of log file
is shown here. Click to
edit.
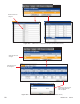
5. Enter a number that is less than the Log Limit in the Log Records field
6. Select a trigger event from the drop down menu for Start Trigger.
7. Click the Save icon at the top of the screen and click Accept.
8. In the Data Log Files window, click the data log filename again and click Start.
9. Go to Logs & Files and at the bottom select the data logging signal used from the drop down menu
and then click Data Log.
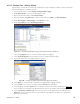
Start Trigger and Stop Trigger enable
preset configuration and customization of
the beginning and end of each event to be
logged