
User Manual


SolutionSymptom
International technical
assistance (outside Canada & USA)
1-604-436-5547
T
ROUBLESHOOTING
G
UIDE
Q
UICK
S
TART
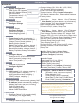
Active alarm.
Active alarm has
been silenced.
Major alarm.
Minor alarm.
Alarm message
only.
Rectifiers Info.,
# of rectifiers.
# of rectifiers in
Power Save.
Float mode.
Equalize mode.
Battery Test mode.
1 LCD Active areas are touch sensitive and respond best to a stylus
suited for this purpose. Tap to activate a new window of operation.
2 Analog Signals Display Digits are normally displayed two rows
high. Tap this active area to minimize digits and display labels. Tap
again for signals display and configuration.
3 Alarm Indication This active area displays text of alarm notification
or status. Tap for alarms display and configuration. Alarm cutoff
(ALCO) and Power Save may be accessed here.
4 Date and Time Tap this active area to edit.
5 Argus (Home Page) Icon Tap this active area to login, adjust
contrast of display, reset, and select language.
6 Software Revision Current version number of the CXC software.
7 Alarm Condition and Icons Indication of alarms and priority are
displayed here. See also Alarm Symbols.
8 Rectifiers Information This active area displays the number of
rectifiers on-line. For a converter only system, a value of 0 will be
displayed. See also Alarm Symbols.
9 Mode Status This active area shows mode of operation and Temp
Comp activation along with the duration until the mode changes.
9
8
7
6
5
4
3
2
1
Applying Startup Power
1. Initiate startup routine by applying power to the CXC; e.g., Close
battery breaker or close converter/rectifier input and output breakers.
The CXC will perform a short self-test as it boots up. Alarm alerts are normal.
2. Check and adjust alarms and control levels in the CXC’s submenus.
3. Check and adjust group settings in the CONVERTERS or
RECTIFIERS submenus; e.g., float, equalize voltage, etc.
4. Verify COMMUNICATIONS settings as needed.
5. Program the CXC’s TEMP COMP and AUTO EQUALIZE settings as
needed.
6. Test relay OUTPUT ALARM\CONTROLS as needed; e.g., Major
Alarm, LVD, etc.
Remote Communications (see manual Chapter 9)
The CXC can be set up, monitored and tested via Craft port (null
modem), ETHERNET 10/100 Base-T or over a phone line using a
modem. Some standard scenarios are described below:
> Network (TCP/IP secured by user) to CXC rear Ethernet port.
> Computer to CXC using a null modem cable connected to the Craft
port.
> Laptop to CXC via direct Ethernet connection using a standard
crossover cable.
> External modem to CXC via RS-232 serial data connection using a
straight through cable connected to the rear RS-232 port.
> External Argus DC modem (CXCI model).
> Internal modem (see ordering options).
CAN bus (located next to the Ethernet port) is provided for
connection to the Cordex series of converters, rectifiers and smart
peripherals.
RS-485 bus provides a secondary connection for products (e.g.,
Pathfinder rectifiers) that do not support the CAN bus interface.
Converter and Rectifier Tips
The Cordex Converter and Rectifier modules are plug and play.
When a module is added to the system, the CXC will detect and
update the converter/rectifier inventory automatically.
If module communication has failed, or a module has been removed
from the system, an INVENTORY UPDATE must be initiated manually.
Controller Tips
Use the CXC GUI or web interface to ensure that the operating
levels (e.g., input/output voltage, converter voltage, etc.) are within
operating parameters of alarm and control thresholds.
Rectifier Communications
Lost
(RECT COMMS LOST)
Check cable connections for breaks or loose contacts.
Ensure all rectifiers are secured and tightly screwed in to the shelf.
Perform INVENTORY UPDATE by tapping the Rectifiers
Information area and then tapping on Inventory Update.
Rectifier Lockout
(RECT LOCKOUT)
Pathfinder rectifier modules with LCD option:
Check if any rectifiers menu has been accessed. Rectifiers must be
in normal operation mode. Perform INVENTORY UPDATE.
Set all rectifiers for Remote Access enabled and Remote Adjust
Access enabled.
No Communications at
RS-232 Port
Set web routing to Front Craft Port in the web settings option of the
COMMUNICATIONS menu.
Ensure the baud rate is set to match.
Ensure you are using a NULL modem cable.
Relays Not Triggering
During Alarm Condition
Ensure alarm condition is mapped to a relay (ALARMS menu).
Ensure polarity of relay is set correctly (HARDWARE menu).
Ensure CUTOFF ALL ALARMS has not been selected.
Rectifier Minor/Major Alarm
Ensure system load is at least 5% of the current rating of the power
modules used in the system or a battery is connected.
Check the rectifier sending the alarm for specific alarm condition.
Perform RECTIFIER REPORT by tapping the Rects (rectifiers
information) area and then tapping on Rectifier Report.
New Rectifier Has Not
Been Acquired
Ensure all rectifiers are secured and tightly screwed in to the shelf.
Perform INVENTORY UPDATE (via Rects area).
Perform RECTIFIER REPORT (via Rects area) to confirm
acquisition.
Unable to communicate with
CXC via the Ethernet port
(for CXCI, see below)
Ensure IP settings are correct (COMMUNICATIONS menu).
Reboot CXC after changing IP settings: select Reset from the
Option button and save settings if prompted.
Use a straight through cable for network connection.
Use a crossover cable only when connecting directly to a PC.
Try pinging the CXC IP address to verify connectivity.
Contact your IT department to ensure both the CXC and PC can
actually communicate across the network.
Unable to communicate with
CXCI: IP reset procedure
Press and hold the front panel reset button for three seconds.
The CXCI will beep three times, IP will be reset (to 10.10.10.201)
and DHCP will be disabled.
The settings will be saved and the CXCI will then reset.
Access will permissible with a laptop and a standard network
crossover cable.
Web interface loads but
shows no live data
Ensure you are using the latest version of Microsoft
® Internet
Explorer. Performance with any other browser is limited and varies
from browser to browser.
Screen is too bright/dim Tap the Argus icon (shown above) and select Contrast from the
pop-up window.
Use the slider on the GUI to adjust contrast as desired.
Tap the check mark to complete adjustment.
Enter the Supervisor password to confirm.
Copyright 2010 Alpha Technologies Ltd. All rights reserved. Alpha is a registered trademark of Alpha Technologies Ltd. Printed in Canada #954-472-10, Rev G
Technical assistance call toll-free (in Canada and the USA)
1-888-462-7487
ALARM SYMBOLS
FRONT PANEL DESCRIPTION
LCD — NORMAL MODE
C
ORDEX
Q
UICK
R
EFERENCE
C
ARD
—S
OFTWARE
V
ERSIONS
2.0
AND
G
REATER