Quick Guide
Neo2QuickGuide.book Page a Tuesday, April 30, 2013 9:37 AM Contact Information United States United Kingdom Renaissance Learning PO Box 8036 Wisconsin Rapids, WI 54495-8036 Technical questions or problems: Tel: +44(0)20 7184 4000 Email: neosupport@renlearn.co.uk Technical questions or problems: Telephone: (800) 338-4204 Email: support@renlearn.com Website: www.renlearn.com/support Latest support information: Website: www.renlearn.co.
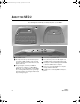
Neo2QuickGuide.book Page 1 Tuesday, April 30, 2013 9:37 AM C ONTENTS What’s in the NEO 2 Kit? . . . . . . . . . . . . . . . . . . . . . . 3 About th e NEO 2 . . . . . . . . . . . . . . . . . . . . . . . . . . . . 4 Removing the Battery Tab . . . . . . . . . . . . . . . . . . . . . 5 Starting the NEO 2 or Shutting It Down . . . . . . . . . . . . 6 Installing NEO Manager . . . . . . . . . . . . . . . . . . . . . . . 6 Installing NEO Manager on Windows Computers . . . . . . . . . . . . . . . . . . . . . . . .
Neo2QuickGuide.book Page 2 Tuesday, April 30, 2013 9:37 AM C ONTEN TS About the Responder SmartApplet . . . . . . . . . . . . . . . . . . . . . . . . . . . . . . . . . . 14 About the Accelerated Reader SmartApplet . . . . . . . . . . . . . . . . . . . . . . . . . . . 19 About the MathFacts in a Flash RP SmartApplet. . . . . . . . . . . . . . . . . . . . . . . . 23 Using the MathFacts in a Flash (Offline) SmartApplet . . . . . . . . . . . . . . . . . . . . 27 About KeyWords Wireless . . . . . . . . . . . .
Neo2QuickGuide.
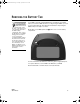
Neo2QuickGuide.book Page 4 Tuesday, April 30, 2013 9:37 AM A BOUT THE NEO 2 The drawings below will help you identify the parts of your NEO 2: C A D B E F A The NEO 2 screen. B The keyboard. The top row includes keys that are unique to NEO, including on/off, the eight file keys, spell check, find, clear file, home, end, applets, and send. C The green light is on when your NEO 2 is connected to a computer, to a SmartOption Mobile Lab, or to an AC adapter.
Neo2QuickGuide.book Page 5 Tuesday, April 30, 2013 9:37 AM R EMOVING THE B ATTERY T AB If you purchased the rechargeable battery pack, install it instead of the batteries and connect the cable on the battery pack to the matching cable next to the NEO 2 battery compartment. Then, connect the AC adapter to your NEO 2 and plug it into an outlet as soon as possible after receiving the NEO 2. Charge the unit for at least 16 hours the first time; charge it 4–8 hours subsequent times.
Neo2QuickGuide.book Page 6 Tuesday, April 30, 2013 9:37 AM S TARTING THE NEO 2 OR S HUTTING I T D OWN To start the NEO 2, press the on/off key in the upper-left corner of the keyboard. The NEO 2 will start AlphaWord Plus, and you can begin typing immediately in the open file if you wish. Notice that you have eight files available to type text in; to switch between files, press one of the file keys (file 1, file 2, etc.). You can also save and name files on your NEO 2.
Neo2QuickGuide.book Page 7 Tuesday, April 30, 2013 9:37 AM I NSTALLING N E O M ANAGER Installing NEO Manager on Windows Computers I n s t a l l i n g N E O M a n a g e r on Windows Computers NEO Manager works with Windows XP, Windows Vista, Windows 7, or Windows 8. 1. Make sure you’re logged in to the computer as an administrator or that you have administrator privileges. 2. Insert the NEO Manager CD into your computer and view the contents of the CD.
Neo2QuickGuide.book Page 8 Tuesday, April 30, 2013 9:37 AM I NSTALLING N E O M ANAGER Installing NEO Manager on Macintosh Computers can log in; if not, choose to create a new account. Once you are logged in, you can select your products and the information you would like to receive, then click Submit. When you have finished, click Done. Installing NEO Manager on Macintosh Computers NEO Manager works with OS 10.4.x, 10.5.x, 10.6.x, 10.7.x, or 10.8.x. 1.
Neo2QuickGuide.book Page 9 Tuesday, April 30, 2013 9:37 AM C ONNECTING NEO 2 TO Y OUR C OMPUTER Connecting a Single NEO 2 to Your Computer 1. If this is the first time you have connected the NEO 2 to your computer, check the following: • Make sure you are logged in to your computer as an administrator or that you have permissions that allow the device drivers to load properly. • Start the NEO Manager software if it isn’t already running on the computer. 2.
Neo2QuickGuide.book Page 10 Tuesday, April 30, 2013 9:37 AM S ETTING U P A R ENAISSANCE R ECEIVER If you received or purchased a Renaissance Receiver, you can use NEO 2’s wireless capabilities to print to your computer’s default printer. You can also use NEO 2s with the 2Know! Toolbar program, NEO Share, AccelTest software, Accelerated Reader RP, MathFacts in a Flash RP, Accelerated Math RP, and Google Docs.
Neo2QuickGuide.book Page 11 Tuesday, April 30, 2013 9:37 AM SETTING UP A RENAISSANCE RECEIVER Naming the Receiver/Computer Connection (Network) Naming the Receiver/Computer Connection (Network) The Renaissance Wireless Server Utility is automatically installed with the NEO Manager software. Make sure you’ve installed NEO Manager on your computer before you follow these steps.
Neo2QuickGuide.book Page 12 Tuesday, April 30, 2013 9:37 AM You can find the web address or RPID on the Software Requirements page in Renaissance Place; the RPID is also on your Renaissance Place Welcome page. After entering the address or RPID, click Verify to make sure the utility recognizes it as valid. 6. Click OK when the program verifies that the settings were changed successfully. (The OK button is available after you verify the address or RPID as described in step 5.
Neo2QuickGuide.book Page 13 Tuesday, April 30, 2013 9:37 AM SMARTAPPLETS I NSTALLED ON THE NEO 2 Which SmartApplets Are Installed? • KeyWords Wireless—KeyWords Wireless allows students to learn and practice keyboarding.
Neo2QuickGuide.book Page 14 Tuesday, April 30, 2013 9:37 AM SMARTAPPLETS INSTALLED ON THE NEO 2 About AlphaWord Plus About AlphaWord Plus When you start your NEO 2, AlphaWord Plus opens automatically (unless you’ve changed settings to have another SmartApplet open.) AlphaWord Plus is the program that lets you write on NEO 2. Simply press one of the file keys (file 1, file 2, etc.) to choose the file to write in and start typing.
Neo2QuickGuide.book Page 15 Tuesday, April 30, 2013 9:37 AM SMARTAPPLETS I NSTALLED ON THE NEO 2 About the Responder SmartApplet Before you use the Responder SmartApplet, make sure you’ve done the following: • installed NEO Manager (see page 6) • connected a Renaissance Receiver to your computer (see page 10) • named the Renaissance Receiver network (see page 11).
Neo2QuickGuide.book Page 16 Tuesday, April 30, 2013 9:37 AM SMARTAPPLETS INSTALLED ON THE NEO 2 About the Responder SmartApplet 3. If you have only one assignment, the program will ask if you are ready to work on it. Press Y for yes to continue; then, press enter. If you have more than one assignment, the program will ask which one you want to work on, and it will list the assignments. Press the letter for the assignment you want; then, press enter. 4.
Neo2QuickGuide.book Page 17 Tuesday, April 30, 2013 9:37 AM SMARTAPPLETS I NSTALLED ON THE NEO 2 About the Responder SmartApplet Using NEO 2 with Accel erated Math RP If you have an active subscription to Accelerated Math RP, students can use a NEO 2 to complete paper assisted-response (multiple-choice) assignments if the Scoring preference for the class allows students to use Renaissance Responders.
Neo2QuickGuide.book Page 18 Tuesday, April 30, 2013 9:37 AM SMARTAPPLETS INSTALLED ON THE NEO 2 About the Responder SmartApplet 7. When you’ve answered all the questions, the program will ask if you are ready to submit your work. Press Y to finish or N to go back and review the questions. Then, press enter. 8. If NEO 2 asks you to wait while your assignment is saved, press enter. 9. When the assignment is complete, the NEO 2 will ask you to get your TOPS Report at the printer; press any key.
Neo2QuickGuide.book Page 19 Tuesday, April 30, 2013 9:37 AM SMARTAPPLETS I NSTALLED ON THE NEO 2 About the Accelerated Reader SmartApplet 2. Click Assign in the Teacher Responder dialog box. The program will show you a PIN. Leave this dialog box open. 3. Start the Responder SmartApplet (see page 15). 4. When NEO 2 asks you to enter the Teacher Responder PIN, enter the one that is shown in your 2Know! Toolbar program. Then, press enter. 5.
Neo2QuickGuide.book Page 20 Tuesday, April 30, 2013 9:37 AM SMARTAPPLETS INSTALLED ON THE NEO 2 About the Accelerated Reader SmartApplet The same preferences apply to students no matter where they take quizzes— on NEO 2 or at a computer— so you only have to set the preferences once. • In Accelerated Reader RP, set the School and Classroom Student Quizzing preferences and the Other Reading Series preference for your class. (For instructions, see the Accelerated Reader Software Manual.
Neo2QuickGuide.book Page 21 Tuesday, April 30, 2013 9:37 AM SMARTAPPLETS I NSTALLED ON THE NEO 2 About the Accelerated Reader SmartApplet 7. If you are in more than one Accelerated Reader class, your classes will be listed. Use the and keys to highlight the class that you are taking this quiz for; then, press enter. 8. On the next screen, use the and keys to highlight the type of quiz you want to take (Reading Practice, Vocabulary Practice, or Other Reading). Then, press enter. 9.
Neo2QuickGuide.book Page 22 Tuesday, April 30, 2013 9:37 AM SMARTAPPLETS INSTALLED ON THE NEO 2 About the Accelerated Reader SmartApplet Note: If you are not allowed to take the quiz, the screen will notify you. Depending on the restriction, it may ask if you want to take a different quiz or tell you to press applets to log out. This message may appear for any of these reasons: To stop a quiz, press ctrl-A or cmd-A.
Neo2QuickGuide.book Page 23 Tuesday, April 30, 2013 9:37 AM SMARTAPPLETS I NSTALLED ON THE NEO 2 About the MathFacts in a Flash RP SmartApplet 19. The program will ask if you want to take a different quiz. Press Y for yes or N for no. Then, press enter. If you choose no, you will go back to the list of SmartApplets available on the NEO 2. About the MathFacts in a Flash RP SmartApplet This SmartApplet is for MathFacts in a Flash work at school.
Neo2QuickGuide.book Page 24 Tuesday, April 30, 2013 9:37 AM SMARTAPPLETS INSTALLED ON THE NEO 2 About the MathFacts in a Flash RP SmartApplet How Students Use t he MathFacts i n a Flash RP SmartApplet to Work on Practi ces or Tests at School Logging In and Choosing What to Work On 1. The teacher’s computer must be on, with the Receiver connected. (You can use the teacher’s computer for other things while students are working in MathFacts in a Flash; the computer doesn’t need to be dedicated to this task.
Neo2QuickGuide.book Page 25 Tuesday, April 30, 2013 9:37 AM SMARTAPPLETS I NSTALLED ON THE NEO 2 About the MathFacts in a Flash RP SmartApplet Working at the Current Level When you work at the current level, you may be asked whether to start a practice or test. If so, press Y for yes or N for no. Then, press enter. If the screen shows you the results of your recent work without giving you choices, press enter to continue.
Neo2QuickGuide.book Page 26 Tuesday, April 30, 2013 9:37 AM SMARTAPPLETS INSTALLED ON THE NEO 2 About the MathFacts in a Flash RP SmartApplet Tips for practices and tests: • During practices, the program will let you know if you enter or select an incorrect answer. If you select answers with arrow keys or letter keys, the program will put an X over the answer you chose and a box around the correct answer. Then, it will give you the chance to choose the correct answer.
Neo2QuickGuide.book Page 27 Tuesday, April 30, 2013 9:37 AM SMARTAPPLETS I NSTALLED ON THE NEO 2 Using the MathFacts in a Flash (Offline) SmartApplet Using the MathFacts in a Flash (Offline) SmartApplet About t he MathFacts in a Flash (Off line) SmartAppl et The MathFacts in a Flash (offline) SmartApplet lets students practice math facts on their own.
Neo2QuickGuide.book Page 28 Tuesday, April 30, 2013 9:37 AM SMARTAPPLETS INSTALLED ON THE NEO 2 Using the MathFacts in a Flash (Offline) SmartApplet Levels that you have already worked on are marked with *. Clearing the history clears the asterisks. The history is automatically cleared when you send it to Renaissance Place. You can also choose to clear the history when you print it or select the Clear option in the History menu. For more information, see page 31.
Neo2QuickGuide.book Page 29 Tuesday, April 30, 2013 9:37 AM SMARTAPPLETS I NSTALLED ON THE NEO 2 Using the MathFacts in a Flash (Offline) SmartApplet Vi ewing the History Students can view the history for one level or for all the work they’ve done in the MathFacts in a Flash (offline) SmartApplet. Viewing the History for One Level Students follow these steps to see a detailed history for one level. 1. Open the MathFacts in a Flash (offline) SmartApplet (see page 27). 2.
Neo2QuickGuide.book Page 30 Tuesday, April 30, 2013 9:37 AM SMARTAPPLETS INSTALLED ON THE NEO 2 Using the MathFacts in a Flash (Offline) SmartApplet 3. Leave View highlighted and press enter. 4. The next screen lists the activities you’ve done so far, including the level name, whether it was a practice or test, the number of problems you answered correctly, and the time you took.
Neo2QuickGuide.book Page 31 Tuesday, April 30, 2013 9:37 AM SMARTAPPLETS I NSTALLED ON THE NEO 2 Using the MathFacts in a Flash (Offline) SmartApplet b. Next, you will be asked enter the student name or ID that you want printed on the history; type it and press enter. c. After your history has been sent to the computer’s default printer, you will be asked if you want to clear the history—that is, erase the history of the practice you’ve done so far in this SmartApplet.
Neo2QuickGuide.book Page 32 Tuesday, April 30, 2013 9:37 AM SMARTAPPLETS INSTALLED ON THE NEO 2 About KeyWords Wireless About KeyWords Wireless The KeyWords Wireless SmartApplet helps students learn keyboarding skills and practice keyboarding. These instructions will help you start using the SmartApplet; for more information, refer to the NEO 2 User Manual on the NEO 2 Documentation CD or at www.renlearn.com/neo/downloads.
Neo2QuickGuide.book Page 33 Tuesday, April 30, 2013 9:37 AM SMARTAPPLETS I NSTALLED ON THE NEO 2 About KeyWords Wireless 7. On the next panel, all students are checked. All checked students will be imported. If there are any students that you do not want to import, remove the check mark next to those students. Click Next >. 8. Read the summary; then, click Import. 9. Click Done. The students will be listed on the KeyWords tab. Adding KeyWords Students Manually in NEO Manager 1.
Neo2QuickGuide.book Page 34 Tuesday, April 30, 2013 9:37 AM SMARTAPPLETS INSTALLED ON THE NEO 2 About KeyWords Wireless If you have chosen a Receiver before, the program may ask if you want to stay connected. Press Y for yes or N for no; then, press enter. (If you choose no, you’ll need to select another Receiver.) If you make a mistake, use the arrow keys to go to the line where there is a mistake; then, use the backspace key to erase it. 4.
Neo2QuickGuide.book Page 35 Tuesday, April 30, 2013 9:37 AM SMARTAPPLETS I NSTALLED ON THE NEO 2 About KeyWords Wireless 4. Type your KeyWords password and press enter. (The password was assigned when you were added as a student.) 5. Move the cursor down until Pre-Test is highlighted; then, press enter. The arrows on the screen show you that there are more options above or below the ones you’re viewing. 6. For the pre-test, after viewing instructions, type the text as instructed.
Neo2QuickGuide.book Page 36 Tuesday, April 30, 2013 9:37 AM SMARTAPPLETS INSTALLED ON THE NEO 2 About KeyWords Wireless Learn New Keys This part of the lesson helps you learn to type the keys. When you choose this option, KeyWords asks you to type the keys you’re learning and to type combinations of the keys in different sequences.
Neo2QuickGuide.book Page 37 Tuesday, April 30, 2013 9:37 AM SMARTAPPLETS I NSTALLED ON THE NEO 2 About KeyWords Wireless If you are using offline mode, you will not be asked to choose a Receiver network. For details, see the NEO 2 User Manual. 3. You may be shown a list of Networks that are available. (Networks are Renaissance Receivers connected to computers.) Use the up and down arrow keys to highlight the Receiver you want to connect to; then, press enter.
Neo2QuickGuide.book Page 38 Tuesday, April 30, 2013 9:37 AM SMARTAPPLETS INSTALLED ON THE NEO 2 About KeyWords Wireless The Student Progress Report includes all lessons you’ve worked on. It shows you your goals and your actual words per minute and accuracy, the accuracy and speed builders you’ve completed, and whether you’ve passed the test. The Last Lesson Report shows this information for the last lesson only. 5. The report will appear on the screen.
Neo2QuickGuide.book Page 39 Tuesday, April 30, 2013 9:37 AM SMARTAPPLETS I NSTALLED ON THE NEO 2 About KeyWords Wireless • Send to send the report to a computer file or to an AlphaWord Plus file on NEO 2. Then, choose one of these options: • Send directly to the computer: If you choose this option, connect NEO 2 to a computer with the USB cable, open a program or file that can accept text, and press send again on the NEO 2.
Neo2QuickGuide.book Page 40 Tuesday, April 30, 2013 9:37 AM SMARTAPPLETS INSTALLED ON THE NEO 2 About Beamer About Beamer The Beamer SmartApplet uses infrared (IR) technology to send data from one NEO to another without using a cable. (You can also send data between a NEO 2 and an AlphaSmart 3000 running System 3 software, a Palm OS device, or a Dana.) Follow these steps to beam files from one NEO to another: You can also beam files to your computer using the AlphaBeam software.
Neo2QuickGuide.book Page 41 Tuesday, April 30, 2013 9:37 AM SMARTAPPLETS I NSTALLED ON THE NEO 2 About the Control Panel About the Control Panel You can also change settings using NEO Manager, which can send setting changes to several NEOs at the same time. For more information, refer to the NEO 2 User Manual on the Documentation CD or at www.renlearn.com/neo/ downloads. The Control Panel lets you define settings for your NEO 2. To use the Control Panel, follow these steps: 1. Press the applets key. 2.
Neo2QuickGuide.book Page 42 Tuesday, April 30, 2013 9:37 AM SMARTAPPLETS INSTALLED ON THE NEO 2 About the Control Panel Setting Set Screen Contrast Description Lets you make the screen lighter or darker. Press or to change the setting (1–16). Lower numbers lighten the background and text; higher numbers darken the background. Keyboard Command Reference List Lets you view a list of keyboard shortcuts you can use to perform functions on the NEO 2.
Neo2QuickGuide.book Page 43 Tuesday, April 30, 2013 9:37 AM SMARTAPPLETS I NSTALLED ON THE NEO 2 About the Calculator About the Calculator To use the calculator, follow these steps: 1. Press the applets key. 2. Press to move the cursor down next to Calculator. Then, press enter. To copy calculations so that you can paste them into an AlphaWord plus file, press shift--C. Then, press applets, scroll up to AlphaWord Plus, press enter, and open the file you want to paste into. Press ctrl-V. 3.
Neo2QuickGuide.book Page 44 Tuesday, April 30, 2013 9:37 AM U SING NEO S HARE TO E XCHANGE F ILES WITH NEO S NEO Share is a quick and easy way to send text or files to NEO 2 users and receive files back from them as you work with your group or classroom. Using NEO Share, you can: • Copy or drag text from another source into NEO Share and immediately send it to NEOs. • Make text files available for NEO 2 users to pick up, including Write On! lessons. • Receive files that were sent back from NEO 2 users.
About Renaissance Learning Renaissance Learning, Inc. is a leading provider of technology-based school improvement and student assessment programs for K12 schools. Renaissance Learning’s tools provide daily formative assessment and periodic progress-monitoring technology to enhance core curriculum, support differentiated instruction, and personalize practice in reading, writing, and math.