Owner’s Manual Model: AR-24TR1 DEHUMIDIFIER Please read this manual carefully before operating the unit and keep it for futrue reference.
CONTENTS Safety Instructions………………………………………...2 Operating Instructions About the controls on the dehumidifier………………..…...3 How the Dehumidifier Operates……………………………5 Automa tic Defrost………………………………………….5 Choosing a Location………………………………………..5 Removing Collected Water…………………….....………...6 Water Level………………………………………………....6 Care and cleaning of the dehumidifier Grille and Case………………………………………...........7 Water Bucket…………………………………………..........7 Air Filter……………………......……………………..........
IMPORTANT SAFETY INFORMATION. READ ALL INSTRUCTIONS BEFORE USING. WARNING! For your safety, the information in this manual must be followed to minimize the risk of fire, electric shock or personal injury. SAFETY PRECAUTIONS When using this dehumidifier, always follow basic safety precautions, including the following: ■ Always operate the product from a power source ■ To turn on your unit, always use the switch of the same voltage ,frequency and rating as indicated on the product identification plate .
About the controls on the dehumidifier. Control type 1 4 hour or 2 hour delay on/off indicator lights High and Low fan indicator lights Bucket full light indicates bucket needs to be emptied or it is not in the proper place. Continuous operation on indicator light Power On indicator light Clean the Filter indicator light Controls NOTE: When the bucket is full or removed, the controls cannot be set. ON/OFF Pad Press to turn the dehumidifier on and off.
About the controls on the dehumidifier. Control type 2 Bucket full light indicates bucket needs to be emptied or it is not in the proper place. Power On indicator light Humidity control knob OFF Continuous Switch off. Dehumidifier continuously running. Controls NOTE: When the bucket is full or removed, the controls cannot be set. Make sure the water tank is correctly positioned. (If the bucket full lamp illuminates when the unit is first switched on, remove the bucket and replace it .
Using the dehumidifier. When first using the dehumidifier, operate the unit continuously 24 hours. How the Dehumidifier Operates Automatic Defrost Moist, humid air is drawn over a cold refrigerated dehumidifying coil. Moisture in the air condenses on this coil and drains into a bucket (or through a hose and drain). When frost builds up on the evaporator coils, the compressor will cycle off and the fan will continue to run until the frost disappears.
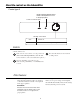
Using the dehumidifier. Always make sure the water bucket is locked into place on the dehumidifier. Removing Collected Water There are 2 ways to remove collected water: Use the bucket. When the bucket is removed, the unit will shut off. Empty and replace the bucket. Use a hose. Water will automatically flow into a floor drain by attaching a 14mm inner diameter hose (not included). 1. Open the drain cover on the side of the unit. 2. Thread the drain tie-in (supplied) onto the nozzle. 3.
Care and cleaning of the dehumidifier. Turn the dehumidifier off and remove the plug from the wall outlet before cleaning. Grille and Case To clean the case: Use water and a mild detergent. Do not use bleach or abrasives. To clean the front grille: Use a vacuum attachment or brush. Water Bucket To clean: Every few weeks, clean the bucket to prevent growth of mold, mildew and bacteria. Partially fill the bucket with clean water and add a little mild detergent.
Troubleshooting. Problem Possible Causes What To Do Dehumidifier does not start The dehumidifier is unplugged. • Make sure the dehumidifier’s plug is pushed completely into the outlet. Dehumidifier has reached its preset level or bucket is full. • The dehumidifier automatically turns off when either condition occurs. Change to a lower setting or empty the bucket and replace properly. Bucket is not in the proper position.
Long term storage. When you do not use the unit for a long period, we suggest you to take following steps to store the unit in a good condition: Make sure there is no water left in the water tank and take off the draining hose Take off the power cord and plug and warp them well. Clean the unit and packed it well to keep it from dust. Electric schematic diagram. AR-24TR1 Fuse type 3.15A Specifications.
66129906419