
User manual


MAINTENANCE AND STORAGE 13
EN
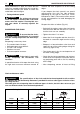
STARTING SYSTEM
To avoid overheating and damage to the engine,
always keep the cooling air vents clean and free
of sawdust and debris.
The starter rope must be replaced as soon as it
shows signs of wear.
CLUTCH UNIT (Fig. 20)
Keep the clutch bell free of sawdust and debris,
remove the casing (as illustrated in Chap. 4.1)
and replace it correctly when the operation has
been completed. Have your dealer check the
greasing of the internal bearing every 30 hours
(approx.).
CHAIN BRAKE
Regularly check the efficiency of the chain brake
and the condition of the metal band around the
clutch bell, remove the casing (as illustrated in
Chap. 4.1) and replace it correctly when the
operation has been completed.
Replace this band when the points in contact
with the clutch bell wear down to about half the
thickness of the two ends not subject to rubbing.
CHAIN SPROCKET
Regularly check the condition of the sprocket
with your local retailer and replace it when wear
exceeds the accepted limits.
Do not mount a new chain with a worn sprocket
or vice-versa.
LUBRICATION HOLE (Fig. 21)
Periodically remove the casing (as illustrated in
Chap. 4.1) remove the bar and check that neither
the machine lubrication holes (1) or the bar (2)
are clogged.
CHAIN CATCHER
This is an important safety device that restrains
the chain if it breaks or degrooves.
Regularly check the condition of the chain
catcher and replace it if it gets damaged.
NUTS AND SCREWS
Periodically check that all the nuts and screws
are securely tightened and the handgrips are
tightly fastened.
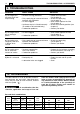
CLEANING THE AIR FILTER (Fig. 22)
Cleaning the air filter is es-
sential to guarantee the efficiency and duration
of the machine. Do not work with a damaged fil-
ter or without a filter, as this could permanently
damage the engine.
It must be cleaned after every 8-10 working
hours.
Clean the filter as follows:
– Unscrew the knob (1) and remove the cover
(2).
– Remove the filter element (3) and tap it gently
to remove any dirt and, if necessary, clean it
with a brush.
– If it is completely clogged, use a screwdriver
to separate the two parts (3a and 3b) and
wash them in clean petrol. If you are using
compressed air, aim the jet so that it blows
from the inside towards the outside.
– Replace the two filter element parts by press-
ing on the edges until you hear them click into
place.
– Fit the filter element (3) and the cover (2) back
on.
CHECKING THE SPARK PLUG (Fig. 23)
Periodically remove and clean the spark plug
using a metal brush to get rid of any deposits.
Check and reset the correct distance between
the electrodes.
Replace the spark plug and fasten it firmly using
the supplied wrench.
The spark plug must be replaced with one with
the same characteristics whenever the elec-
trodes have burnt or the insulation has worn, and
in any case every 100 working hours.
TUNING THE CARBURETTOR
The carburettor is tuned by the manufacturer to
achieve maximum performance in all situations,
with a minimum emission of toxic gas in compli-
ance with the regulations in force.
IMPORTANT