
Operation Manual


ENGLISH
Dear Customer,
Thank you for choosing this quality ALPINA home appliance. Your Alpina appliance comes with a 2 year warranty and will
provide years of service if looked after. The ALPINA name brings you Quality, Reliability and Dependability. We hope you
will continue to make ALPINA your first choice in home appliances.
IMPORTANT SAFEGUARDS
When using electrical appliances, basic safety precautions should be followed:
1. Read all instructions carefully.
2. Make sure the power supply corresponds to one on the rating label.
3. To avoid electrical shock, do not immerse electrical parts in water or other liquid.
4. Do not allow children to operate or play with the appliance.
5. Unplug from outlet when not in use, or before putting on/taking off parts.
6. Do not use with damaged electrical cord or plug.
7. If damaged or malfunction occurs, refer to an authorized service center only.
8. Do not place on or near hot surfaces.
9. Never pull the appliance by the power cord.
10. Do not use the appliance for other than intended household use.
Read these instructions
1. The use of attachments or other accessories which are not supplied with the appliance are not recommended. This
could result into electrical shock or damage to the appliance.
2. Never use the appliance near or below curtains and other inflammable materials.
3. Keep the cable away from heat, direct sunlight, moisture & sharp edges.
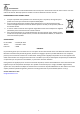
Instruction for use
Before first use, remove all packaging materials/stickers from the unit and wipe the surface of the plates with a damp
cloth, then dry.
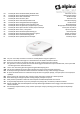
1. Place the unit on a clean, level and heat resistant surface or mat.
2. You can lightly drop small amount of oil or butter to the surface, since the plate is non-stick surface, the use of butter
or oil is optional.
3. Plug the appliance into the mains supply, the red indicator light (POWER) will turn on.
4. Note: Do not place any bread on the plate during the first use for at least 10 minutes to allow the new elements to
preheat and burn off any dust that may accumulated during assembly.
5. The green indicator light will turn on when the cooking temperature is reached. Open the sandwich maker; place a
slice of bread in the bottom half with the buttered side, for additional flavor use bacon dripping and add the top
slice then gently close the lid, lock the handle with the hinge.
6. Your sandwich will be toasted in 3 to 8min or longer to suit your taste. Open the lid and remove the sandwich bread
using a plastic or wooden spatula. Do not use sharp objects to avoid damaging the non-stick coated surface.
7. The toasting section should always be closed in the intervals between toasting.
Cleaning & Maintenance
1. Always make sure the appliance is unplugged from the mains supply before cleaning.
2. Remove crumbs or any residue from the toasting surface.
3. Clean the appliance with a damp cloth, do not use abrasive detergents.
Warning:
This appliance is equipped with a grounded, Type G, 3-pin power supply cord. This is a safety feature. Do not attempt to
defeat the safety purpose of this plug.
2