MOUNTING INSTRUCTIONS USER GUIDE ALP471-40-SERIES ALP472-40-SERIES
Thank you for your purchase. Alpine maintains a strong practice of ongoing development of products and commercial research. Combining commitment to the customer, design innovation and skilled, dedicated workforces, they have produced a range of products that are an essential part of every commercial facility. Every product is designed to the highest standards, enabling you to get your requirements done in a reliable and cost-effective way.
Table of Contents 2 Hardware List 3 Mounting Instructions 5 Warranty 5 Notes
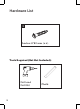
Hardware List 1 Anchor 8*80 mm (x 4) Tools Required (But Not Included): Drill and Drill Bit 2 Chalk
Mounting Instructions Step 1: A Mark on the ground the four areas you want to anchor your receptacle in place. B Drill four 10 * 100 mm holes in the ground, making sure to not make them too large.
Mounting Instructions Step 2: A Place your four Anchors (1) through the holes on the bottom of the receptacle. B Line up the Anchors (1) to the pre-drilled holes on the ground. C Secure all four in place and your receptacle is ready to handle the harshest of weather conditions.
Warranty 1. Alpine Industries (the “Company” or “Tiger Companies”) warrants to the purchaser that the product will be free from defects in workmanship and materials for a period of 1 year from the date of purchase. The warranty period is not extended if we repair, replace, exchange, or provide a refund for the product (as determined in our sole discretion). We may change the availability of this limited warranty at our discretion, but any changes will not be retroactive. 2.
ALP471-40-SERIES ALP472-40-SERIES © 2022 Alpine Industries alpineindustries.