R EN CDA-7878R FM/MW/LW/RDS CD Receiver DE • OWNER'S MANUAL Please read before using this equipment. • BEDIENUNGSANLEITUNG Lesen Sie diese Bedienungsanleitung bitte vor Gebrauch des Gerätes. FR • MODE D'EMPLOI Veuillez lire avant d'utiliser cet appareil. • MANUAL DE OPERACIÓN Léalo antes de utilizar este equipo. • ISTRUZIONI PER L'USO Si prega di leggere prima di utilizzare il attrezzatura. ES • ANVÄNDARHANDLEDNING Innan du använder utrustningen bör du läsa igenom denna användarhandledning.
CD changer for CDA-7878R. CD-Wechsler für CDA-7878R. Changeur CD pour CDA-7878R. Cambiador de CD para CDA-7878R. Cambia CD per CDA-7878R. CD-växlare för CDA-7878R. CD changer for CDA-7878R. CD-Wechsler für CDA-7878R. Changeur CD pour CDA-7878R. Cambiador de CD para CDA-7878R. Cambia CD per CDA-7878R. CD-växlare för CDA-7878R. You cannot connect to CDA-7878R. Ein Anschluß an CDA-7878R ist nicht möglich. Il est impossible de se raccorder au CDA7878R. No es posible conectarlo a CDA-7878R.
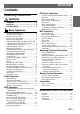
ENGLISH Contents Operating Instructions WARNING WARNING .................................................. 2 CAUTION ................................................... 2 PRECAUTIONS ......................................... 2 Basic Operation Detaching the Front Panel ................................. 4 Attaching the Front Panel ................................. 4 Initial System Start-Up ..................................... 4 Turning Power On and Off ...............................
WARNING WARNING This symbol means important instructions. Failure to heed them can result in serious injury or death. DO NOT OPERATE ANY FUNCTION THAT TAKES YOUR ATTENTION AWAY FROM SAFELY DRIVING YOUR VEHICLE. Any function that requires your prolonged attention should only be performed after coming to a complete stop. Always stop the vehicle in a safe location before performing these functions. Failure to do so may result in an accident.
Never Attempt the Following Installation Location Do not grip or pull out the disc while it is being pulled back into the player by the automatic reloading mechanism. Do not attempt to insert a disc into the unit when the unit power is off. Make sure the CDA-7878R will not be installed in a location subjected to: • • • • Direct sun and heat High humidity and water Excessive dust Excessive vibrations Correct Handling Do not drop the disc while handling.
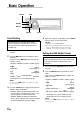
Basic Operation POWER RESET ANGLE 8 9 MODE/Audio Control Detaching the Front Panel Attaching the Front Panel 1 1 2 3 Press and hold the POWER button for at least 2 seconds to turn off the power. Press the (Release) button at upper left side until the front panel pops out. Grasp the left side of the front panel and pull it out. 2 First, insert the right side of the front panel into the main unit. Align the groove on the front panel with the projections on the main unit.
Turning Power On and Off 1 Press the POWER button to turn on the unit. NOTE The unit can be turned on by pressing any other button except the eject c button. The volume level gradually increases to the previous level you were listening to before the unit was turned off. Press and hold the POWER button for at least 2 seconds to turn off the unit.
Basic Operation TUNE g DN MODE/Audio Control f UP SETUP Adjusting Source Signal Level If the difference in volume level between the CD player and FM radio is too great, adjust the FM signal level as follows. 1 2 1 2 Press the f UP button repeatedly to select "FM-LEVEL." Each press of the f UP button scrolls the modes as follows: 3 ↔ SUB-W (switching phase)∗ ↔ ↔ ↔ AUX MUTE SUB-W STEREO/MONO∗ ↔ CONTRAST ↔ ↔ ↔ DEMO SCROLL ↔ BEEP ↔ DISC/FOLDER ↔ SRC DHE ∗ Displayed when you set SUB-W to ON.
Switching the Phase of the Subwoofer Output You can switch the phase of the subwoofer output to NORMAL 0˚ or REVERSE 180˚. To select the desired phase. 1 2 3 Press and hold the SETUP button for at least 2 seconds. Press the fUP button to select “Switching the phase of the SUB-W (SUB-W NORMAL or REVERSE) mode.” You can set the subwoofer output to stereo or monaural. Make sure to set the correct output for your subwoofer type.
Basic Operation SOURCE TUNE g DN f UP SETUP 4 This CD player can scroll the disc and track names recorded on CD-TEXT discs, as well as the text information of MP3 files, folder names, and ID3 tags. MUTE SUB-W STEREO/MONO∗ SCROLL ↔ BEEP ↔ DISC/FOLDER ↔ SRC DHE ∗ Displayed when you set SUB-W to ON. NOTE If you press the g DN button, the display scrolls in reverse sequence. 3 2 Press and hold the SETUP button for at least 2 seconds. Press the f UP button repeatedly to select “AUX.
3 Press the TUNE button to toggle the mode between AUX IN ON and AUX IN OFF. NOTES • The initial setting at the factory is AUX IN OFF. • You can set the AUX mode display by pressing the g DN or f UP button after AUX IN ON is set, select the AUX mode display setting, and then press the TUNE button. • When connecting the KCA-410C, you can set two AUX mode displays. 4 5 Press the SETUP button to return to normal mode.
Basic Operation TUNE DISP/B.OUT T.S.M. g DN f UP 2 When the Blackout mode is turned on, the display will turn off to reduce power consumption. This additional power enhances the sound quality. NOTE If any button on the unit is pressed during the blackout mode, the function will be displayed for 5 seconds to show the operation before returning to Blackout mode. AUX ↔ DEMO ↔ CONTRAST MUTE SUB-W STEREO/MONO∗ ∗ Displayed when you set SUB-W to ON.
Displaying the Title/Text NOTES • Some characters may not be displayed correctly with this device, depending on the character type. • The CD changer must also be CD Text compatible for the Text information to be displayed. • When the Scroll Setting (refer to page 8) is set to “SCROLL MANU”, press and hold the TITLE button for at least 2 seconds to scroll the Text information only once (TEXT DISPLAY, FOLDER NAME DISPLAY, FILE NAME DISPLAY or ID3 TAG DISPLAY mode).
Basic Operation -/J g DN BAND f UP MODE/Audio Control TITLE Titling Discs 7 It is possible to title your favourite CD's. 1 2 3 4 5 6 NOTES • You can enter 24 CD titles on this unit. If you try to store beyond the limit, the display will show “FULL DATA.” At this point, no more titles can be stored. • The CD Changer title length or memory capacity varies depending upon the model being used. • To input a new title, one of the previously inputted titles must first be deleted.
Radio Operation SOURCE g DN TUNE BAND Preset buttons (1 through 6) f UP Manual Tuning Automatic Seek Tuning 1 1 2 Press the SOURCE button until a radio frequency appears in the display. Press the BAND button repeatedly until the desired radio band is displayed. Each press changes the band: 2 → FM1 → FM2 → FM3 → MW → LW 3 Press the TUNE button repeatedly until "DX SEEK" and "SEEK" disappear from the display.
Radio Operation SOURCE A.ME BAND Preset buttons (1 through 6) Manual Storing of Station Presets 1 2 3 4 Select the radio band and tune in a desired radio station you wish to store in the preset memory. Press and hold any one of the Preset buttons (1 through 6) for at least 2 seconds until the station frequency on the display blinks. Press the Preset button into which you wish to store the station while the frequency display is blinking (within 5 seconds).
RDS Operation SOURCE g DN f UP F Setting RDS Reception Mode and Receiving RDS Stations The RDS (Radio Data System) is a radio information system using the 57 kHz subcarrier of regular FM broadcast. The RDS allows you to receive a variety of information such as traffic information, station names, and to automatically re-tune to a stronger transmitter that is broadcasting the same programme.
RDS Operation SETUP/F AF Recalling Preset RDS Stations 4 5 Press the AF button to activate the RDS mode. The display shows "AF" when the RDS mode is activated. 1 2 Press the "F" button to activate the normal mode. The indicator will turn off. ↔ DEMO CONTRAST AUX MUTE NOTE For presetting the RDS stations, refer to the Radio Operation section. The RDS stations can be preset in the FM1, FM2 and FM3 bands only.
PI SEEK Setting PTY (Programme Type) Tuning 1 1 2 3 4 Press and hold the SETUP button for at least 2 seconds. Press the f UP button repeatedly to select "PI SEEK." Press the TUNE button to toggle the mode between "PI SEEK ON" and "PI SEEK OFF." 2 Press the T.INFO button to activate the Traffic Information mode. To cancel the Traffic information mode, press the T.INFO button again. Press the g DN or f UP button to select your desired traffic information station.
RDS Operation T.INFO g DN f UP F Receiving Traffic Information While Playing CD or Radio 1 2 Press the T.INFO button repeatedly until the T.INFO indicator appears in the display. Press the g DN and f UP buttons to select a traffic information station if necessary. • When a traffic information broadcast starts, the unit automatically mutes the CD player or the regular FM broadcast.
4 Press the P. PTY button to activate the PRIORITY PTY mode again. • To change the programme category, perform the step 3. • To disable the PRIORITY PTY function, press and hold the P. PTY button for at least 2 seconds. NOTE In the PRIORITY PTY function, unlike in the T.INFO function, the volume does not increase during operation. 5 Press the "F" button to activate the normal mode. indicator will turn off. The NOTE Operate the unit while the indicator is illuminated.
CD Player Operation SOURCE -/J g DN f UP Opening and Closing the Movable display 1 REPEAT c Playback 1 Press the c button. The movable display will open. Press the c button. The movable display will open. Insert a disc with the label side facing up. To close the movable display, press the c button again. The movable display will close. 2 NOTES • Do not apply shock to the movable display when it is open as it may result in malfunction of the unit.
About the usable discs. We recommend using only compact discs containing the marks shown below. You can play CD-Rs (CD-Recordable)/CD-RWs (CD-ReWritable) for audio use on this unit. You can also play CD-Rs/CD-RWs containing MP3 formatted audio files. • Some of the following CDs may not play on this unit: Flawed CDs, CDs with fingerprints, CDs exposed to extreme temperatures or sunlight (e.g.
CD Player Operation SOURCE BAND Select buttons (1 through 6) M.I.X. F SCAN M.I.X. (Random Play) Scanning Programmes 1 1 Press the M.I.X. button in the play or pause mode. The tracks on the disc will be played back in a random sequence. After all the tracks on the disc have been played back once, the player will begin a new random sequence play until the M.I.X. mode is cancelled. To cancel M.I.X. play, press the M.I.X. button again to turn off the M.I.X.
Controlling CD Changer (Optional) An optional 6-disc or 12-disc CD Changer may be connected to the CDA-7878R if it is Ai-NET compatible. With a CD Changer connected to the Ai-NET input of the CDA-7878R, the CD Changer will be controllable from the CDA-7878R. Using the KCA-400C (Multi-Changer Switching device) or the KCA-410C (Versatile Link Terminal) multiple changers can be controlled by the CDA7878R. See the Multi-Changer Selection section on page 23 for selecting the CD Changers.
MP3 Operation -/J SOURCE MODE/Audio Control g DN f UP c FOLDER DN FOLDER UP FILE SEARCH Playing MP3 Files 4 You can play CD-ROMs, CD-Rs, and CD-RWs containing MP3 files on this unit. Use the format compliant with ISO 9660 level 1 or level 2. For further information about playing or storing MP3 files, refer to pages 26-27 before using the unit. 1 Press the c button. The movable display will open. Insert a disc containing an MP3 file with the label side facing up.
Fast Forward and Backward M.I.X. (Random Play) 1 1 Press and hold the g DN or f UP button to quickly move backward or forward until you reach the desired section of the file. Note There is no audio output during fast forward/backward for MP3 files. To cancel M.I.X. play, press the M.I.X. button again to turn off the M.I.X. Selecting Folders 1 Scanning Programmes 1 You can locate all the files on a disc and play them. 2 3 -M.I.X.
MP3 Operation TUNE g DN f UP SETUP Setting the Range of MP3 File Selection About MP3 You can set the range of MP3 file selection to “entire disc contents” or “folder contents only.” 1 2 Press and hold the SETUP button for at least 2 seconds. Press the f UP button repeatedly to select DISC/FOLDER (track selection range). Each press of the f UP button changes the modes as shown.
• Supported playback sampling rates and bit rates Sampling rates: 8 kHz - 44.1 kHz, bit rates: 8 320 kbps Note that for sampling rates such as 11,025 kHz, this device's frame display (Page 11) may not display correctly. • ID3 tags This device supports ID3 tag v1. If ID3 tag data is in an MP3 file, this device can display the title (track title), artist name, and album name ID3 tag data. This device can only display single-byte alphanumeric characters and the underscore.
Adjusting the Sound Operation MODE/Audio Control g DN f UP DHE DSP Preset buttons (1 through 6) Selecting DHE Mode Using digital signal processing technology, DHE (Digital Harmonics Enhancer) operates on harmonic components which determine tone and coloration of the musical instruments. The process operates independently on individual frequency bands, so each instrument or vocal will be distinct.
Adjusting and Storing the Equalizer Curve Direct select Press one of 1 - 6 buttons to activate your desired curve. You can modify the Equalizer settings to create a response curve more appealing to your personal taste. 1 2 3 4 5 6 Select the equalizer characteristic to adjust. See "Equalizer Presets" (on page 28). (If you select the PRESET 2) 3 → EQ ← → EQ MEMORY ← → LPS ← → OFF ← Press the MODE button. The Frequency band indication in the display flashes.
Adjusting the Sound Operation The Crossover/Time Correction Crossover: This unit is equipped with an Active Crossover. The crossover limits the frequencies delivered to the outputs. Each channel is controlled independently. Thus, each speaker pair can be driven by the frequencies for which they have been optimally designed. The divider adjusts the HPF (high pass filter) or LPF (low pass filter) of each band, and also the slope (how fast the filter rolls off the highs or lows).
Time Correction: The distance between the listener and the speakers in a car vary widely due to the special conditions of the mobile environment. This difference in the distances from the speakers to the listener creates a shift in the sounds image and frequency characteristics. This is caused by the time delay between the sound reaching the listener’s right versus the left ear. To correct this, the CDA-7878R is able to delay the audio signal to the speakers closest to the listener.
Adjusting the Sound Operation BAND MODE/Audio Control g DN f UP DIVIDER Adjusting and Storing the Crossover/ Time Correction Before performing the following procedures, refer to “Crossover” (page 30) and “Time Correction” (page 31). 1 1 2 4 5 Press and hold the DIVIDER button for at least 2 seconds. Rotate the Audio Control knob to adjust the slope. Slope can be adjusted to FLAT, 6, 12, 18, or 24 db/oct. To adjust another channel, repeat steps 2 to 4.
Adjusting the Time Correction 9 Press the BAND button to select the channel to be adjusted. 2 way system → Low → Low range (L) range (R) Rear high∗ Rear high range (R) ← range (L) ← Recalling the Stored Crossover/ Time Correction Settings 1 Press the DIVIDER button. → Front high range (L) Front high range (R) ← 2 Press the g DN or f UP button to select the stored content (Memory 1 or Memory 2).
Adjusting the Sound Operation MODE/Audio Control g DN f UP CSD Customized Sound Database The unit is equipped with a Customized Sound Database that creates the most suitable sound for your car type. You can fine tune the sound effects by inputting the size of your front speaker or tweeter, whether there is a Subwoofer, and the material of your seats. 1 2 3 Press and hold the CSD button for at least 2 seconds.
Remote Control Operation 1 2 3 4 Controls on Remote Control 1 Power Button Press the button to turn the power on/off. 2 Source Button Press to select the audio source. 3 -/J Button Press the button to switch between the Play and Pause modes for CD. 4 ANGLE 89 Buttons Press the button to adjust the angle of the movable display. 5 Band/Programme Button Radio mode: BAND Button Press the button and the band will change as shown below. → FM1 → FM2 → FM3 → MW → LW CD/Changer mode: To switch the disc mode.
Remote Control Operation Operating the Audio Processor Recalling the Stored Equalizer Curve Choosing the Listening Position Select Private mode → LPS mode → Crossover mode ↓ ↓ ↓ ↓ FLAT MEMORY1 OFF MEMORY1 ↑ ↓ ↑ ↓ ↑ ↓ ↑ ↓ POPS MEMORY2 ALL MEMORY2 ↑ ↓ ↑ ↓ ↑ ↓ ↑ ROCK MEMORY3 FRONT ↑ ↓ ↑ ↓ ↑ ↓ NEWS MEMORY4 FRONT-L ↑ ↑ ↓ ↑ ↓ MEMORY5 FRONT-R ↑ ↓ ↑ ↓ ↑ ALL MODE MEMORY6 ↑ ↑ Selecting DHE mode Steps Equalizer Presets Recalling the Stored Crossover/Time Collection 1 P
Adjusting/Storing the CROSSOVER/TIME CORRECTION Adjusting Storing the settings 1 2 12 Press and hold the ENTER button for more than 3 4 5 6 7 8 9 Select the Crossover mode from the table above. 2 seconds to flash the display. Press the ENTER button to activate the Adjusting mode. 13 Press the 8 or 9 button to select the preset number (1 to 2) that you want to store. Press the BAND button to select the channel (LPF/HPF) that you want to adjust.
Remote Control Operation Battery Replacement Applicable battery: Use two “AAA” sized dry batteries or equivalent. 1 2 3 Opening the battery cover Slide out the battery cover while firmly pressing the direction of arrow. Replacing the battery Put the batteries in the case observing the polarities as illustrated. Closing the cover Push the cover as illustrated until a click is heard.
Information In Case of Difficulty If you encounter a problem, please review the items in the following checklist. This guide will help you isolate the problem if the unit is at fault. Otherwise, make sure the rest of your system is properly connected or consult your authorized Alpine dealer. Basic No function or display. • Vehicle's ignition is off. - If connected following instructions, the unit will not operate with the vehicle's ignition off. • Improper power lead connections.
Information Indication for CD Player HI TEMP • Protective circuit is activated due to high temperature. - The indicator will disappear when the temperature returns to within operation range. NO DISC • No CD is inserted. - Insert a CD. • Although a disc is inserted, “NO DISC” is displayed and the unit does not start to play or eject the disc. - Remove the disc by following these steps: 1) Press the c button. The movable display will open.
Specifications FM TUNER SECTION Tuning Range Mono Usable Sensitivity Alternate Channel Selectivity Signal-to-Noise Ratio Stereo Separation Capture Ratio REMOTE CONTROL 87.5 – 108.0 MHz 0.7 µV 90 dB 65 dB 35 dB 2.0 dB 531 – 1,602 kHz 25.1 µV/28 dB LW TUNER SECTION Tuning Range Sensitivity (IEC Standard) Weight (without battery) "AAA" sized dry battery 2 42 mm (1-21/32") × 121 mm (4-25/32") × 23 mm (29/32") 50 g (1.
Installation and Connections Before installing or connecting the unit, please read the following and pages 2 and 3 of this manual thoroughly for proper use. Warning MAKE THE CORRECT CONNECTIONS. Failure to make the proper connections may result in fire or product damage. USE ONLY IN CARS WITH A 12 VOLT NEGATIVE GROUND. (Check with your dealer if you are not sure.) Failure to do so may result in fire, etc. BEFORE WIRING, DISCONNECT THE CABLE FROM THE NEGATIVE BATTERY TERMINAL.
Installation NOTE For the screw *, provide a proper screw to the chassis installing location. Metal plate Detachable Front panel Caution When you install this unit in your car, do not remove the Detachable Front Panel. If the Detachable Front Panel is removed during installation, you might press too hard and warp the metal plate that holds it in place. 3 Slide the CDA-7878R into the dashboard. When the unit is in place, make sure the locking pins are fully seated in the down position.
Installation and Connections Connections Antenna ISO Antenna Convertor Plug ISO Antenna Plug (Pink/Black) AUDIO INTERRUPT IN 2 (Blue/White) REMOTE TURN-ON 3 To vehicle phone To amplifier or equalizer (Red) IGNITION 4 (Black) GND 9 (Blue) POWER ANT choke coil 6 (Yellow) BATTERY To power antenna 8 Ignition Key 5 7 Battery Changer (Ai-NET) (Sold Separately) : < Speakers - = 1 > Amplifier Front Amplifier Rear Amplifier Subwoofers* ; ! Ai-NET NORM EQ/DIV .
1 Antenna Receptacle Connect to the supplied ISO antenna convertor plug. 2 Audio Interrupt In Lead (Pink/Black) Connect this lead to the Audio Interface output of a cellular phone which provides ground shorting when a call is received. 3 Remote Turn-On Lead (Blue/White) Connect this lead to the remote turn-on lead of your amplifier or signal processor.
46-EN