
User Guide

9-EN
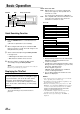
3 Press and hold the MX button for at least 2 seconds to
select the MX mode.
4 Turn the Rotary encoder to select your preferred
mode or OFF.
FM (MX level 1 to 3):
The medium to high frequencies become more clear,
and produces well balanced sound in all the bands.
CD (MX level 1 to 3):
CD mode processes a large quantity of data. This data
is used to reproduce the sound cleanly by making use
of the data quantity.
MP3/DAB (MX level 1 to 3):
This corrects information that was omitted at the time
of compression. This reproduces a well-balanced
sound close to the original.
DVD (Video CD) (MX level 1 to 2):
The dialog portion of the video is reproduced more
clearly.
DVD (CD) (MX level 1):
This disk contains a large quantity of data such as
music clip. MX uses this data to reproduce the sound
accurately.
AUX (MX level 1):
Choose the MX mode (MP3, MUSIC, or MOVIE) that
corresponds to the media connected.
5 After setting, press the Rotary encoder to return to the
normal mode.
NOTES
• To cancel MX mode for all music sources, press the MX
button to turn MX off.
• MX mode is automatically cancelled if no buttons are
pressed within 15 seconds.
• You cannot set the MX mode while RDS and DAB are active.
• Setting to MX OFF makes MX mode of each music source
OFF.
• This function is inoperable when DEFEAT is ON.
• By “Setting the Defeat of the external input” (page 26) to
ON, operation is bypassed.
• Each music source, such as radio, CD, and MP3 can have
its own MX setting.
• On disks with both MP3 and CD-DA, when the source
changes from “MP3 to CD-DA” or “CD-DA to MP3”, the
MX-mode switching process may take a little time before a
piece is played due to.
• MX mode does not function when MX is ON for MW, LW
radio.
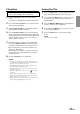
Time Correction
Before performing the following procedures, refer to
"About the Time Correction" (page 7).
1 Make time corrections by pressing the T.CORR button.
Each press changes the modes as follows:
→ Bass Focus mode → Time correction mode
Normal mode ←
2 Select a speaker to be adjusted by pressing the BAND
button.
→ F – L → F – R → R – L → R – R
3 Adjust the desired time correction value by turning the
Rotary encoder.
4 For setting another speaker, repeat the step 2 and 3.
5 After setting, press the Rotary encoder to return to the
normal mode.
NOTE
Time Correction mode is automatically cancelled if no buttons
are pressed within 15 seconds.
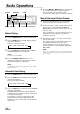
Setting the MX Mode
MX (Media Xpander) makes vocals or instruments
sound distinct regardless of the music source. The
radio, CD and MP3 will be able to reproduce the music
clearly even in cars with a lot of road noise.
1 Press the MX button to select MX ON.
2 Press the SOURCE button to select the source you
want to MX (Media Xpander)-correct.
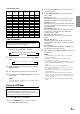
Time Difference Table
0 0.0 14 1.4 28 2.8
1 0.1 15 1.5 29 2.9
2 0.2 16 1.6 30 3.0
3 0.3 17 1.7 31 3.1
4 0.4 18 1.8 32 3.2
5 0.5 19 1.9 33 3.3
6 0.6 20 2.0 34 3.4
7 0.7 21 2.1 35 3.5
8 0.8 22 2.2 36 3.6
9 0.9 23 2.3 37 3.7
10 1.0 24 2.4 38 3.8
11 1.1 25 2.5 39 3.9
12 1.2 26 2.6 40 - 98 4.0 - 9.8
13 1.3 27 2.7 99 9.9
Number of
Steps
Time
Difference
(ms)
Number of
Steps
Time
Difference
(ms)
Number of
Steps
Time
Difference
(ms)