CDA-7990 FM/AM CD Player ENGLISH R • MANUAL DE OPERACIÓN Léalo antes de utilizar este equipo. ESPAÑOL • MODE D'EMPLOI Veuillez lire avant d’utiliser cet appareil. FRANÇAIS • OWNER'S MANUAL Please read before using this equipment.
Contents WARNING WARNING ............................................. 2 CAUTION .............................................. 3 PRECAUTIONS .................................... 3 Basic Operation Detaching the Front Panel ........................... 6 Attaching the Front Panel ............................ 7 Initial System Start-Up ................................ 7 Turning Power On and Off ..........................
WARNING WARNING This symbol means important instructions. Failure to heed them can result in serious injury or death. DO NOT OPERATE ANY FUNCTION THAT TAKES YOUR ATTENTION AWAY FROM SAFELY DRIVING YOUR VEHICLE. Any function that requires your prolonged attention should only be performed after coming to a complete stop. Always stop the vehicle in a safe location before performing these functions. Failure to do so may result in an accident.
CAUTION This symbol means important instructions. Failure to heed them can result in injury or material property damage. HALT USE IMMEDIATELY IF A PROBLEM APPEARS. Failure to do so may cause personal injury or damage to the product. Return it to your authorized Alpine dealer or the nearest Alpine Service Center for repairing. PRECAUTIONS Temperature Be sure the temperature inside the vehicle is between +60°C (+140°F) and –10°C (+14°F) before turning your unit on.
Never Attempt the Following Do not grip or pull out the disc while it is being pulled back into the player by the automatic reloading mechanism. Do not attempt to insert a disc into the unit when the unit power is off. New Discs As a protective measure to prevent the CD from jamming, the CD player will automatically eject discs with irregular surfaces or inserted incorrectly.
Installation Location Make sure the CDA-7990 will not be installed in a location subjected to: • Direct sun and heat • High humidity and water • Excessive dust • Excessive vibrations Handling the Detachable Front Panel • Do not expose to rain or water. • Do not drop or apply shock. Disc Cleaning Fingerprints, dust, or soil on the surface of the disc could cause the CD player to skip. For routine cleaning, wipe the playing surface with a clean, soft cloth from the center of the disc to the outer edge.
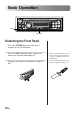
Basic Operation RLS POWER Detaching the Front Panel Press the POWER button for more than 3 seconds to turn off the power. Press the RLS (Release) button at lower left corner until the front panel pops out. Grasp the left side of the front panel and pull it out. 6-EN • The front panel may become hot in normal usage (especially the connector terminals), this is not malfunction. • To protect the front panel, place it in the supplied carrying case.
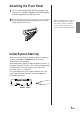
Attaching the Front Panel insert the right side of the front panel into 1 First, the main unit. Align the groove on the front panel with the projections on the main unit. 2 Push the left side of the front panel until it locks firmly into the main unit. • Before attaching the front panel, make sure that there is no dirt or dust on the connector terminals and no foreign object between the front panel and the main unit. 2 1 Initial System Start-Up Make sure that the Power is turned off.
Basic Operation MUTE MODE(Audio Control) POWER Turning Power On and Off 1 Press the POWER button to turn on the unit. The volume level gradually increases to the previous level you were listening to before the unit was turned off. Press the POWER button for more than 3 seconds to turn off the unit. • Controllable with Remote Control This unit can be controlled with an optional Alpine remote control. For details, consult your Alpine dealer.
Adjusting Volume/Subwoofer/ Bass/Treble/Balance (Between Left and Right)/Fader (Between Front and Rear) the MODE (Audio Control) knob repeatedly 1 Press to choose the desired mode. VOLUME SUB-W FADER 2 BASS * * * * * Each press changes the modes as follows: TREBLE BALANCE Rotate the MODE (Audio Control) knob until the desired sound is obtained in each mode. Audio Mute Function • * Not displayed when setting the SUB-W mode to OFF. (For the setting of the SUBW mode, refer to page 19.
Basic Operation CLK MODE(Audio Control) Displaying Time the CLK (clock) button repeatedly until the 1 Press time is displayed. Each press changes the modes as follows: Radio mode Radio frequency Clock priority mode TITLE mode CD Player/Changer modes Playing time mode Clock priority mode TITLE mode 10-EN DISC TEXT mode TRACK TEXT mode • Selecting any tuner or CD function while in the clock priority mode will interrupt the time display momentarily.
Setting Time and hold the CLK (Clock) button for at least 1 3Press seconds while the time is displayed until the time indication blinks. 2 Rotate the MODE (Audio Control) knob to adjust the hours while the time indication is blinking. 3 When the hours has been adjusted, press the MODE (Audio Control) knob. 4 Rotate the MODE (Audio Control) knob to adjust the minutes while the time indication is blinking. The time is automatically set 5 seconds after the minute adjustment.
Basic Operation SETUP DN UP TUNE Adjusting the Bass/Treble Center Frequencies You can change the Bass/Treble center frequencies on this unit. This gives you flexibility in creating your ideal sound field. 1 Press the hold the SETUP button for at least 3 seconds. 2 Press the UP button to select the BASS/TRE mode.
4 Press the TUNE button to select the desired setting. 1. BC (Setting the Bass Center Frequency): BC 60Hz BC 70Hz BC 200Hz BC 150Hz BC 80Hz BC 90Hz BC 130Hz BC 100Hz Emphasizes the displayed Bass frequency ranges. 2. BW (Setting the Bass Band Width): (Q-Factor) BW WIDE1 (Narrow) BW WIDE2 BW WIDE3 BW WIDE4 (Wide) Changes the displayed frequency’s band width to narrow or wide. 3. TC (Setting the Treble Center Frequency): TC 10.0kHz TC 12.5kHz TC 15.0kHz TC 17.
Basic Operation SETUP DN UP TUNE Setting when Using the Remote Control Press and hold the SETUP button for at least 3 1 seconds. 2 Press UP or DN button to select REM CONT mode. Each press changes the modes as shown: BASS/TRE MUTE 3 REM CONT AUX-IN D-OUT TUNER SUB-W ILLUMI SCROLL Press the TUNE button to toggle the REM CONT mode between On and Off. REM CONT OFF REM CONT ON • REM CONT ON: Set to ON when using the optional Remote Control to operate the CDA-7990.
Switching the Tuner Mode The CDA-7990 incorporates the MAX TUNE SQ for the highest quality tuner audio. Moreover, you can choose between two settings to suit your own personal sound preferences and usage. 1 Press and hold the SETUP button for at least 3 seconds. 2 Press the UP or DN button to select TUNER mode. Each press changes the modes as shown. BASS/TRE MUTE 3 REM CONT AUX-IN D-OUT TUNER SUB-W ILLUMI SCROLL Press the TUNE button to toggle the TUNER mode between NORMAL and Hi-Fi.
Basic Operation SETUP DN UP TUNE Changing Lighting Color 1 Press and hold the SETUP button for at least 3 seconds. 2 Press the UP button repeatedly to select “ILLUMI”. Each press of the UP button changes the modes as shown: BASS/TRE MUTE 16-EN REM CONT AUX-IN D-OUT TUNER SUB-W ILLUMI SCROLL • If you press the DN button the display scrolls in reverse sequence.
3 Press the TUNE button to toggle the mode between Blue and Green. ILLUMI BLUE • The initial setting at the factory is “ILLUMI BLUE”. ILLUMI GREEN I L L UM I 4 B L UE Press the SETUP button to set the selected mode.
Basic Operation SETUP DN UP TUNE MODE(Audio Control) CD Text Scroll Setting This CD player has the ability to scroll the disc and track name recorded on CD-Text discs. The scrolling feature will work with names greater than 12 characters. This feature will not work for the 12 character titles that were input manually. 1 Press and hold the SETUP button for at least 3 seconds. 2 Press the UP button repeatedly to select “SCROLL”.
Subwoofer On and Off Press and hold the SETUP button for more than 3 1 seconds. 2 Press the UP button repeatedly to select “SUB-W”. Each press of the UP button changes the modes as shown: BASS/TRE MUTE 3 REM CONT AUX-IN D-OUT TUNER SUB-W • If you press the DN button the display scrolls in reverse sequence. ILLUMI SCROLL Press the TUNE button to toggle mode between SUB-W ON and SUB-W OFF.
Basic Operation SETUP DN UP TUNE SOURCE Digital Optical Output On and Off When connecting to the Multimedia Manager (PXA-H900), set the D-OUT mode to ON. Set to OFF when not connecting PXA-H900. 1 Press and hold the SETUP button for at least 3 seconds. 2 Press the UP button to select the D-OUT mode. Each press changes the modes as shown: BASS/TRE MUTE 3 REM CONT AUX-IN D-OUT TUNER SUB-W ILLUMI SCROLL Press the TUNE button to turn on the D-OUT mode.
Setting the AUX Mode You can input TV/video sound by connecting an optional AiNET/RCA Interface cable (KCA-121B) to this component. 1 Press and hold the SETUP button for more than 3 seconds. 2 Press the UP button repeatedly to select “AUX-IN” . Each press of the UP button changes the modes as shown: BASS/TRE MUTE 3 REM CONT AUX-IN SCROLL • The initial setting at the factory is AUX-IN OFF. AUX-IN ON Once AUX-IN is ON, AUXILIARY is displayed by pressing the UP or DN button.
Basic Operation B. OUT indicator SETUP DN UP TUNE B.OUT (Black out) Turning Mute Mode On/Off If a device having the interrupt feature is connected, audio will be automatically muted whenever the interrupt signal is received from the device. This function can be turned ON or OFF from the head unit by following procedure below. 1 Press and hold the SETUP button for at least 3 seconds. 2 Press the UP button to select the MUTE mode.
Blackout Mode On and Off Turning off the back light of front panel can resist the inference from the noise caused by the back light and provide you a much higher quality sound. 1 Press and hold the B. OUT (Black out) button for at least 3 seconds, the “B-OUT ON” indication appears and disappears. Then the blackout mode starts. The back light turns off with only the B. OUT indicator ON, and the audio signals bypass the treble and bass circuits. This reduces noise to give a clean, flat response.
Basic Operation TITLE Displaying the Title/Text It is possible to display the CD/Station title if the title has been previously inputted. For details, see Titling Discs/Stations (pages 26, 27). Text information, such as the disc name and the track name, will be displayed if playing a CD text compatible disc. 1 Press the TITLE button. The mode will change every time the button is pressed. About “Title” and “Text” Title: With this device, it is possible to input the CD/ Station name (see pages 26, 27).
CD/Changer mode: ELAPSED TIME DISPLAY CLOCK DISPLAY TEXT DISPLAY (DISC NAME)* 1 TEXT DISPLAY(TRACK NAME)* 1 TITLE DISPLAY* 2 *1 Displayed during playback of a text compatible CD. “NO TEXT” will be displayed when the CD is not text compatible. *2 “------------” will be displayed when the title has not been inputted. Sample display with a text compatible CD. • Some characters used for CD Text, may not be compatible with this device. These characters will not be displayed correctly.
Basic Operation BAND MODE(Audio Control) TITLE Titling Discs/Stations It is possible to title your favorite CD’s or radio stations. 1 Press the TITLE button and select the title display mode. For details, see “Displaying the Title/Text” (pages 24, 25). 2 Press and hold the TITLE button for at least 3 seconds. The first character will blink. 3 Press the BAND button to switch to the desired character.
5 Press the MODE (Audio Control) button to store the first character. The first character will stop blinking and the display will automatically advance to the next character. When that character begins to blink, you may choose the next letter or symbol of your title. [A] A 6 Repeat the steps 3 and 5 above to complete the titling. Pressing the MODE (Audio Control) button after entering the 12th character, automatically stores the title into memory.
Basic Operation DN UP T.S.M. Searching for Titled Stations If a Station is titled, you can do a search for it. (To title Stations, refer to “Titling Discs/Stations” on pages 26, 27.) 1 Press and hold the T.S.M. button for at least 2 seconds. The title blinks in the display. 2 Press the DN or desired station title. 3 Press the T.S.M. button to play the selected station. The unit will automatically search for the station and begin play.
Searching for Titled Discs/CDTEXT If a CD is titled or contains CD-TEXT, you can do a search for it. (To title CDs, refer to “Titling Discs/Stations” on pages 26, 27.) 1 Press and hold the T.S.M. button for at least 2 seconds. The title blinks in the display. 2 Press the DN or UP button to select the desired disc title or CD-TEXT.
Basic Operation DN UP BAND TITLE Erasing Disc Title (CD/CD Changer only) 1 Press the TITLE button to select the disc titling mode. Then, press and hold for at least 3 seconds. 2 Press and hold the button for at least 2 seconds to activate the title scanning mode. The title in the display will blink. 3 Press the DN or UP button repeatedly unitl the disc title you want to erase is displayed. 4 Press and hold the button for at least 2 seconds to erase the disc title displayed.
Recalling the Stored Settings Settings stored in the Alpine Multimedia Manager (PXA-H900) using the optional Remote Control, can be recalled at any time. 1 Press the A. PROC button on the Remote control. 2 Press the or button within 5 seconds, to recall the stored setting. • Refer to the Owner’s manual of the optional Remote Control. Switching the Disc Mode Use this function when connecting the optional CD/MD player, changer. 1 Press the BAND button to switch the Disc mode in the CD/MD/Changer mode.
Radio Operation DN UP TUNE BAND SOURCE Manual Tuning the SOURCE button until a radio frequency 1 Press appears in the display. 2 Press the BAND button repeatedly until the desired radio band is displayed. Each press changes the band: F1(FM1) F2(FM2) AM 3 Press the TUNE button repeatedly until “DX SEEK” and “SEEK” disappear from the display. • The initial mode is DX SEEK. 4 Press the DN or UP button to move downward or upward one step respectively until the desired station frequency is displayed.
Automatic Seek Tuning the SOURCE button until a radio frequency 1 Press appears in the display. 2 Press the BAND button repeatedly until the desired radio band is displayed. Each press changes the band: F1(FM1) F2(FM2) AM 3 Press the TUNE button to illuminate the DX and SEEK indicators in the display. With the DX (Distance) mode activated, both strong and weak stations will be tuned in the Auto-Seek operation. Press again to return to the local mode.
Radio Operation Preset buttons 1~6 A. ME BAND SOURCE Manual Storing of Station Presets the radio band and tune in a desired radio 1 Select station you wish to store in the preset memory. 2 Press and hold any one of the Preset buttons (1 through 6) for at least 2 seconds until the “ P ” (Preset) on the display blinks. F1 3 P 87 . 7 Press the Preset button into which you wish to store the station while the “ P ” (Preset) display is blinking (within 5 seconds).
4 Repeat the procedure to store up to 5 other stations onto the same band. To use this procedure for other bands, simply select the band desired and repeat the procedure. A total of 24 stations can be stored in the preset memory (6 stations for each band; FM1, FM2, AM and D.A.P.). • If you store a station in a preset memory which already has a station, the current station will be cleared and replaced with the new station. • The function indicator will always light in green in the radio mode.
Radio Operation D.A.P. Preset BAND SOURCE Storing into Direct Access Preset (D.A.P.) Band A combination of radio stations in any band (up to 6 stations) can be manually preset into the D.A.P. band. 1 Press the D.A.P. button to toggle the D.A.P. setting between ON and OFF. D.A.P. ON D.A.P. OFF D.A.P. ON Press the BAND button to select FM or AM. The selected band will be displayed. To memorize stations onto the D.A.P.
Tuning to Preset Stations the SOURCE button to select the radio 1 Press mode. 2 Press the BAND button repeatedly until the desired band is displayed. To select the D.A.P. band, press the D.A.P. button to set the D.A.P. to ON. 3 Press the station Preset button that has your desired radio station in memory. The display shows the band, preset number with a “P” and frequency of the station selected. F1 P 1 107 . 1 Preset indicator Display when receiving the station stored in “1” to “6”.
CD Player Operation DN UP SOURCE Function indicator Playback Insert a disc with the label side facing up. 1 Insert a disc with the label side facing up. The disc will be pulled into the unit automatically. The unit starts to play the CD. CD T 0 2 0 ' 32 • Three-inch (8 cm) CD’s can be used. • If the CD is not removed for several seconds after it has been ejected, the player automatically draws the CD into the compartment to protect the CD.
2 To pause playback, press the button. Pressing the button again will resume playback. 3 To eject the disc, press the button. Music Sensor (Skip) press the DN button once during 1 Momentarily CD play to return to the beginning of the current track. If you wish to access the beginning of a track further back, repeatedly press until you reach the desired track. Press the UP button once to advance to the beginning of the next track.
CD Player Operation REPEAT SCAN FUNC M.I.X. Repeat Play Press the REPEAT button to play back repeatedly 1 the track being played. The RPT indicator appears and the track will be played repeatedly. Press the REPEAT button again and select OFF to deactivate the repeat play. Function indicator • If a CD Changer is connected and the RPT ALL mode is selected, the unit repeatedly plays back all tracks on the disc selected.
M.I.X. (Random Play) the M.I.X. button in the play or pause mode. 1 Press The M.I.X. indicator will illuminate and the tracks on the disc will be played back in a random sequence. After all the tracks on the disc have been played back once, the player will begin a new random sequence play until the M.I.X. mode is cancelled. To cancel M.I.X. play, press the M.I.X. button again to turn off the M.I.X. • If a CD Changer equipped with the ALL M.I.X. function is connected, ALL M.I.X. will also be selectable.
CD Player Operation Disc Select buttons 1~6 BAND FUNC SOURCE Function indicator Controlling CD Changer (Optional) An optional 6-disc or 12-disc CD Changer may be connected to the CDA-7990 if it is Ai-NET compatible. With a CD Changer connected to the Ai-NET input of the CDA-7990, the CD Changer will be controllable from the CDA-7990. Using the KCA-400C (the Multi-Changer Switching device) multiple changers can be controlled by the CDA-7990.
When a 12-disc CD Changer is connected: To select discs numbered from 1 to 6, the procedure is the same as for the 6-disc CD Changer. To select discs numbered from 7 to 12, first press the FUNC button. This changes the “D” indicator to “d”. Then press the desired Disc Select button. With the FUNC button activated, the Disc Select buttons 1 to 6 will represent discs 7 to 12 respectively. • Press the FUNC button to turn the function indicator off, then, select the discs numbered from 7 to 12.
Information In Case of Difficulty Unable to tune stations in the seek mode. If you encounter a problem, please review the items in the following checklist. This guide will help you isolate the problem if the unit is at fault. Otherwise, make sure the rest of your system is properly connected or consult your authorized Alpine dealer. • You are in a weak signal area. - Make sure the tuner is in the DX mode.
Unable to fast forward or backward the CD. • The CD has been damaged. - Eject the CD and discard it; using a damaged CD in your unit can cause damage to the mechanism. CD playback sound skips due to vibration. • Improper mounting of the unit. - Securely re-mount the unit. • Disc is very dirty. - Clean the disc. • Disc has scratches. - Change the disc. • Pick-up lens is dirty - Do not use the lens cleaner disc on the market. Consult your nearest ALPINE dealer. CD playback sound skips without vibration.
Specifications FM TUNER SECTION Tuning Range 87.7 – 107.9 MHz Mono Usable Sensitivity 9.3 dBf (0.8 µV/75 ohms) 50 dB Quieting Sensitivity 13.5 dBf (1.3 µV/75 ohms) Alternate Channel Selectivity 80 dB Signal-to-Noise Ratio 80 dB Stereo Separation 50 dB Capture Ratio 2.0 dB AM TUNER SECTION Tuning Range Sensitivity (IEC Standard) 530 – 1,710 kHz 22.
LIMITED WARRANTY ALPINE ELECTRONICS OF AMERICA, INC. AND ALPINE OF CANADA INC. ("Alpine"), are dedicated to quality craftsmanship and are pleased to offer this Warranty. We suggest that you read it thoroughly. Should you have any questions, please contact your Dealer or Alpine at one of the telephone numbers listed below. This Warranty covers Car Audio/Visual Products and Related Accessories ("the product"). Products purchased in the Canada are covered only in the Canada. Products purchased in the U.S.A.
R ALPINE ELECTRONICS, INC. Tokyo office: 1-1-8 Nishi Gotanda, Shinagawa-ku, Tokyo 141-8501, Japan Tel.: (03) 3494-1101 ALPINE ELECTRONICS OF AMERICA, INC. 19145 Gramercy Place, Torrance, California 90501, U.S.A. Tel.: 1-800-ALPINE-1 (1-800-257-4631) ALPINE ELECTRONICS OF CANADA, INC. Suite 203, 7300 Warden Ave. Markham, Ontario L3R 9Z6, Canada Tel.: 1-800-ALPINE-1 (1-800-257-4631) ALPINE ELECTRONICS OF AUSTRALIA PTY. LTD. 6-8 Fiveways Boulevarde Keysborough, Victoria 3173, Australia Tel.