EN R 2-DIN CD RECEIVER WITH ADVANCED BLUETOOTH CDE-W235BT FR ES • OWNER’S MANUAL Please read before using this equipment. • MODE D’EMPLOI Veuillez lire avant d’utiliser cet appareil. • MANUAL DE OPERACIÓN Léalo antes de utilizar este equipo. Thank you for purchasing this Alpine product. Please take a moment to protect your purchase by registering your product now at the following address: www.alpine-usa.com/registration.
ALPINE ELECTRONICS MARKETING, INC. 1-7, Yukigaya-Otsukamachi, Ota-ku, Tokyo 145-0067, JAPAN Phone 03-5499-4531 ALPINE ELECTRONICS OF AUSTRALIA PTY. LTD. 161-165 Princes Highway, Hallam Victoria 3803, Australia Phone 03-8787-1200 ALPINE ITALIA S.p.A. Viale C. Colombo 8, 20090 Trezzano Sul Naviglio (MI), Italy Phone 02-484781 ALPINE ELECTRONICS FRANCE S.A.R.L. (RCS PONTOISE B 338 101 280) 98, Rue de la Belle Etoile, Z.I. Paris Nord Il, B.P.
Contents Operating Instructions WARNING WARNING ....................................................... 5 CAUTION ........................................................ 5 PRECAUTIONS ............................................... 5 Getting Started Accessory List ...............................................................8 Turning Power On and Off.......................................8 Source Selection..........................................................8 Initial System Start-Up................
Contents Setting the caller information display/text message indicator ON/OFF .............................. 22 Setting text message indicator ON/OFF (MSG ALERT) ................................................................22 Setting the caller information display ON/OFF (CALLER ID) ...................................................................22 Phone Book Auto Update ON/OFF................ 23 Changing the Phone book List Order........... 23 Setting the Received Calls automatically (Auto Answer)..
Operating Instructions WARNING WARNING This symbol means important instructions. Failure to heed them can result in serious injury or death. DO NOT OPERATE ANY FUNCTION THAT TAKES YOUR ATTENTION AWAY FROM SAFELY DRIVING YOUR VEHICLE. Any function that requires your prolonged attention should only be performed after coming to a complete stop. Always stop the vehicle in a safe location before performing these functions. Failure to do so may result in an accident.
Inserting Discs Disc Cleaning Your player accepts only one disc at a time for playback. Do not attempt to load more than one disc. Make sure the label side is facing up when you insert the disc. “ERROR” will be displayed on your player if you insert a disc incorrectly. If “ERROR” continues to be displayed even though the disc has been inserted correctly, push the RESET button with a pointed object such as a ballpoint pen.
• Some of the following CDs may not play on this unit: Flawed CDs, CDs with fingerprints, CDs exposed to extreme temperatures or sunlight (e.g., left in the car or this unit), CDs recorded under unstable conditions, CDs on which a recording failed or a re-recording was attempted, copy-protected CDs which do not conform to the audio CD industry standard. • Use discs with compressed audio files written in a format compatible with this unit. For details, refer to “About MP3/WMA” on page 12.
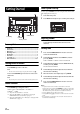
Initial System Start-Up Getting Started Be sure to press the RESET button when using the unit for the first time, after changing the car battery, etc. 1 2 Turn off the unit power. Press RESET with a ballpoint pen or similar pointed object. RESET button AUDIO/SETUP SOURCE/ /ENTER Rotary encoder Adjusting Volume Turn the Rotary encoder until the desired sound is obtained. Accessory List • • • • • • • • Head Unit ..................................................................................
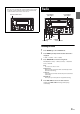
Controllable with Remote Control This unit can be controlled with an optional Alpine remote control. For details, consult your Alpine dealer. Point the optional remote control transmitter at the remote-control sensor. Radio Preset buttons (1 through 3) Remote control sensor Preset buttons (4 through 6) BAND TUNE/A.ME /ENTER Rotary encoder SOURCE/ Listening to Radio 1 2 Press SOURCE to select TUNER mode. Press BAND repeatedly until the desired radio band is displayed.
Presetting Stations Manually 1 2 CD/MP3/WMA Select the radio band and tune in a desired radio station you wish to store in the preset memory. /REPEAT 4 Press and hold, for at least 2 seconds, any one of the preset buttons (1 through 6) into which you wish to store the station. The selected station is stored. The display shows the band, preset number and station frequency memorized. Notes • A total of 18 stations can be stored in the preset memory (6 stations for each band; FM1, FM2 and AM).
• The playback time may not be correctly displayed when a VBR (Variable Bit Rate) recorded file is played back. • During CD/MP3/WMA playback, press , and then you can quickly return to the hierarchy level selected last time in the search mode. Repeat Play Folder/File Name Search (concerning MP3/WMA) Folder and file names may be searched and displayed during playback. Folder Name Search mode 1 Press z/REPEAT 4. The song is played back repeatedly.
About MP3/WMA CAUTION Except for private use, duplicating audio data (including MP3/ WMA data) or distributing, transferring, or copying it, whether for free or for a fee, without permission of the copyright holder is strictly prohibited by the Copyright Act and by international treaty. What is MP3? MP3, whose official name is “MPEG Audio Layer 3,” is a compression standard prescribed by the ISO, the International Standardization Organization and MPEG which is a joint activity institution of the IEC.
Audio Setup Sound Setting You can flexibly customize the unit to suit your own preference and usage. From the AUDIO SETUP menu, Audio Setting can be modified. Use steps 1 to 5 to select one of the setting modes to modify. See the applicable section below for details about the selected setting item. 1 2 Press and hold AUDIOSETUP for at least 2 seconds to activate the SETUP mode. Turn the Rotary encoder to select AUDIO, and then press ENTER.
Adjusting the Parametric Equalizer Curve (3BAND EQ) You can modify the Equalizer settings to create a response curve more appealing to your personal taste. The setting of Bass, Mid and Treble can be adjusted in this mode. Setting the Mid Bandwidth (WIDTH (Q)) Turn the Rotary encoder to select the desired Mid bandwidth. WIDE 0.75 MEDIUM 1.00 MEDIUM 1.25 NARROW 1.
Setting the Source Volume Level The output level of each source is individually adjustable. For example, if the TUNER level sounds lower than CD, its output can be adjusted without affecting the other sources. The Hands free phone talk level, ring tone level and microphone gain level can also be adjusted by using this setting.
Other Functions About the indication display When displaying Text, the following indicators are lit according to the mode.
Using the Front AUX Input Terminal Connect a portable music player, etc. by simply connecting it to the input on the front panel. An optional adapter cable is required (standard RCA to 3.5ø mini-phono plug or 3.5ø to 3.5ø mini phono plug). Press SOURCE, and select the AUXILIARY mode to listen to the portable device. Main unit Portable player, etc. or Optional adapter cable (RCA pin plugs [red, white] 3.5ø miniplugs) or (3.5ø miniplugs).
Notes SETUP • Press to return to the previous mode. • Pressing and holding for at least 2 seconds will return to normal mode. • If no operation is performed for 60 seconds, the unit will return to normal mode automatically. General Setting “GENERAL” is selected on the setup main menu in step 2. Displaying the Time This function controls clock on or off at power off. When the clock function is set to ON, the unit will display clock at power off.
Playing MP3/WMA Data (PLAY MODE) This unit can play back CDs containing both CD and MP3/WMA data (created in Enhanced CD (CD Extra) format). However, in some situations, playback of an enhanced CD may be difficult. In this case, you can select playback of a single session only, containing the CD data. When a disc contains both CD and MP3/WMA data, playback starts from the CD data portion of the disc.
BT Hands Free Calling Preset buttons (1 through 3) Before Using BLUETOOTH Function Before using the BLUETOOTH function, the following settings need to be made. Preset buttons (4 through 6) Set “HFP” or “AUDIO” to ON when you want to use Hands-Free phone or BT Audio function. Refer to “Setting the BLUETOOTH Connection (BT IN)” on page 21. Note 1 • Before using BLUETOOTH function, it must be paired with this unit. Refer to “How to connect to a BLUETOOTH compatible device (Pairing)” on page 20.
BLUETOOTH SETUP Hands-Free Phone setting (HFP) ON: Select when you want to pair your BLUETOOTH compatible phone with this unit. The following steps 1 to 5 are common to the various BLUETOOTH functions. For details, refer to each individual function. OFF: Hands-Free Phone function is not used. Note Note • Set “HFP” or “AUDIO” to ON, and then perform BLUETOOTH SETUP operation. Refer to “Setting the BLUETOOTH Connection (BT IN)” on page 21.
Setting the Visible Mode You can set whether this unit can be recognized or not from a BLUETOOTH compatible device. Normally set this to VISI M ON. Setting item: VISIBLE M Setting contents: VISI M OFF / VISI M ON (Initial setting) VISI M OFF: Disable recognition of this unit from the BLUETOOTH compatible device. VISI M ON: Enable recognition of this unit from the BLUETOOTH compatible device.
Phone Book Auto Update ON/OFF You can set whether to update the phone book automatically. Selecting the output speaker You can select the connected speaker in car to output the sound signal of telephone. Setting item: PB UPDATE Setting contents: OFF / ON (Initial setting) OFF: The phone book will not update. ON: When the mobile phone reconnects with this unit, the phone book will update. Changing the Phone book List Order The phone book is listed alphabetically according to the initial letter of name.
Answering a Call Incoming calls are announced by the received call ring tone and a displayed message (PHONE). Press ENTER or f. The call starts. Notes • When “AUTO ANS” is set to AT ANS ON, you can receive a call automatically. Refer to “Setting the Received Calls automatically (Auto Answer)” on page 23. • While calling, the source sound on the unit is muted. After calling, playback will resume. Hanging up the Telephone Press f. The call finishes.
Dialing a Number In The Phone Book Up to 1,000 names (at most 5 telephone numbers for each name) are downloadable from a mobile phone. Dial a call by selecting a person from the phone book list. Call waiting function If a second call is received during a current call, you can have the first caller wait momentarily while you take the second call. When you are finished with one call, you can switch to the other one.
Muting the microphone input quickly (Voice Mute) Flash Memory (optional) While calling, activating the Voice Mute function will instantly mute the microphone input. Your voice will not be heard by the caller. While calling, press to mute the microphone input. Press again will bring the microphone input back to its previous volume level. Note • The operation can also be performed in the option menu of phone mode (calling mode). Refer to “Option Menu Setting” on page 17.
Flash Memory Connection (optional) iPod/iPhone (optional) Connect Flash Memory 1 2 /REPEAT 4 Preset buttons (4 through 6) Preset buttons (1 through 3) Open the cover of the USB Port. Connect the Flash Memory directly to the USB Port, or via the USB cable.
Notes • An iPhone connected to this unit operates as an iPod. The iPhone can be used as a hands-free device using the integrated BLUETOOTH module. • Internet and telephone functions of iPod touch or iPhone, etc., can also be used when connecting to the unit. However, using these functions will stop or pause the playing songs, at this time do not operate the unit to avoid a malfunction.
3 4 5 Turn the Rotary encoder to select the desired Artist, and then press ENTER. Turn the Rotary encoder to select the desired Album, and then press ENTER. Turn the Rotary encoder to select the desired Song, and then press ENTER. Notes • After pressing and holding ENTER for at least 2 seconds while in each hierarchy (except SONG and AUDIOBOOK hierarchy), all songs of the selected hierarchy are played back.
Random Play Shuffle (M.I.X.) Information The Shuffle function of the iPod/iPhone is displayed as s on this unit. Shuffle Albums: The songs on each album are played back in proper order. Upon completion of all the songs on the album, the next album is selected randomly. This continues until all albums have been played. Shuffle Songs: Song shuffle randomly plays back songs within a selected category (playlist, album, etc.). The songs within the category are played just once until all songs have been played.
CD CD Player not functioning. • Out of operating temperature range +50°C (+120°F) for CD. – Allow the vehicle’s interior (or trunk) temperature to cool. CD playback sound is wavering. • Moisture condensation in the CD Module. – Allow enough time for the condensation to evaporate (about 1 hour). CD insertion not possible. • A CD is already in the CD player. – Eject the CD and remove it. • The CD is being improperly inserted.
Indication for Flash Memory • A USB device that is not supported by the unit is connected. – Connect a USB device that is supported by the unit. NO DEVICE • A Flash Memory is not connected. – Make sure the Flash Memory device is correctly connected and the cable is not excessively bent. • No song (file) is stored in the Flash Memory. – Connect the Flash Memory device after storing songs (files). Indication for iPod Mode • The iPod/iPhone is not connected.
GENERAL Power Requirement Specifications FM TUNER SECTION Tuning Range Mono Usable Sensitivity 50 dB Quieting Sensitivity Alternate Channel Selectivity Signal-to-Noise Ratio Stereo Separation Capture Ratio 87.7 ~ 107.9 MHz 9.3 dBf (0.8 μV/75 ohms) 13.5 dBf (1.3 μV/75 ohms) 80 dB 65 dB 35 dB 2.0 dB Power Output Maximum Pre-Output Voltage Bass Mid Treble Loudness Weight 14.4 V DC (11 ~ 16 V allowable) 18 W RMS × 4* 2 V/10 k ohms ±14 dB at 100 Hz ±14 dB at 1 kHz ±14 dB at 10 kHz 10 dB at 100 Hz 1.
Installation and Connections Before installing or connecting the unit, please read the following and refer to “Operating Instructions” on page 5 for proper use. CAUTION WARNING HAVE THE WIRING AND INSTALLATION DONE BY EXPERTS. MAKE THE CORRECT CONNECTIONS. The wiring and installation of this unit requires special technical skill and experience. To ensure safety, always contact the dealer where you purchased this product to have the work done.
Installation Screw Hex Nut (M5) CAUTION Do not block the unit’s heat sink, thus preventing air circulation. If blocked, heat will accumulate inside the unit and may cause a fire. *2 Bolt Stud Metal Mounting Strap Heat sink *1 Ground Lead This unit Chassis * For the screw marked “*2”, use an appropriate screw for the chosen mounting location. 3 The main unit must be mounted within 30 degrees of the horizontal plane, back to front. Slide the CDE-W235BT into the dashboard until it clicks.
Mounting the Microphone For the sake of safety, mount the microphone in the following location. • In a stable and secure location. • In a location that does not inhibit safely driving the vehicle. • Mount the microphone in a location where the driver’s voice can easily be picked up. Choose a location for the microphone that can easily pick up the drivers voice. Requiring the driver to move towards the microphone for audibility causes a distraction that could be dangerous.
Connections Microphone (Included) (Blue) (Blue/White) POWER ANT To power antenna REMOTE TURN-ON To amplifier (Pink/Black) AUDIO INTERRUPT IN Not used (Orange) ILLUMINATION (Red) IGNITION (Yellow) BATTERY (Black) To the instrument cluster illumination lead Ignition Key GND Battery (Gray) SPEAKER RIGHT FRONT (Gray/Black) Speakers Front Right (Violet/Black) SPEAKER RIGHT REAR (Violet) Rear Right (Green) SPEAKER LEFT REAR Rear Left (Green/Black) (White/Black) SPEAKER LEFT FRONT (White)
Microphone (Included) Power Antenna Lead (Blue) Connect this lead to the +B terminal of your power antenna, if applicable. Note • This lead should be used only for controlling the vehicle’s power antenna. Do not use this lead to turn on an amplifier or a signal processor, etc. Remote Turn-On Lead (Blue/White) Connect this lead to the remote turn-on lead of your amplifier or signal processor. Audio Interrupt In Lead (Pink/Black) Not used.
LIMITED WARRANTY ALPINE ELECTRONICS OF AMERICA, INC. AND ALPINE OF CANADA INC. (“Alpine”), are dedicated to quality craftsmanship and are pleased to offer this Warranty. We suggest that you read it thoroughly. Should you have any questions, please contact your Dealer or contact Alpine at one of the telephone numbers listed below. This Warranty covers Car Audio Products and Related Accessories (“the product”). Products purchased in the Canada are covered only in the Canada. Products purchased in the U.S.A.
About the Rules of Bluetooth Electromagnetic Radiation Regulation USA/Canada This device complies with Part 15 of the FCC Rules and RSS-Gen of IC Rules. Operation is subject to the following two conditions: (1) this device may not cause interference, and (2) this device must accept any interference, including interference that may cause undesired operation of this device.