
Owner's Manual


10-EN
Presetting Stations Manually
1
Select the radio band and tune in a desired radio station
you wish to store in the preset memory.
2
Press and hold, for at least 2 seconds, any one of the
preset buttons (1 through 6) into which you wish to store
the station.
The selected station is stored.
The display shows the band, preset number and station
frequency memorized.
Notes
• A total of 18 stations can be stored in the preset memory (6 stations for
each band; FM1, FM2 and AM).
• If you store a station in a preset memory which already has a station,
the current station will be cleared and replaced with the new station.
Presetting Stations Automatically
1
Press BAND repeatedly until the desired radio band is
displayed.
2
Press and hold TUNEA.ME for at least 2 seconds.
The frequency on the display continues to change while the
automatic memory is in progress. The tuner will automatically
seek and store 6 strong stations in the selected band. They will
be stored into preset buttons 1 to 6 in order of signal strength.
When the automatic memory has been completed, the tuner
goes to the station stored in preset location No.1.
Note
• If no stations are stored, the tuner will return to the original station you
were listening to before the auto memory procedure began.
Tuning to Preset Stations
1
Press BAND repeatedly until the desired band is
displayed.
2
Press any one of the station preset buttons (1 through 6)
that has your desired radio station in memory.
The display shows the band, preset number and frequency of
the station selected.
Frequency Search Function
You can search for a radio station by its frequency.
1
Press ENTER in Radio mode to activate Frequency
search mode.
The “” indicator lights up.
2
Turn the Rotary encoder to select the desired frequency.
3
Press ENTER to receive the selected frequency.
Note
•Press in the search mode to cancel. Or, the search mode will be
canceled if no operation is performed for 10 seconds.
Playback
1
Insert a disc with the label side facing up.
The disc will be pulled into the unit automatically.
Note
• When a disc is already inserted, press SOURCE to switch to the
DISC mode.
2
While playing back MP3/WMA, press or to select the
desired folder.
Pressing and holding or will change folders continuously.
3
Press or to select the desired track (file).
Pressing and holding or will fast backward/fast
forward track continuously.
4
To pause playback, press .
Pressing again will resume playback.
5
To eject the disc, press .
Notes
• Do not remove a CD during its eject cycle. Do not load more than one
disc at a time. A malfunction may result from doing either.
•The “” indicator lights up when a disc is inserted.
• Three-inch (8 cm) CDs can not be used.
• Any file protected by DRM (Digital Rights Management) copy
protection, cannot be played back on this unit.
• The track display for MP3/WMA data playback is the file numbers
recorded on the disc.
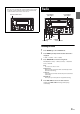
CD/MP3/WMA
SOURCE/
/REPEAT 4
/SHUFFLE 5
/ENTER
Rotary encoder