R EN CVA-1003R Mobile Media Station DE • OWNER'S MANUAL Please read before using this equipment. • BEDIENUNGSANLEITUNG Lesen Sie diese Bedienungsanleitung bitte vor Gebrauch des Gerätes. FR • MODE D'EMPLOI Veuillez lire avant d'utiliser cet appareil. • MANUAL DE OPERACIÓN Léalo antes de utilizar este equipo. • ISTRUZIONI PER L'USO Si prega di leggere prima di utilizzare il attrezzatura. ES • ANVÄNDARHANDLEDNING Innan du använder utrustningen bör du läsa igenom denna användarhandledning.
CD changer for CVA-1003R. CD-Wechsler für CVA-1003R. Changeur CD pour CVA-1003R. Cambiador de CD para CVA-1003R. Cambia CD per CVA-1003R. CD-växlare för CVA-1003R. CD changer for CVA-1003R. CD-Wechsler für CVA-1003R. Changeur CD pour CVA-1003R. Cambiador de CD para CVA-1003R. Cambia CD per CVA-1003R. CD-växlare för CVA-1003R. You cannot connect to CVA-1003R. Il est impossible de se raccorder au CVA-1003R. No es posible conectarlo a CVA-1003R. Ein Anschluß an CVA-1003R ist nicht möglich.
ENGLISH Contents Operating Instructions WARNING WARNING .................................................. 3 CAUTION ................................................... 3 PRECAUTIONS ......................................... 3 Basic Operation CD Player/Changer Operation (Optional) Playing Optional CD player or Changer ......... 17 Music Sensor (Skip) ........................................ 17 Fast Forward and Backward ........................... 18 Repeat Play ...........................................
Other Useful Features Displaying the Title/Text ................................. 28 Setting the Bass Control ................................. 30 Installation and Connections Setting the Treble Control ............................... 31 Warning ........................................................... 47 Switching Phase .............................................. 32 Caution ............................................................ 47 Turning Defeat Mode On and Off ...................
WARNING CAUTION WARNING This symbol means important instructions. Failure to heed them can result in injury or material property damage. This symbol means important instructions. Failure to heed them can result in serious injury or death. DO NOT OPERATE ANY FUNCTION THAT TAKES YOUR ATTENTION AWAY FROM SAFELY DRIVING YOUR VEHICLE. Any function that requires your prolonged attention should only be performed after coming to a complete stop.
WARNING Operation of some of the functions of this unit is very complex. Because of this, it was deemed necessary to place these functions into a special screen. This will restrict operation of these functions to times when the vehicle is parked. This ensures the focus of the driver's attention will be on the road and not on the CVA-1003R. This has been done for the safety of the driver and passengers. The Title Input and SETUP screens cannot be made while the car is moving.
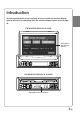
Introduction You can operate most of the functions of this unit with the monitor display open or closed. For operations with the monitor display closed, refer to page 43.
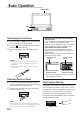
Basic Operation OPEN/CLOSE PWR Detaching the Front Panel 1 2 3 Press and hold the PWR (Power) button for more than 2 seconds to turn off the power. Press the (Release) button at lower left side until the front panel pops out. Grasp the left side of the front panel and pull it out. NOTES • The front panel may become hot in normal usage (especially the connector terminals), this is not a malfunction. • To protect the front panel, place it in the supplied carrying case.
Basic Operation Turning Power On and Off Some of this unit's functions, cannot be performed while the vehicle is in motion. Be sure to stop your vehicle in a safe location and apply the parking brake, before attempting these operations. 1 Press the PWR (Power) button to turn on the unit. The opening screen appears automatically on the monitor display. NOTE The unit can be turned on by pressing any other buttons except the OPEN/CLOSE and ANGLE 7 8 buttons.
Basic Operation MUTE OPEN/CLOSE ANGLE 7 8 78 MODE/LOUD Lowering the Monitor 1 Press the OPEN/CLOSE button. The unit will beep 3 times and lower the monitor automatically. NOTES • The CVA-1003R is a precision device. With gentle handling, its unique capabilities can be enjoyed for a long time. • If the monitor touches an obstacle while it is being lowered, the unit will stop lowering the monitor immediately.
Basic Operation Adjusting Volume/Balance (Between Left and Right)/Fader (Between Front and Rear) 1 Press the MODE button repeatedly to choose the desired mode. Each press changes the modes as follows: → VOL → BAL → FAD NOTES • If the 5 or 6 button is not pressed in 5 seconds after selecting the BALANCE, or FADER mode, the unit automatically returns to the VOLUME mode. • If the subwoofer is ON, its level can also be adjusted using the MODE button.
Radio Operation A.ME/TUNE BAND SOURCE Preset buttons (1 through 6) g DN f UP Example of Radio mode Screen Selected Source Preset button number for the stored station Frequency of the current station The current setting status Volume Level Current Time Manual Tuning Automatic Seek Tuning 1 1 2 Press the SOURCE button until a radio band and frequency appears in the display. Press the BAND button repeatedly until the desired radio band is displayed.
Radio Operation Manual Storing of Station Presets 1 2 3 4 3 Select the radio band and tune in a desired radio station you wish to store in the preset memory. Press and hold any one of the Preset buttons (1 through 6) for at least 2 seconds until the station frequency (sub display) or preset number (monitor display) on the display blinks. Press and hold the A. ME button for at least 2 seconds. The frequency on the display continues to change while the automatic memory is in progress.
RDS Operation SETUP AF BAND Preset buttons (1 through 6) g DN f UP Preset 4 Setting RDS Reception Mode and Receiving RDS Stations The RDS (Radio Data System) is a radio information system using the 57 kHz subcarrier of regular FM broadcast. The RDS allows you to receive a variety of information such as traffic information, station names, and to automatically re-tune to a stronger transmitter that is broadcasting the same programme.
RDS Operation Recalling Preset RDS Stations 1 2 3 4 5 Press the FUNC button so that the FUNC indicator appears in the sub display. To perform the same operation with the monitor display open, press the FUNC button only when the "FUNC" indicator lights red in the monitor display. Press the AF button to activate the RDS mode. The display shows "AF" when the RDS mode is activated. Receiving RDS Regional (Local) Stations 1 2 3 Press the FUNC button to activate the normal mode.
RDS Operation P.PTY PTY g DN f UP FUNC T.INFO Receiving Traffic Information PTY (Programme Type) Tuning 1 1 2 Press the T.INFO button to activate the Traffic Information mode. Press the g DN or f UP button to select your desired traffic information station. When a traffic information station is tuned in, the TP indicator lights up. 2 Traffic information is heard only when it is being broadcast. If traffic information is not being broadcast, the unit is set in the standby mode.
RDS Operation Receiving Traffic Information While Playing CD or Radio 1 2 Press the T.INFO button repeatedly until the T.INFO indicator appears in the display. Press the g DN and f UP buttons to select a traffic information station if necessary. • When a traffic information broadcast starts, the unit automatically mutes the CD player or the regular FM broadcast.
RDS Operation R.TEXT Displaying Radio Text Text messages from a radio station can be scrolled in the display. 1 2 3 4 5 Tune in a radio station that transmits text messages. Press the FUNC button so that the FUNC indicator appears in the sub display. To perform the same operation with the monitor display open, press the FUNC button only when the "FUNC" indicator lights red in the monitor display. Press the R.TEXT button to activate the Radio Text mode. The display shows "R/T WAIT" for a few seconds.
CD Player/Changer Operation (Optional) :/J J SOURCE g DN f UP Example of CD Mode Screen Selected Source Elapsed playing time Track number (DISC number in the Changer Mode) The current setting status Volume Level Playing Optional CD Player or Changer When an optional Alpine CD player or CD changer is connected, you can control it from the CVA-1003R. This section describes operation assuming that an Alpine CD player is connected. (When a CD changer is connected, see page 21 to select your desired disc.
CD Player/Changer Operation (Optional) g DN f UP Fast Forward and Backward 1 Press and hold the g DN or f UP button to quickly move backward or forward until you reach the desired section of the track. Repeat Play 1 Press the RPT (Repeat) button to play back repeatedly the track being played. The track will be played repeatedly. Press the RPT button again and select OFF to deactivate the repeat play.
CD Player/Changer Operation (Optional) M.I.X. (Random Play) Scanning Programmes 1 1 Press the M.I.X. button in the play or pause mode. The tracks on the disc will be played back in a random sequence. After all the tracks on the disc have been played back once, the player will begin a new random sequence play until the M.I.X. mode is cancelled. To cancel M.I.X. play, press the M.I.X. button again to turn off the M.I.X. NOTES • If a CD Changer equipped with the ALL M.I.X. function is connected, ALL M.I.X.
CD Player/Changer Operation (Optional) TITLE :/J J SOURCE Select buttons (1 through 6) g DN f UP Titling Discs 5 It is possible to title your favourite CD's. NOTE The Parking Brake must be engaged to access the Title display mode screen. Attempting to access this screen while driving will display the warning-CAN'T OPERATE WHILE DRIVING. 1 2 3 4 When the monitor display is open, press the TITLE button and select the title display mode. For details, see "Displaying the Title/Text" (page 28).
CD Player/Changer Operation (Optional) Erasing Disc Title 1 2 3 4 5 When the monitor display is open, press the TITLE button to select the disc titling mode. Then, press and hold the button for at least 3 seconds. Press and hold the -/J button for at least 2 seconds to activate the title scanning mode. The title in the display will blink. Press the g DN or f UP button repeatedly until the disc title you want to erase is displayed.
CD Player/Changer Operation (Optional) BAND SOURCE Multi-Changer Selection 3 Alpine's Ai-NET system will support up to 6 CD Changers. When operating two or more changers, the KCA-400C (Multi-Changer Switching device) must be used. If you use 1 Switching device, you can connect up to 4 CD Changers. If you use 2 Switching devices, you can connect up to 6 CD Changers. 1 Press the SOURCE button on the CVA-1003R to activate the CD Changer mode.
MD Player Operation (Optional) :/J J SOURCE g DN f UP Example of MD Mode Screen Selected Source Track number Elapsed playing time The current setting status Volume Level Playing Mini-Disc (MD) When an optional Alpine MD player is connected to the CVA-1003R, you can control the player from the CVA-1003R. (When the MDA-5051R is connected, MDs can be played back only.) 1 Press the SOURCE button until the "MD" appears in the display. Insert an MD into the MD player, the player starts to play the MD.
MD Player Operation (Optional) g DN f UP M.I.X. RPT Fast Forward and Backward M.I.X. (Random Play) 1 1 Press and hold the g DN or f UP button to quickly move backward or forward until you reach the desired section of the track. When you reach the desired section, release the button. The player starts playing from that section. Repeat Play 1 Press the RPT button to play back repeatedly the track being played. The RPT (Repeat) indicator appears and the track plays repeatedly.
DVD/Video CD/CD Player Operation (Optional) :/J J SOURCE g DN f UP Playing DVD/Video CD/CD If an optional Alpine DVD/video CD/CD player is connected to the CVA-1003R, you can control it from the CVA-1003R. WARNING It is dangerous (and illegal in many states) for the driver to watch the TV/Video while driving the vehicle. The driver may be distracted from looking ahead and an accident could occur.
DVD/Video CD/CD Player Operation (Optional) SOURCE Disc Select buttons (1 through 6) RPT Repeat Play 1 Press the RPT button during play to repeatedly play the chapter/track or title/disc being currently played. Each press changes the repeat play as follows: DVD: → Controlling DVD Changer If an optional Alpine DVD Changer is connected to the CVA-1003R, the DVD Changer can be controlled from the CVA-1003R.
Navigation System Operation (Optional) SOURCE Turning on the Navigation Mode If an optional Alpine Navigation System is connected, the display shows the navigation screen. 1 Press the SOURCE button to select the Navigation mode. NOTE If the Navigation mode does not appear in the display by pressing the SOURCE button, set the external setting of NAV.IN to ON (Refer to "Setting the External Input" on page 38).
Other Useful Features TITLE Displaying the Title/Text It is possible to display the CD title if the title has been previously inputted. For details, see "Titling Discs" (page 20). You can display disc/track names during playback of CD text discs or MDs with input titles. 1 In the MD/CD changer mode, press the TITLE button. The mode will change every time the button is pressed. ∗1 Displayed during playback of a CD with CD Text. "NO TEXT" will be displayed when the CD does not contain CD Text information.
Other Useful Features MD mode: The monitor display is open. (displayed in the monitor display) ↔ TITLE DISPLAY (DISC NAME)∗2 TITLE DISPLAY (TRACK NAME)∗2 MD mode: The monitor display is closed. (displayed in the sub monitor) ↓ TITLE DISPLAY (DISC NAME)∗2 ↓ TITLE DISPLAY (TRACK NAME)∗2 ↓ ELAPSED TIME DISPLAY ↓ CLOCK DISPLAY NOTES • Some characters may not be displayed correctly with this device, depending on the character type.
Other Useful Features Preset 1 bass engine Preset 2 g DN f UP Preset 1 bass engine Preset 2 g DN f UP NOTES • If no buttons are pressed within 10 seconds, the Bass control setting will be turned off automatically. • Depending on the type of external audio processors connected to the unit, you may not be able to set some settings. • The settings of the Bass will be individually memorized for each source (FM, MW, LW and CD) until the setting is changed.
Other Useful Features Setting the Treble Control You can change the Treble Frequency emphasis to create your own tonal preference. 1 2 3 4 When the monitor display is open, press the bass engine button. Bass engine mode is displayed in the monitor display. Operation with the monitor display closed You can set the Treble control with the monitor display closed. 1 2 3 Press the Preset 2 button to select the desired mode. Press the g DN or f UP button to adjust the selected mode.
Other Useful Features SETUP Preset 1 bass engine Preset 3 g DN f UP Example of SETUP Screen Selected Mode Selected Preset Number Setting items of the Display Setting Mode Setting/Adjusting status Volume Level Switching Phase Before switching Phase, select the Subwoofer ON (refer to "Subwoofer Control On and Off" on page 39). 1 2 3 4 Current Time Turning Defeat Mode On and Off When the defeat mode is on, the sound signals bypass the surround circuits and directly go to the line output.
Other Useful Features Illumination Control 1 2 3 3 When the monitor display is open, press and hold the SETUP button for at least 2 seconds. The SETUP screen appears. Press the Preset 1 button to activate the DISPLAY setting mode. Press the Preset 1 button again to select DIMMER. To set another setting, press the Preset 1 button or another Preset button. 4 Press the g DN or f UP button to set the Illumination control.
Other Useful Features SETUP OPEN/CLOSE Preset 1 Preset 2 g DN f UP Adjusting Tint of Picture Tint adjustment can be made only in the navigation, DVD, AUX1 and AUX2 modes. Tint adjustment cannot be made if a Navigation system with the RGB feature is connected. 1 2 3 When the monitor display is open, press and hold the SETUP button for at least 2 seconds. The SETUP screen appears. Switching the Background Screen 1 2 3 Press the Preset 1 button to activate the DISPLAY setting mode.
Other Useful Features CD Text/MD Title Scroll Setting When connecting to Alpine's CD/MD player or CD changer, the disc or track name recorded on the disc will scroll.This scrolling feature is available only with text compatible CDs and MDs prerecorded with title. The scrolling feature will work for titles that were input manually. 1 2 3 When the Automatic Opening/Closing mode is "AUTO," the monitor automatically opens when the ignition key is turned to the "ACC" or "ON" position.
Other Useful Features CLOCK SETUP TUNE Preset 2 Preset 3 g DN f UP Turning Sound Guide Function On or Off The Sound Guide function will give audible feedback with a beep sound when a button on the unit is pressed to acknowledge the receipt of the signal from the button. 1 2 3 When the monitor display is open, press and hold the SETUP button for at least 2 seconds. The SETUP screen appears. Press the Preset 2 button to activate the GENERAL setting mode. Press the Preset 2 button again to select BEEP.
Other Useful Features Displaying Time 1 When the monitor display is closed, press the CLOCK button repeatedly until the clock time is displayed in the sub display. NOTES • Selecting any tuner or CD function while in the clock priority mode will interrupt the time display momentarily. The function selected will be displayed for about 5 seconds before the time returns to the display. • The clock time is not shown on both the monitor display and the sub display simultaneously.
Other Useful Features SETUP Preset 3 g DN Preset 6 f UP Preset 5 Setting the External Input Switching NTSC/PAL Setting 1 1 2 3 When the monitor display is open, press and hold the SETUP button for at least 2 seconds. The SETUP screen appears. Press the Preset 3 button to select the AUXILIARY setting mode. Press the Preset 3 button to select the desired external input, AUX IN or NAV.IN.
Other Useful Features Adjusting Source Signal Levels 3 HI-FI: Sound quality priority setting NORMAL: Standard setting STABLE: Noiseless priority setting If the difference in volume level between the CD player and FM radio is too great, adjust the FM signal level as follows. 1 2 When the monitor display is open, press and hold the SETUP button for at least 2 seconds. The SETUP screen appears. Press the Preset 5 button to select the FM setting mode. Press the Preset 5 button again to select FM LEVEL.
Other Useful Features SETUP BAND Preset 6 g DN f UP Interrupt Feature (MIX LEVEL) FUNC 4 NOTES • The volume level of the audio will be automatically reduced when the voice guidance of the Navigation system starts. • When the voice guidance of the Navigation system starts to interrupt the audio, the display is automatically changed to the navigation screen.
Other Useful Features 3 Press the g DN or f UP button to set ON/ OFF. MODE2 Expand Box ON: When connecting the expansion box KCE-103V (not supplied), set to ON. Expand Box OFF: When not connecting the expansion box KCE-103V (not supplied), set to OFF. In the Mode 2 (Zoom), the monitor displays a normal picture wider to fit in the wide-screen monitor by unevenly stretching out.
Other Useful Features V.SEL NOTES • When AUX IN (AUX1 IN, AUX2 IN) and NAV.IN are set to ON, the AUX (AUX1, AUX2) and NAV. mode is displayed (refer to "Setting the External Input" on page 38). • To switch the sound source, press the SOURCE button during SIMUL. If the picture and the sound are from the same source, the SIMUL function is not cancelled. Simultaneous Operation You can watch the video portion of another source while listening to current source. 1 Press the V.
Operation with the Monitor Display Closed You can operate this unit with the monitor display closed for the items below. Basic Operation Turning Power On and Off ...................................... Adjusting Volume/Balance (Between Left and Right)/Fader (Between Front and Rear) ........... Turning Loudness On and Off ................................ Audio Mute Function .............................................. Radio Operation Manual Tuning ......................................................
Information In Case of Difficulty If you encounter a problem, please review the items in the following checklist. This guide will help you isolate the problem if the unit is at fault. Otherwise, make sure the rest of your system is properly connected or consult your authorized Alpine dealer. Basic No function or display. • Vehicle's ignition is off. - If connected following instructions, the unit will not operate with the vehicle's ignition off. • Improper power lead connections.
Information Indication for CD Changer HI-TEMP • Protective circuit is activated due to high temperature. - The indicator will disappear when the temperature returns to within operation range. ERROR - 01 • Malfunction in the CD Changer. - Consult your Alpine dealer. Press the magazine eject button and pull out the magazine. Check the indication. Insert the magazine again. If the magazine cannot be pulled out, consult your Alpine dealer. • Magazine ejection not possible. - Press the magazine eject button.
Information Specifications MONITOR SECTION CHASSIS SIZE Screen Size 6.5" LCD Type Transparent type TN LCD Operation System TFT active matrix Number of Picture Elements 336,960 pcs. (1,440 × 234) Effective Number of Picture Elements 99.99% or more Illumination System U-shaped cold cathode fluorescent tube Width Height Depth 178 mm (7") 50 mm (2") 165 mm (6-1/2") NOSEPIECE SIZE Width Height Depth 170 mm (6–3/4") 46.2 mm (1-13/16") 20.
Installation and Connections Before installing or connecting the unit, please read the following and pages 3 and 4 of this manual thoroughly for proper use. Warning MAKE THE CORRECT CONNECTIONS. Failure to make the proper connections may result in fire or product damage. USE SPECIFIED ACCESSORY PARTS AND INSTALL THEM SECURELY. Be sure to use only the specified accessory parts. Use of other than designated parts may damage this unit internally or may not securely install the unit in place.
Installation and Connections NOTE For the screw marked , use an appropriate screw for the chosen mounting location. Installation Installing the Monitor • Location Before final installation, make sure the display will not hamper gear shifting when it is opened and closed in the chosen location. NOTE Install at an angle within 30 degrees from horizontal.
Installation and Connections To prevent external noise from entering the audio system. • Locate the unit and route the leads at least 10 cm away from the car harness. • Keep the battery power leads as far away from other leads as possible. • Connect the ground lead securely to a bare metal spot (remove any paint, dirt or grease if necessary) of the car chassis. • If you add an optional noise suppressor, connect it as far away from the unit as possible.
Installation and Connections Basic Connections Antenna 1 2 ISO Antenna Plug (Pink/Black) AUDIO INTERRUPT IN (Blue/White) REMOTE TURN-ON (Yellow/Blue) PARKING BRAKE 3 To vehicle phone 4 To amplifier or equalizer 5 To the parking brake signal lead 6 ILLUMINATION (Orange) To the instrument cluster illumination lead 7 To power antenna (Red) IGNITION (Black) GND 8 (Blue) POWER ANT 9 " Ignitin key ! # (Yellow) BATTERY Battery $ & REMOTE OUT AUX1 (White/Brown) To remote input lead %
Installation and Connections 1 ISO Antenna Convertor Plug 2 Antenna Receptacle Connect to the supplied ISO antenna convertor plug. 3 Audio Interrupt In Lead (Pink/Black) Connect this lead to the Audio Interface output of a cellular phone which provides ground shorting when a call is received. If a device having the interrupt feature is connected, audio will be automatically muted whenever the interrupt signal is received from the device.
Installation and Connections System Example 1: Refer also to Basic Connections. Speakers 2 Rear or Subwoofer∗ 1 Amplifier (NVE-N077P) 7 3 Navigation System (Sold Separately) 4 5 6 (Yellow) 9 Ai-NET NORM EQ/DIV 8 (Yellow) (White) DVD Video Player (Sold Separately) ! (Red) REMOTE IN REMOTE OUT AUX1 (White/Brown) (White/Brown) " CD Changer (Ai-NET) (Sold Separately) # ∗ When Subwoofer is set to OFF: Output is from Rear speakers. When Subwoofer is set to ON: Output is from Subwoofer.
Installation and Connections When connecting with NVE-N055PS of the Alpine's Navigation System To Video output terminal (NVE-N055PS) VIDEO IN Connector Box CVA-1003R Navigation GUIDE IN RGB Convertor Cable KCE-030N (Sold Separately) REMOTE OUT REMOTE IN (White/Brown) (White/Brown) DISP CONT IN DISP CONT OUT (Yellow/Red) (Yellow/Red) GUIDE CONT IN GUIDE CONT OUT (White/Green) (White/Green) To Guide output terminal RCA Extension Cable (Included with Navigation) When connecting with NVE-N0
Installation and Connections System Example 2 (connecting to KCE-103V (Optional) ): Refer also to Basic Connections. CD Changer (Ai-NET) (Sold Separately) Speakers 5 2 Rear or Subwoofer∗ 1 Amplifier 3 4 6 REMOTE IN (White/Brown) REMOTE OUT AUX1 (White/Brown) (Yellow) (White: L-ch) DVD Video Player (Sold Separately) 2 (Red: R-ch) + 6 REMOTE IN (White/Brown) .
Installation and Connections 1 Rear/Subwoofer Output RCA Connectors RED is right and WHITE is left. 2 RCA Extension Cable (Sold Separetely) 3 Ai-NET Connector Connect this to the output or input connector of other product equipped with Ai-NET. 4 Ai-NET Cable (Included with DVD video player) 5 Ai-NET Cable (Included with CD Changer) 6 Remote Control Output Lead (White/Brown) Connect this lead to the remote control input lead. This lead outputs the controlling signals from the remote control.
56-EN