
Installation Manual


Spare Tire Camera & Light System for Jeep Wrangler
8/14
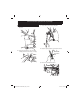
Spare Tire and Wheel Removal
1 Using 19mm socket, extract the lug nuts.
2 Remove the spare tire center cap.
Pop center
cap out
3 Using panel removing tools, unclip and remove wire
cover on the rear gate.
4 Using panel removing tools, unclip and remove vent
cover on the rear gate.
Camera & Light Extension Cable Installation
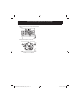
1 Connect RCA from the Camera & Light Extension
Cable to the AUX input of the headunit.
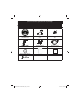
Connection Type Connectable Head Unit
A
Direct
Connection
X109-WRA
B
Using Camera
T-Harness
Connection
i109-WRA
X009-WRA
Other iDatalink capable Alpine HU
(X008U, X108U, INE-W957HD,
INE-W967HD)
C
Cutting Camera
T-Harness
for Manual
Connection
All other HU or display devices
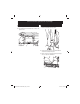
- Connection Type A -
If connecting to Alpine X109-WRA, connect 6pin
black connecter on X109-WRA main harness to
gray connector on the Camera & Light Extension
Cable. (See page 14 in detail)
6pin Black
Connector
Grey
Connector
- Connection Type B -
If connecting to iDatalink capable Alpine HU, use
Camera & Light T-Harness to iDatalink Maestro
Module and connect 6pin black connecter to gray
connector on the Camera & Light Extension Cable.
(See page 14 in detail)
6pin Black
Connector
Grey
Connector
To i109-WRA and X009-WRA harness or
Aftermarket iDatalink harnesses (sold separately)
Spare Tire Camera and Light Installation
336034 HCE-TCAM1-WRA_IM_r5.indd 8336034 HCE-TCAM1-WRA_IM_r5.indd 8 7/20/16 4:02 PM7/20/16 4:02 PM