01GB00ICS-X7.book Page 1 Friday, October 12, 2012 9:24 PM R EN IN-DASH APP RECEIVER ICS-X7 ALPINE ELECTRONICS MARKETING, INC. 1-7, Yukigaya-Otsukamachi, Ota-ku, Tokyo 145-0067, JAPAN Phone: 03-5499-4531 ALPINE ELECTRONICS OF AUSTRALIA PTY. LTD. 161-165 Princes Highway, Hallam Victoria 3803, Australia Phone 03-8787-1200 ALPINE ELECTRONICS OF AMERICA, INC. 19145 Gramercy Place, Torrance, California 90501, U.S.A. Phone 1-800-ALPINE-1 (1-800-257-4631) ALPINE ELECTRONICS GmbH Wilhelm-Wagenfeld-Str.
01GB00ICS-X7.book Page 2 Friday, October 12, 2012 9:24 PM 01GB02ICS-X7.
01GB00ICS-X7.book Page 3 Friday, October 12, 2012 9:24 PM ENGLISH Contents Tuning to Preset Stations ................................17 Setup Operating Instructions Audio Setup Audio Setup Operation ...................................18 WARNING WARNING ................................................. 6 CAUTION .................................................. 6 NOTICE ..................................................... 7 Features Home Screen and Favorites ..............................
01GB00ICS-X7.book Page 4 Friday, October 12, 2012 9:24 PM Format Settings ........................................... 25 Setting the Menu Language ........................ 26 About ICS-X7 ................................................. 26 Displaying the Product Information ............ 26 Checking the DivX® Registration ............... 26 Initialising the System ................................. 26 BLUETOOTH Setting .................................... 26 Setting the BLUETOOTH On/Off ..............
01GB00ICS-X7.book Page 5 Friday, October 12, 2012 9:24 PM Operating the Mobile Digital TV Receiver (DVB-T) ...................................................... 43 Changing to the Mobile Digital TV Receiver (DVB-T) Mode ........................................ 43 About the DVB-T Operation Screen ........... 43 Operating a TV ............................................... 44 Change to the TV Mode .............................. 44 About the TV Operation Screen ..................
01GB00ICS-X7.book Page 6 Friday, October 12, 2012 9:24 PM Operating Instructions WARNING USE THE CORRECT AMPERE RATING WHEN REPLACING FUSES. Failure to do so may result in fire or electric shock. WARNING DO NOT BLOCK VENTS OR RADIATOR PANELS. Doing so may cause heat to build up inside and may result in fire. This symbol means important instructions. Failure to heed them can result in serious injury or death.
01GB00ICS-X7.book Page 7 Friday, October 12, 2012 9:24 PM NOTICE Product Cleaning Use a soft dry cloth for periodic cleaning of the product. For more severe stains, please dampen the cloth with water only. Anything else has the chance of dissolving the paint or damaging the plastic. Temperature Be sure the temperature inside the vehicle is between +45°C (+113°F) and 0°C (+32°F) before turning your unit on. Maintenance If you have problems, do not attempt to repair the unit yourself.
01GB00ICS-X7.book Page 8 Friday, October 12, 2012 9:24 PM • Manufactured under licence from Dolby Laboratories. Dolby and the double-D symbol are trademarks of Dolby Laboratories. • Windows Media, and the Windows logo are trademarks, or registered trademarks of Microsoft Corporation in the United States and/or other countries. • iPhone, iPod, iPod classic, iPod nano, iPod touch, and iTunes are trademarks of Apple Inc., registered in the U.S. and other countries.
01GB00ICS-X7.book Page 9 Friday, October 12, 2012 9:24 PM Features Home Screen and Favorites You can easily switch to the application of your choice from the Home Screen or Favorites. The Home Screen displays icons for applications usable with this unit. Favorites is a shortcut function that displays up to 4 icons on the screen you are using. The icon layout is customisable for your convenience. Home button Touch the Home button. Press the Home button.
01GB00ICS-X7.book Page 10 Friday, October 12, 2012 9:24 PM Using the Media View button You can switch between the Navigation screen and the main screen for the current media source with just one touch. Media View button Press . Media screen Using the Media Control buttons For operations like moving up or down between songs, in addition to using the operation buttons displayed on the screen, you can also use the Media Control buttons on the unit itself.
01GB00ICS-X7.book Page 11 Friday, October 12, 2012 9:24 PM Getting Started Media Control button 1/2/3 This action varies according to the Audio/Visual application. (Track Up/Down, PLAY/PAUSE, Fast reverse/Fast forward, etc) MUTE button Accessory List • • • • • • • • • • • • ICS-X7..................................................................................1 Power cable.........................................................................1 Mounting sleeve ........................................
01GB00ICS-X7.book Page 12 Friday, October 12, 2012 9:24 PM Turning Power On or Off Initial System Start-Up Some of this unit’s functions cannot be performed while the vehicle is in motion. Be sure to stop your vehicle in a safe location and apply the parking brake, before attempting these operations. Be sure to press the RESET switch when using the unit for the first time, after changing the car battery, etc. 1 Turn the ignition key to the ACC or ON position. The system turns on.
01GB00ICS-X7.book Page 13 Friday, October 12, 2012 9:24 PM Using the Home Screen The Home Screen displays icons for applications that can be operated with this device. You can easily display the Home Screen and switch to the application of your choice. Customising the Home Screen Rearranging the Application Icons 1 The display will change to Icon Rearrangement mode. will display on the icon. Displaying the Home Screen 1 Press the Home button. Touch and hold an application icon for at least 1 second.
01GB00ICS-X7.book Page 14 Friday, October 12, 2012 9:24 PM Using the Favorites Menu 3 Touch an icon in Favorites or displayed on the Home screen and drag and drop to the desired location in Favorites. Favorites is a shortcut function that lets you easily switch to the application of your choice. Favorites menu displays on your current screen and can register up to 4 icons for applications you use frequently. Display the Favorites Menu 1 Touch the Home button. The Favorites menu is displayed.
01GB00ICS-X7.book Page 15 Friday, October 12, 2012 9:24 PM Switching Between Simple Mode & Info Mode You can select between the Simple mode and Info mode for the main screen display for audio/visual applications. To display all the operation buttons, switch to Info mode. Touch [ About the Indicator Display The Indicator Bar at the bottom of the screen displays various types of information, like the current time. ]. The screen changes to Simple mode or Info mode.
01GB00ICS-X7.book Page 16 Friday, October 12, 2012 9:24 PM 4 Radio Press Media Control button 2 to choose the tuning mode. DX SEEK Display example for Radio main screen Local SEEK MANUAL • There are two modes you can select for auto tuning, DX and Local: - DX (Distance) mode; Both strong and weak stations will be tuned in. - Local mode; Only strong stations will be tuned in. The initial setting is DX.
01GB00ICS-X7.book Page 17 Friday, October 12, 2012 9:24 PM Tuning to Preset Stations You can tune in the preset stations in memory on either band using its preset number. 1 2 Touch [Band] repeatedly until the desired band is displayed. Touch any one of the preset buttons that has a station stored to it. Or, when “PRESET” appears in the guide after pressing Media Control button 2 repeatedly, touch [ ], [ ], or press Media Control button 1 ( ) or Media Control button 3 ( ). The preset station is received.
01GB00ICS-X7.book Page 18 Friday, October 12, 2012 9:24 PM Setting the Balance/Fader/Subwoofer Setup Audio Setup [Balance/Fader/Subwoofer] is selected on the Audio setup menu in step 3. Refer to “Audio Setup Operation” (page 18). Audio Setup Operation The parking brake must be engaged to access the Setup screen. Attempting to access this screen while driving will display the warning-Unable to operate while driving.
01GB00ICS-X7.book Page 19 Friday, October 12, 2012 9:24 PM Setting the MX (Media Xpander) Equalizer Presets (Bass Max EQ) [Media Xpander] is selected on the Audio setup menu in step 3. Refer to “Audio Setup Operation” (page 18). MX (Media Xpander) makes vocals or instruments sound distinct regardless of the music source. The FM radio, USB memory and iPod/ iPhone, will be able to reproduce the music clearly even in cars with a lot of road noise.
01GB00ICS-X7.book Page 20 Friday, October 12, 2012 9:24 PM Setting Defeat [Defeat] is selected on the Audio setup menu in step 3. Refer to “Audio Setup Operation” (page 18). If Defeat is “On,” MX, Bass Max EQ, Download Sound Setting and Parametric EQ functions are turned OFF. This disables any settings made for these functions. Setting item: Defeat Setting content: Off / On (Initial setting: Off) Adjusting the Crossover Settings (XOVER) [X-OVER] is selected on the Audio setup menu in step 3.
01GB00ICS-X7.book Page 21 Friday, October 12, 2012 9:24 PM Adjusting the Parametric Equalizer Curve (Parametric EQ) [Parametric EQ] is selected on the Audio setup menu in step 3. Refer to “Audio Setup Operation” (page 18). You can modify the Equalizer settings to create a response curve more appealing to your personal taste. Setting item: Parametric EQ 1 • When Bass Max EQ is set, the interlinked Parametric EQ settings are also changed.
01GB00ICS-X7.book Page 22 Friday, October 12, 2012 9:24 PM These values are the time correction values for the different speakers. Setting these values to make each sound reach the listening position at the same time as the sound of other speakers. About Time Correction The distance between the listener and the speakers in a car vary widely due to the complex speaker placement.
01GB00ICS-X7.book Page 23 Friday, October 12, 2012 9:24 PM About the Crossover Display Setup Crossover (X-OVER): This unit is equipped with an active crossover. The crossover limits the frequencies delivered to the outputs. Each channel is controlled independently. Thus, each speaker pair can be driven by the frequencies for which they have been optimally designed.
01GB00ICS-X7.book Page 24 Friday, October 12, 2012 9:24 PM Switching Display Modes Setting item: Display Mode Setting contents: WIDE (Initial setting) / CINEMA / NORMAL Adjusting Brightness Setting item: Bright Setting content: -15 to +15 (Initial setting: 0) You can adjust the brightness between MIN (-15) and MAX (+15). When it reaches the minimum or maximum point, the display shows “MIN” or “MAX” respectively.
01GB00ICS-X7.book Page 25 Friday, October 12, 2012 9:24 PM General Setup Setting the Clock Display You can select the clock display type, 12-hour or 24-hour, depending on your preference. General Setup Operation The parking brake must be engaged to access the General mode screen. Attempting to access this screen while driving will display the warning-Unable to operate while driving. The following steps 1 to 4 are common operations to each “Setting item” of General Setup.
01GB00ICS-X7.book Page 26 Friday, October 12, 2012 9:24 PM Setting the Menu Language Initialising the System The Setup menu, feedback information, etc. for this unit can be changed to appear in the selected language. You can initialise all data, to restore the factory settings. Remove the USB memory, etc. from the system before operation Setting item: Language Sel.
01GB00ICS-X7.book Page 27 Friday, October 12, 2012 9:24 PM Setting the BLUETOOTH Device 2 Select one of 5 paired BLUETOOTH compatible devices that you previously registered. 1 2 EU1: ISO 8859-1 EU2: ISO 8859-15 Russian: ISO 8859-5 Japanese: CP932 Chinese: GB18030 Thai: CP874 Arabic: CP1256 Unicode UTF-8 Unicode UTF-16LE Unicode UTF-16BE Touch [Set BLUETOOTH Device]. Touch [Audio] or [HFT] of the device you want to connect from the Paired Device list.
01GB00ICS-X7.book Page 28 Friday, October 12, 2012 9:24 PM Screen/LED Customize Touch [Screen/LED Customize] on the General setup menu in step 3. Refer to “General Setup Operation” (page 25). Adjusting the Touch Panel Adjustment becomes necessary when the display position on the LCD and the touch position on the touch panel do not match. Setting item: Screen Alignment Setting the Brightness of the Backlighting Backlighting is provided by a fluorescent light built into the liquid crystal panel.
01GB00ICS-X7.book Page 29 Friday, October 12, 2012 9:24 PM Security Code Setting [Security Code] is selected on the General setup menu in step 3. Refer to “General Setup Operation” (page 25). Application Setup Application Setup Operation Setting Security Code You can set the system to be unusable without entering a password. When you turn this setting to “On” and set a password, password input is required when the system is connected to a battery and turned on for the first time.
01GB00ICS-X7.book Page 30 Friday, October 12, 2012 9:24 PM Display example for rear camera mode Camera Setting Touch [Camera] on the Application setup menu in step 3. Refer to “Application Setup Operation” (page 29). Setting the Camera Input With an optional camera connected, its video is output to the monitor. When the camera is connected, set this item. Setting item: AUX Camera Setting contents: Off (Initial setting) / Rear / OTHER Rear: OTHER: 3 Rear camera Side camera, Room camera, etc.
01GB00ICS-X7.book Page 31 Friday, October 12, 2012 9:24 PM Setting the AUX Camera Signal Input When the AUX camera is connected, the video input signal type can be chosen. Further setting item: Camera Signal Setting contents: NTSC (Initial setting) / PAL NTSC/PAL: Choose the video input signal type manually. Setting the Camera Interrupt Even when the unit is powered off, the monitor will display the rear view behind the vehicle when the gear lever is shifted to the reverse position.
01GB00ICS-X7.book Page 32 Friday, October 12, 2012 9:24 PM Setting the AUX3 Phone Setting Connection with external input devices is available through the iPod VIDEO connector. An optional adapter cable is required (standard RCA to 3.5ø mini-phono plug or 3.5ø to 3.5ø mini phono plug). You can also play back video connecting with an optional AV cable (4pole mini AV plug to 3-RCA). Setting item: AUX3 In Sel.
01GB00ICS-X7.book Page 33 Friday, October 12, 2012 9:24 PM MirrorLink™ Setting Touch [MirrorLink] on the Application setup menu in step 3. Refer to “Application Setup Operation” (page 29). Media Control button Setup Media Control button setup is performed for the Mirror mode/Car mode. Set “On” to enable the Media Control buttons. Setting item: Media Control button Setup Setting contents: Off / On (Initial setting) 1 Touch [Media Control button Setup]. The Media Control button Setup screen is displayed.
01GB00ICS-X7.book Page 34 Friday, October 12, 2012 9:24 PM BLUETOOTH Operation 2 Register a BLUETOOTH device in this unit (see page 26). • Refer to “BLUETOOTH Setting” (page 26). • You can search for this unit using a BLUETOOTH compatible device, and then connect that BLUETOOTH compatible device to this unit. The device name of this unit is “ICS-X7” and the initial number of the passcode is “0000.” Also refer to the Owner’s Manual of the connected device(s).
01GB00ICS-X7.book Page 35 Friday, October 12, 2012 9:24 PM Hands-Free Phone Control 3 Touch [Recent Calls]. The Recent Calls screen appears. Display example for Call History screen Answering a Call Incoming calls are announced by the received call ring tone and a displayed message (PHONE No., etc.). 1 2 An incoming call triggers the ringtone and an incoming call display. Touch [ ] or press Media Control button 1. The call starts.
01GB00ICS-X7.book Page 36 Friday, October 12, 2012 9:24 PM Using Short Cut Dialling to Make a Call You can assign up to 3 phone numbers for one-touch dialing to make a call easily. For how to assign one-touch dialling, refer to “Assigning as a Short Cut Dialling Number” (page 38). 1 Changing the Voice Output The voice output for calls is switchable between car speakers and the mobile phone speaker. Touch [ ] or press Media Control button 2.
01GB00ICS-X7.book Page 37 Friday, October 12, 2012 9:24 PM Adding the Phone Book 1 2 Percent Search Function The Home screen is displayed. The unit's percent search function can be used to search for phone book, more efficiently. Touch [Phone]. 1 Press the Home button. 3 4 Touch [Load]. 2 Touch [Phone]. The Phone menu screen is displayed. Touch [Add]. Stays on standby for connection of the mobile phone. • Touch [Cancel] to cancel the standby mode. 5 Press the Home button.
01GB00ICS-X7.book Page 38 Friday, October 12, 2012 9:24 PM Assigning as a Short Cut Dialling Number Call Waiting Function Assigning from Call History If a call comes in from another phone during a call, a notice is displayed on the screen. This function can only be used if the connected mobile phone has a call waiting function service included. 1 Press the Home button. Receiving calls during a current call The Home screen is displayed.
01GB00ICS-X7.book Page 39 Friday, October 12, 2012 9:24 PM BLUETOOTH Audio If a BLUETOOTH compatible mobile phone, portable player, etc. is connected by wireless, you can play back a song (operation is controllable from the unit). Display example for BLUETOOTH Audio main screen Simple mode Playback 1 Press the Home button. The Home screen is displayed. 2 3 Touch [BLUETOOTH]. Touch [ (file). ] or [ ] to select the desired track Returning to the beginning of the current file: Touch [ ].
01GB00ICS-X7.book Page 40 Friday, October 12, 2012 9:24 PM M.I.X. (Random Play) Available for AVRCP Ver. 1.3 and 1.4 only. Touch [ ] during playback. The M.I.X. mode switches every time [ ] is touched. (GROUP) (ALL) (OFF) • Operations may differ depending on the connected BLUETOOTH compatible device. Selecting Groups Available for AVRCP Ver. 1.3 and 1.4 only. Touch [ Group] or [Group ] to select the group. • Operations may differ depending on the connected BLUETOOTH compatible device.
01GB00ICS-X7.book Page 41 Friday, October 12, 2012 9:24 PM Auxiliary Device (Optional) AUX Operation Screen Display During Video File Playback Touch the screen. The AUX operation screen is displayed. Example for AUX1, AUX2, AUX3, DVD, Game mode display Operating Auxiliary Devices (Optional) To operate devices connected to the AUX terminals of ICS-X7, follow the procedure described below. • Set AUX In to “On.” Refer to “Setting the AUX Mode” (page 31).
01GB00ICS-X7.book Page 42 Friday, October 12, 2012 9:24 PM About the DVD Operation Screen External DVD player display example 2/2 (Info mode) When the external DVD player playback screen is displayed, you can touch the screen to display the operation screen. For details on how to operate, refer to the Owner’s Manual of the connected DVD player. External DVD player display example 1/2 (Info mode) [ ] Touching during play initiates a pre stop. Touching again stops play.
01GB00ICS-X7.book Page 43 Friday, October 12, 2012 9:24 PM Operating an External DVD Changer To operate an External DVD changer (Optional), set “Setting the Primary AUX Name” (page 31) or “Setting the Secondary AUX Name” (page 31) to “DVD-CHG..” Change to the External DVD Changer Mode 1 About the DVB-T Operation Screen When you touch the screen in the DVB-T mode, the operation screen is displayed. For details on how to operate, refer to the Owner’s Manual of the connected Digital TV Receiver (DVB-T).
01GB00ICS-X7.book Page 44 Friday, October 12, 2012 9:24 PM Operating a TV To operate a TV Receiver (TV) (Optional), set “Setting the Primary AUX Name” (page 31) or “Setting the Secondary AUX Name” (page 31) to “TV.” Change to the TV Mode 1 Press the Home button. The Home screen is displayed. 2 Touch [TV]. The display shows the TV mode screen. About the TV Operation Screen When the TV playback screen is displayed, you can touch the screen to display the operation screen.
01GB00ICS-X7.book Page 45 Friday, October 12, 2012 9:24 PM Camera Operation (Optional) When an optional camera is connected, the view video of camera can be output to the monitor. Depending on your camera, please choose the camera type first. For details, refer to “Setting the Camera Input” (page 30). Guide Display ON/OFF Setting 1 The operation screen is displayed on the screen. • After a 5-second time-out, the operation screen returns to the camera display screen.
01GB00ICS-X7.book Page 46 Friday, October 12, 2012 9:24 PM Indication mark meaning When the car is put into reverse gear, the monitor switches to the rear view camera image. Guides appear to help visualise the car's width and distance from the rear bumper. about 1 m In the screen, according to the distance guidance marks, the truck seems to be parked about 1 m away (at the position B). In actual fact, however, if you reversed to position A, you would collide with the truck.
01GB00ICS-X7.book Page 47 Friday, October 12, 2012 9:24 PM When there is a steep upward slope behind the car (example) Other Camera Operation Set “OTHER” for “AUX Camera” (page 30). 1 Press the Home button. The Home screen is displayed. 2 Touch [Other Camera]. About the Adjustment of the Caution Display Location Distance guidance marks The Caution display location for other cameras can be adjusted. Refer to “Adjusting the Caution Display Location” (page 45) for the operations.
01GB00ICS-X7.book Page 48 Friday, October 12, 2012 9:24 PM Current track no./Total song no. Status Indicator The Indicator displays during Repeat and M.I.X. playback. Song title Artist title Album title Next track (song) title Artwork display Elapsed time Audio Setup button (see “Audio Setup Operation” on page 18) USB Memory (Optional) You can play back music files (MP3/WMA/AAC) and video files (DivX® ) stored in a USB memory device on the internal player of this system.
01GB00ICS-X7.book Page 49 Friday, October 12, 2012 9:24 PM Repeat Play Random Play (M.I.X. ALL) Operation differs depending on whether the most recent song search was a Tag Search or a Folder/File Search. This operation is available only if the most recent song search was a Tag Search. Touch [ Touch [ ] during playback. The repeat mode switches every time the button is touched. Folder/File Search mode: Repeat Repeat Folder* (OFF) Repeat ALL] during playback.
01GB00ICS-X7.book Page 50 Friday, October 12, 2012 9:24 PM Tag Search Direct Up/Down Function By using file tag information and keeping these songs organised in playlists, this unit’s search functions will ease song searches in large libraries. Each music category has its own individual hierarchy. Use the Playlists/ Artists/Albums/Songs/Genres/Composers search mode to narrow searches based on the table below.
01GB00ICS-X7.book Page 51 Friday, October 12, 2012 9:24 PM Method for creating MP3/WMA/AAC files Order of files The playback order of the folders and files is as follows. (The following numbers may differ from actually displayed numbers.) Audio data is compressed using software with MP3/WMA/AAC codecs. For details on creating MP3/WMA/AAC files, refer to the user’s manual for that software. MP3/WMA/AAC files that are playable on this device have the file extensions. MP3: “mp3” WMA: “wma” (ver. 7.x, 8.
01GB00ICS-X7.book Page 52 Friday, October 12, 2012 9:24 PM USB Video Playback Display example for the USB Video main screen Simple mode WARNING It is dangerous for the driver to watch the USB Video while driving the vehicle. The driver may be distracted from looking ahead and an accident could occur. Install the ICS-X7 correctly so that the driver cannot watch USB Video unless the vehicle is stopped and the emergency brake is applied.
01GB00ICS-X7.book Page 53 Friday, October 12, 2012 9:24 PM Stopping Playback Playing Still Frames (Pausing) Touch [ ] twice or touch and hold [ ] for at least 2 seconds during playback. 1 “ ” indicator is displayed, and playback stops. • Playback starts from the beginning when Media Control button 2 ( / ) is pressed while playback is stopped. During playback, touch and hold [ ] (Fastreverse) or touch and hold [ ] (Fast-forward). Touch and hold for more than 1 second to forward/reverse at 8x speed.
01GB00ICS-X7.book Page 54 Friday, October 12, 2012 9:24 PM Searching for a Desired Video File About DivX® You can select a video file from the list screen. DivX® is a codec (software) to compress moving images while maintaining image quality using a highly advanced compression ratio and operating speed. 1 Touch [ (Search)]. The search mode is activated. 2 Touch [Video]. The folder list screen appears. Folder Name Search Mode 3 Touch [ ] in the desired folder.
01GB00ICS-X7.book Page 55 Friday, October 12, 2012 9:24 PM iPod/iPhone (Optional) Display example for iPod/iPhone main screen (Info mode) Audio mode An iPod/iPhone can be connected to this unit by using the cable KCU461iV (sold separately). You can connect a video-capable iPod to enjoy video as well as music. When the ICS-X7 is connected by the above cable, the controls on the iPod are disabled.
01GB00ICS-X7.book Page 56 Friday, October 12, 2012 9:24 PM Searching by artist name Playback 1 1 2 Press the Home button. 3 Touch [iPod]. Touch [ (file). ] or [ ] or to select the desired track 4 4 ]. To Search for the Album of the Artist 1 Touch the selected artist name. The Albums search screen of the selected artist is displayed. 2 Touch [ ] of the desired album’s name. All songs of the selected album are played back. ]. To pause playback, press Media Control button 2 ( / ).
01GB00ICS-X7.book Page 57 Friday, October 12, 2012 9:24 PM Percent Search Function Direct Up/Down Function This search mode splits all listings, into 10 groups on the Percent search bar. If you touch and hold the percentage area, the first character of the first index in each group on the percentage (10-100%) display. If you touch [ ] of the album name in the search mode, this album will be played back repeatedly. To go to the previous or next Album, use the Direct Up/Down Function.
01GB00ICS-X7.book Page 58 Friday, October 12, 2012 9:24 PM Random Play (Shuffle) Changing to App Direct Touch [ App Direct lets you enjoy applications in an iPhone/iPod touch, displayed on the screen of the ICS-X7. ] during playback. The files will be played back in a random sequence. The Shuffle mode switches every time [ ] is touched. Shuffle Songs Shuffle Albums (OFF) Shuffle Songs Shuffle Albums: The songs on each album are played back in proper order.
01GB00ICS-X7.book Page 59 Friday, October 12, 2012 9:24 PM MirrorLink™ Operation (Optional) Car Mode -1 Media Control buttons 1 to 3 Press: Returns to the previous screen. Press: Displays the Home screen. Press and hold: Switches the operation mode. DISCLAIMER ENABLED BY CONNECTIVITY FUNCTIONS OF THE MOBILE PHONE, THE MOBILE PHONE'S USER INTERFACES FOR MUSIC OR DRIVE ARE DISPLAYED DIRECTLY ON OUR HEAD UNIT WITH NO ALTERATION.
01GB00ICS-X7.book Page 60 Friday, October 12, 2012 9:24 PM Switching the Media Control button Operation. Press and hold the Media Control button 2 for at least 2 seconds, to select the operation mode. Guide Display 1 Guide Display 2 Guide Display 3 Guide Display 4 • In the Mirror mode/Car mode, you can change four patterns. • In the Music Application mode, you cannot change the Guide Display. • In Navigation mode, you can operate the system by using the touch panel only.
01GB00ICS-X7.book Page 61 Friday, October 12, 2012 9:24 PM Information Product Software Update This product use software that can be updated through a USB memory device. Download the software from the Alpine website and update the product using the USB memory device. Updating this product Check the Alpine website for details on updating. http://www.alpine-asia.com http://www.alpine.com.au In Case of Difficulty If you encounter a problem, please turn the power off, then on again.
01GB00ICS-X7.book Page 62 Friday, October 12, 2012 9:24 PM • The iPod/iPhone is not verified. - Change another iPod/iPhone. No data. • There are no data in the iPod/iPhone. - Download data to the iPod/iPhone and connect to the ICS-X7. • There are no data in the USB memory. - Download data to the USB memory and connect to this unit. Un-readable song was skipped. • A copy-protected WMA file has been detected. - You can only play back non-copy-protected files.
01GB00ICS-X7.book Page 63 Friday, October 12, 2012 9:24 PM GENERAL Specifications Power Requirement MONITOR SECTION Operating temperature Screen Size 7.0" LCD Type Transparent type TN LCD Operation System TFT active matrix Number of Picture Elements 1,152,000 pcs.
01GB00ICS-X7.book Page 64 Friday, October 12, 2012 9:24 PM Installation and Connections Before installing or connecting the unit, please read the following and pages 6 to 7 of this manual thoroughly for proper use. Caution HAVE THE WIRING AND INSTALLATION DONE BY EXPERTS. Warning MAKE THE CORRECT CONNECTIONS. The wiring and installation of this unit requires special technical skill and experience. To ensure safety, always contact the dealer where you purchased this product to have the work done.
01GB00ICS-X7.book Page 65 Friday, October 12, 2012 9:24 PM 3 Installation Remove the mounting sleeve from the main unit (see “Removal” on page 65). Slide the unit into the mounting sleeve and secure it. Mounting Sleeve (Included) Caution Do not block the unit’s fan or heat sink, thus preventing air circulation. If blocked, heat will accumulate inside the unit and may cause a fire.
01GB00ICS-X7.book Page 66 Friday, October 12, 2012 9:24 PM Take the face plate off, and secure the ground lead of the unit to a clean metal spot using a screw (*) already attached to the car’s chassis. Attach the Original Mounting Bracket to each side of the ICS-X7, using the screws supplied with ICS-X7. Screws (M5 × 8) (Included) Ground Lead * Mounting Bracket Face Plate (Included) Chassis 66-EN 01GB07ICS-X7.
01GB00ICS-X7.book Page 67 Friday, October 12, 2012 9:24 PM Connection Diagram of SPST Switch (sold separately) (If the ACC power supply is not available) ACC (Red) ICS-X7 SPST SW (Optional) FUSE (5A) (Optional) BATTERY (Yellow) FUSE (20A) (Optional) Battery • If your vehicle has no ACC power supply, add an SPST (Single-Pole, Single-Throw) switch (sold separately) and fuse (sold separately). • The diagram and the fuse amperage shown above are in the case when ICS-X7 is used individually.
01GB00ICS-X7.
01GB00ICS-X7.book Page 69 Friday, October 12, 2012 9:24 PM Radio Antenna Receptacle Switched Power Lead (Ignition) (Red) Remote Control Output Lead (Brown) Connect this lead to an open terminal on the vehicle’s fuse box or another unused power source which provides (+) 12V only when the ignition is turned on or in the accessory position. Connect this lead to the remote control input lead. This lead outputs the controlling signals from the remote control.
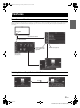
01GB00ICS-X7.book Page 70 Friday, October 12, 2012 9:24 PM System Example Connection of a USB Memory or Mobile Phone Mobile Phone (Sold separately) USB Connector USB Extension Cable (I type) (Included) Mobile Phone connection kit KCU-230NK (Sold separately) or USB Memory (Sold separately) • Do not leave USB Memory, Mobile Phone in a vehicle for a long time. Heat and humidity may damage the USB Memory, Mobile Phone. • To connect an Mobile phone, an optional connection kit KCU-230NK is required.
01GB00ICS-X7.book Page 71 Friday, October 12, 2012 9:24 PM Connection of an External device AUX/PRE OUT Connector To Video Output terminal AUX/PRE OUT cable (Yellow) (Red) DVD Changer (Sold separately) (White) To Audio Output terminal REMOTE OUT REMOTE IN (Brown) (White/Brown) Remote Out/Reverse cable 1 Video/Audio Input Connectors (AUX INPUT) 2 RCA Extension Cable (Sold Separately) 3 Remote Control Output Lead (Brown) Connect this lead to the remote control input lead.
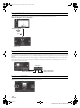
01GB00ICS-X7.book Page 72 Friday, October 12, 2012 9:24 PM Connection of a Mobile Digital TV Receiver and DVD Changer To Video Output terminal DVD Player (sold separately) To Audio Output terminal DVE-5207, etc.
01GB00ICS-X7.book Page 73 Friday, October 12, 2012 9:24 PM Connection of an External Amplifier Power Supply Connector AUX/PRE OUT Connector AUX/PRE OUT cable Amplifier 4 ch (Sold separately) (Red) (White) Input Front speaker Input Rear speaker (Red) (White) Amplifier for subwoofer (Sold separately) (Red) Input (White) REMO REMOTE ON (Blue/White) (Blue/White) Subwoofer REMOTE ON Power cable 1 Front Output RCA Connectors RED is right and WHITE is left.
01GB00ICS-X7.book Page 74 Friday, October 12, 2012 9:24 PM Connection of camera AUX/PRE OUT Connector To Video Output terminal AUX/PRE OUT cable (Yellow) (Red) Camera with RCA video output (sold separately) HCE-C105, etc. (White) 1 CAMERA Input Connector (AUX INPUT) 2 RCA Extension Cable (sold separately) 74-EN 01GB07ICS-X7.
01GB00ICS-X7.book Page 75 Friday, October 12, 2012 9:24 PM About the Rules of Bluetooth Electromagnetic Radiation Regulation Country Rules of Electromagnetic Radiation Regulation Thailand This telecommunication equipment conforms to NTC technical requirement. 01GB07ICS-X7.
01GB00ICS-X7.book Page 76 Friday, October 12, 2012 9:24 PM 01GB07ICS-X7.