
Installation Guide


5-EN
01GB04-US_EN.fm
ALPINE iLX-F411/iLX-F409 M3514702010 (EN)
EN
FR
ES
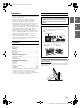
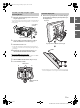
1 Mount the original mounting bracket to the main unit
using the supplied screws.
• If you do not have the original mounting bracket, mount the Double din
KIT* (provided with the side mounting bracket), etc. to the main unit.
* Sold separately.
2 Connect all other leads of the main unit according to
details described in the “Connections” (page 9).
3 Mount the main unit in a car.
• Fix the cables carefully. Do not damage them by mounting them into
movable parts, such as the seat rail, or by locating them against sharp or
pointed edges.
4 Reattach the removed vehicle parts (panels, etc.) or
other aftermarket dash kit back onto the vehicle.
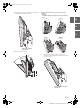
Note on using HDMI Connection Cables
When using HDMI connection cables, secure the cables to the HDMI
Terminals with the supplied HDMI Fixation Bracket.
1 Slide the HDMI Fixation Bracket into the grooves (A).
2 Secure it with the screw (B).
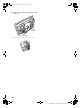
1 Remove the 2 angle adjustment screws (M4×6) fixing the
left and right sides of the Display unit and pull the top of
the display forward.
• Vertical positioning screws may need to be removed earlier (See Step 4)
in order to manipulate the screen enough to install the POWER PLATE.
Installation example using the Original
Mounting Bracket
Original Mounting Bracket
Screws (M5×8)
(included)
HDMI Fixation Bracket
(Included)
HDMI Terminal
(A) (A)
(B)
Install the display unit
Angle adjustment screws (M4×6) (left and right)
Display unit
01GB00-US.book Page 5 Monday, April 27, 2020 5:11 PM