
Installation Manual


3-EN
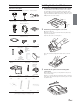
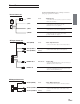
Accessories
Check accessory parts.
AV Input Connector AV Output Connector Power Connector
RUE-4159H Universal
Remote Control
EPG
EXIT
INFO
RUE-4159H
MONITOR
ENTER
MONITOR
SOURCE
TEXT BACK
MENUTOP.M
DISP
RETURN
REPEAT
AUDIO ANGLESUB.T
DVD
EXT-DVD
DVD-HU
1234
5678
90+10CLR
MUTE
DEVICE
DTV
USB
HDMI2 AUXHDMI1
DVD.CMD PIC.M
CH CH SCAN
SETUP
SHS-N106 Single
Source Fold -Flat
Wireless Headphones
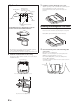
Installation Bracket
X 2
Trim Ring
Screws (for
Installation Bracket)
Screws (for Trim Ring)
X 4 X 5
AAA Batteries
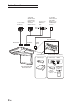
Optional FM
Switching Box
Sold
Separately
Part No.
TMXR2000FMSB
Quick Start
Guide,
Installation
Manual,
Registration
Card
HDMI/USB
Cover Plate
X 6
TMX-R3300HDMI Overhead
Monitor
FM Transmitter
Antenna Wire
Optional
KCU-315UH
HDMI/USB
Extension
Connector
Sold
Separately
Top
interchangeable
cover
Right side
interchangeable
cover
Left side
interchangeable
cover
Rear
interchangeable
cover
X 3 X 3 X 3 X 3
(Color of Interchangeable cover: high gloss gun metal black, high
gloss bright gray, high gloss champagne gold)
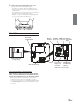
Installing the Overhead Monitor
1 Install the metal installation bracket to the ceiling.
4 screws will be used to attach the bracket to the ceiling.
The protruding screw holes should be facing down, away
from the ceiling. Ensure that the bracket is affixed to the roof
supports behind the headliner and exercise caution to avoid
drilling into the roof of the vehicle.
2 Install the top interchangeable color cover.
Open the monitor lid.
Attach the cover to the monitor from the front (side facing
the panel open button).
Push the sides of the cover into place.
Close the monitor lid and push the back of the cover into
place.
3 Install both side panels of the interchangeable
color covers.
Align and insert the notches on the panels into the grooves
on the monitor body.
Slide the cover in the direction towards the front control keys
at the front of the unit and snap the notch into place. A click
should be heard.
Front
Protruding
screw
holes.