Portable Navigation System PND-K3 Portable Navigation System msn OWNER’S MANUAL Version 1.
Precau t ions A n d N o t ices Important Information 7 There may be situations where the navigation system displays the vehicle’s location erroneously. Use your own driving judgment in this situation, taking into account current driving conditions. Please be aware that in this situation the navigation system should correct the vehicle’s position automatically. However, there may be times where you may have to correct the position yourself.
W arnin g s Points to Observe for Safe Usage DO NOT BLOCK VENTS OR RADIATOR PANELS. Doing so may cause heat to build up inside and may result in fire. Read this manual carefully before using this system. It contains instructions on how to use this product in a safe and effective manner. Alpine cannot be responsible for problems resulting from failure to observe the instructions in this manual.
U ser A g reemen t In using this PND-K3 Portable Navigation System (hereinafter referred to as “System”), which includes Alpine Electronics, Inc. (“Alpine”) Specifications, Space Machine, Inc. (“Space Machine”) Software and NAVTEQ North America, LLC. (“NAVTEQ”) Database, you are bound by the terms and conditions set forth below. By breaking the seal on the System and using your copy of the System, you have demonstrated your agreement to the terms and conditions of this Agreement.
Table o f C on t en t s Precautions And Notices............................................... 2 . Important Information....................................................... 2 Warnings........................................................................... 3 . Points to Observe for Safe Usage....................................... 3 User Agreement............................................................... 4 Table of Contents........................................................... 5 In The Box...
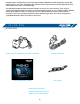
Congratulations and thank you for purchasing the Alpine PND-K3 Portable Navigation System. We hope you enjoy using this exciting product and trust that it will make your driving experience more comfortable, stress-free, and entertaining. The PND-K3 Portable Navigation System provides an easy-to-use user interface, clear, easy-tounderstand spoken driving instructions, and award winning design all in a portable product. PND-K3 is built upon Alpine’s history of navigation success in North America.
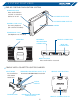
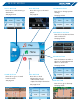
S y s t em Fea t ures PND-K3 Portable Navigation System Power Button Press and hold for 2 seconds to turn the device on or off Volume Up Button Volume Down Button SD/MMC Card Slot Screen For music playback (SD card not included ) Headphone Jack (Headphone not included) Speakers external gps/antenna connector Cradle Connector Mini USB Connector Reset Button Press and hold for 2 seconds Cradle with Cigarette Lighter Charger Mute Wire For Installation with Stereo Head Unit AMPS/NEC Mounting Holes (x
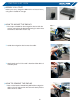
INSTALLATION BEFORE YOU START Before you start, charge the PND-K3 for at least three hours, using the included AC charger. I ns t alla t ion Before You Start Before you start, charge the PND-K3 for at least 3 hours, using the included AC charger. INSTALLATION INSTALLATION BEFORE YOU START Before you start, charge the BEFORE YOU START How to Mount the PND-K3 PND-K3you for start, at least threethe hours, Before charge suitable for the navigation device.
M ain M enu Go To Button Play button Settings Button Press this to start entering a destination. Press this to go to the music player. Press this to change system settings. See page 13-18. See page 33. See page 27-30. MSN DIRECT BUTTON Press this to receive real-time news and traffic. See page 35-36. Phone button Press this button to make a phone call, when Bluetooth device is connected See page 25-26. HOME BUTTON Press this to go to a saved home location. See page 23.
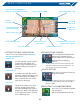
M a p Func t ions Next Maneuver Arrow And Voice Prompt Button Next Street Name Main Menu Button Route Button Zoom In Button Eta/etr/distance To Destination Zoom Out Button TRAFFIC BUTTON Map Orientation Battery Status Indicator Gps Status Bar Change Route View To Arrow Only Mode Current Position Setting the Map Orientation Estimate Time Display Touch this icon to switch between North Up, Heading Up and 3D View.
Map Func tions, continued Next Maneuver Arrow and Voice Prompt Button Next Street Name Main Menu Button Route Button Zoom In Button Zoom Out Button ETA/ETR/Distance to Destination TRAFFIC BUTTON Map Orientation Battery Status Indicator GPS Status bar change Route view to Arrow only Mode Current Position GPS Status Bar Switching Map Display GPS Signal Strength Touch this button to switch between Map and Arrow modes. Battery Status Note: You can only switch map display during guidance mode.
f rom t h e ma p d is p lay Setting a Destination 1 Touch anywhere on map screen. 2 The vehicle arrow changes to a crosshair cursor. 3 Move the cursor to the new desired street. Note: Use Map Zoom button to zoom out the map if the destination is far from the current location. 4 Touch the selected position bar on the bottom of the screen. 5 Select Set as Destination. 6 Touch Go! on the Confirm Destination Screen. Note: To use destination options on the Confirm Destination Screen, see page 19-21 for details.
I n p u t A d es t ina t ion Address button History Button Search by typing an address. Select from recent destinations. See page 14. See page 16. Places button address Book button Select places. Select from saved destinations. See page 15-16. See page 17. Intersection button coordinates button Set destination by intersection. Set destination using geographic coordinates. See page 18. See page 17.
Set A Destination by Address There are several ways to set a destination. You can set a destination directly from the map (Page 12) or select Go to from the main menu. Go to Main Menu ➜ Go to ➜ Address Finding a Destination by Entering Street Name First 1 Select by Street. 2 Type the street name and touch OK. If there are multiple matches, the system automatically displays a short list of street names. Type only the name of the street. Prefix and suffix of the street are not necessary.
S e t A Des t ina t ion b y Place You can select from approximately 6 million place locations stored inside your PND-K3 Portable Navigation System. Go to Main Menu ➜ Go to ➜ Places Finding a Place Near You or Near Your Destination Note: Last 4 names and Last 4 types takes you to a list from the last 4 places/types you have previously entered. By Name 1 Select by Name. 2 Type the desired place name. Touch OK. A list of place names appears.
set a Destination by Place, Continued Go to Main Menu ➜ Go to ➜ Places Finding a Place Within City Vicinity 1 Select Within City Vicinity. 2 Select Within a City. Note: Last 4 Cities takes you straight to the list of cities you have previously entered. 3 Type a city name and select a city. 4 You can choose by Name or by Type. 5 Follow steps from “by Name” or “by Type” on page 16. Finding a Place Along Your Route 1 Select Along Route. 2 Select the desired place type button. Touch OK.
Set A Destination From The Address Book Go to Main Menu ➜ Go to ➜ Address Book 1 Select the desired destination. 2 The Confirm Destination Screen appears. Touch Go! to calculate the route. Editing Address Book Go to Main Menu ➜ Go to ➜ Address Book 1 Select the destination you would like to modify. 2 Touch to edit your entry. 3 Edit Name, Phone Number and Icon or delete the selected destination. Note: Select DELETE ALL to delete all addresses saved in the address book.
set a Destination BY INTERSEC TION Go to Main Menu ➜ Go to ➜ Intersection Finding a Destination by Entering a Street Name First 1 Select by Street. 2 Type in the first street name. Touch OK. The list of applicable street names appears. Select the desired street and input the address number. 3 Input the second street name. If there is only one street crossing with the first street, the name of the street automatically appears. 4 Confirm City name if there are more than 1 cites with the same intersection.
Des t ina t ion O p t ions The Destination Options Menu allows you to find places nearby, find alternative routes to get to your destination, set a destination as your home, save a destination in the address book, and create waypoints. To get to the Destination Options Menu, enter your desired destination by using the method on pages 13-18 in order to get to the Confirm Destination Screen. Select Options. Finding Nearby Places 1 Touch Find Nearby Places. 2 Select a desired place type.
Destination Options, continued To get to the Destination Options Menu, enter your desired destination by using the method on pages 13 through 18 in order to get to the Confirm Destination screen. Select Options. Saving a Destination into the Address Book 1 Touch Save to Address Book. 2 Type in desired name. Touch OK. 3 Select an icon. If there is no desired icon, touch No Icon. 4 Touch Ok. Setting Waypoints You can set up to 3 waypoints between you current location and your destination.
Des t ina t ion O p t ions , con t inue d To get to the Destination Options Menu, enter your desired destination by using the method on pages 13 through 18 in order to get to the Confirm Destination screen. Select Options. Setting Waypoints, continued Optimizing Your Route 1 Touch Set as Waypoint. The Waypoint List appears. 2 Touch Options. Waypoint options screen appears. 3 Touch Optimize Route. 4 The system takes you back to the Waypoint List screen with optimal route. Touch Go! to calculate the route.
ROUTE Viewing Turn List During Guidance You can view a list of street names and upcoming turns and streets. Main Menu ➜ Info ➜ Route or directly from the Map ➜ 1 Touch View Turn List. 2 A list of upcoming streets and turns appears on the screen. To preview a specific point, select a street name/maneuver on the list. Finding an Alternate Route On Route screen, touch Change Method.
Home You can go Home from anywhere once the Home Address is set. See page 19 to set a destination as Home. Going Home Go to Main Menu ➜ Home Touch Go! to calculate the route. Note: To find an alternate Route to go Home, see page 22.
B lue t oo t h Bluetooth enabled mobile phones can be paired to interface with PND-K3. You can customize this interface using the Bluetooth Setup controls. Go to Main Menu ➜ ➜ Bluetooth The Bluetooth Setup menu appears and displays the setup options. 1 Select ‘Bluetooth Devices...’. 2 Select ‘Discoverable Mode’. 3 On the Bluetooth enabled mobile phone, search for Bluetooth devices 4 Once the PND-K3 is found on the mobile phone, connect to the PND-K3.
M obile P h one Most Bluetooth enabled mobile phones can be synchronized to interface with PND-K3. Once you have paired and synchronized your mobile phone with PND-K3 (see Setup on page 24) you can place and receive calls in addition to many other convenient functions. Some Bluetooth enabled phones may not be compatible and some features may not be available even after synchronizing and pairing. Note: It may take a few minutes for information to transfer from your phone to the PND-K3.
Mobile Phone Set tings, Continued Touch Main Menu ➜ Using your Call Logs 1 Touch Call Logs. 2 Touch Dialed Calls, Missed Calls or Received Calls. 3 A list of your call history appears. Select the desired contact from the list. 4 Confirmation screen appears with the contact’s detailed information if available. Touch Dial to place the call. Note: You can continue to use the PND-K3 during an active call. Touch the icons to jump to the Map screen or Main Menu screen.
S e t t in g s Map Button Display button For map settings, see page 28. For display settings, see page 28. Audio button Navigation button For audio settings, see page 30. For navigation settings, see page 29. Regional button Bluetooth button For Regional settings, see page 30. For Bluetooth settings, see page 24. MSN DIRECT BUTTON For MSN Direct settings, see page 31. Restore Defaults button This allows you to delete all stored information and default back to the original factory settings.
C us t omizin g Dis p lay Go to Main Menu ➜ ➜ Display Note: Touch OK to complete the setting. Menu Color You can choose from 8 different colors for all menu screens. Brightness The brightness of the screen can be adjusted. Setting Day/Night Mode Day - a bright tone screen Night - a dark tone screen Auto - switches automatically between Day and Night modes Screen Recalibration This allows you to recalibrate the touch screen for better accuracy.
C us t omizin g N a v i g a t ion Tool Go to Main Menu ➜ ➜ Navigation Note: Touch OK to complete the setting. Route Method You can change the routing method. See page 22 for details. Guidance Map You can choose between full map and arrow only in guidance mode. Route Button You can choose between 3 different route buttons.
S e t t in g A u d io Go to Main Menu ➜ ➜ Audio Note: Touch OK to complete the setting. Changing Navi Mix Volume This allows you to vary the volume of the voice prompts with respect to the music. Button Sounds This allows you to turn button sounds ON or OFF. Guidance Prompt This allows you to turn ON or OFF the guidance voice prompts. R e g ional S e t t in g s Go to Main Menu ➜ ➜ Regional Note: Touch OK to complete the setting. Language You can select a Language from English, French and Spanish.
M S N D I R E C T S E TT I N G (Only on PND-K3msn) Before Using MSN-Direct You must subscribe to MSN-Direct to enable the feature on the PND-K3. 1 Go to www.msndirect.com/activate to begin activation. 2 Make sure to have the product key. To find the product key, Go to Main Menu ➜ ➜ MSN ➜ MSN Subscription Status 3 Follow as instructed and the cradle will be activated. MSN Direct Settings Traffic Avoidance: You can set detour automatically, prompt, or off.
I n f orma t ion Go to Main Menu ➜ Info GPS Button dashboard button For viewing GPS, see page 32. For viewing dashboard, see page 31. System button Route button For viewing system information, see page 32. For changing the route, see page 22. VIE W ING DA SHBOA RD Go to Main Menu ➜ Info ➜ Dashboard The odometer displays the route distance and time traveled. Driving Average Overall Average Maximum Speed Driving Time Idle Time Total Time Average speed. Average speed (includes idle time.).
Viewin g GP S S t a t us This feature allows you to view GPS satellite signal information. You can view the dynamic location information received from satellite, such as, signal strength, compass (direction information), latitude/ longitude, approximate altitude, and speed. An explanation of the messages is shown below.
M usic Play er Music Player The PND-K3 is not only a navigation device, it’s also a music player! Choose “Play” from the Main Menu, then just place an SD card with your favorite music into the PND-K3. It’s that simple! Play Skip to previous track Skip to next track Back to Main Menu Map Repeat Shuffle Music Library Once music is playing, click and drag to skip to anywhere in the song.
M S N D I R E C T (Only on PND-K3msn) Go to Main Menu ➜ Viewing Traffic You can view traffic and receive instructions for detours. Incident List Takes you to a list of incidents sorted by distance. On Route button shows all incidents occurring on your route. Viewing Gas Prices You can view gas price information by distance or by price. Detour To set-up automatic detour, see page 31. Searching Movie Times. Viewing Weather Change the Location Touch . The list of cities near you appears.
M S N D I R E C T, C O N T I N U E D Go to Main Menu ➜ Viewing Stocks Viewing News and Alerts News You can read a brief description of latest news. Breaking news appears in red text. Searching Local Events You can search current local events. 1 Select by Category 2 Select by Sub Category (if applicable) 3 Select by Name or Date. Emergency Alerts The wether alerts appars Subscriber Announcement MSN updated subscriber message announcements appear here. You can check the latest market activity.
I n C ase o f Di f f icul t y If you encounter a problem, please review the items in the following checklist. This guide will help you isolate the problem if the unit is at fault. Otherwise make sure the rest of your system is properly connected and completely charged. Contact your authorized Alpine dealer or Alpine directly at 1-888NAV-HELP (1-888-628-4357). Unable to play Music from SD card. Some SD cards may not be compatible with the PND-K3. Unable to use Phone feature.
S p eci f ica t ions Main Unit Size: 123mm x 74mm x 20mm Main Unit Weight: 6.4 oz CPU: SiRF Titan GPS: Embedded 20 channel GPS with built-in antenna Internal Storage: Built-in flash memory with Pre-loaded Maps of US, Canada, Puerto Rico, and the Virgin Islands Card Slot: Secure Digital (SD) or Multimedia Card (MMC) for playback of MP3 or WMA music files Audio: Integrated speaker and headphone slot on main unit. Audio output slot on cradle. USB Interface: 2.0 Display Size: 4.
Index A B C D E F G Accessories Address Book Announcement Audio Button Sounds Changing Navi Mix Volume Guidance Prompt 6 17 10 30 30 30 30 Battery Status Indicator Before Using This Product Before You Start Bluetooth Auto Answer Auto Connect Enable Bluetooth 11 10 2 8 24 24 24 24 Change Route View Cigarette Lighter Charger Clock Confirm Destination Screen Coordinates Cradle AMPS/NEC Mounting Holes Connector Connector Slot Eject Button Mounting Plate Mute Wire power cord Current Position 10 6, 7 3
L imi t e d W arran t y ALPINE ELECTRONICS OF AMERICA, INC. AND ALPINE OF CANADA INC. (“Alpine”), are dedicated to quality craftsmanship and are pleased to offer this Warranty. We suggest that you read it thoroughly. Should you have any questions, please contact your Dealer or contact Alpine at one of the telephone numbers listed below. PRODUCTS COVERED: 2 This Warranty covers Car Audio, Navigation Products and Related Accessories (“the product”).