
Owner's Manual
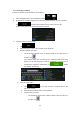
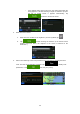
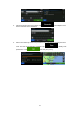
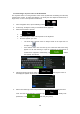
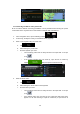
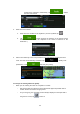

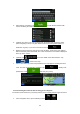
Table Of Contents
- Quick Reference Guide
- Owners Manual
- Reset
- Table of Contents
- Features
- Supplied Accessories
- Parts & Controls
- Operating Instructions
- Features
- Getting Started
- Accessory List
- Location of Controls
- Turning Power On or Off
- Turning the System On
- Initial System Start-Up
- Inserting/Ejecting a Disc
- Adjusting the Screen Viewing Angle
- Adjusting the Volume
- Lowering Volume Quickly
- Common Operations
- Using My Favorites
- User Registration
- Setting My Favorites
- Easy Sound Setup mode/BASS ENGINE SQ mode
- Access to iDataLink Mode
- Applying TuneIt
- Settings When Switching Users
- How to Input Characters and Numbers (Keypad)
- Top banner and Bottom banner Fade Out Setting
- Switching Sources
- Rear Entertainment Function
- Switching the Dual Screen Display
- Touch operation
- Selecting an Item in a List
- About the Indicator Display
- Radio/HD RadioTM/ RBDS
- Listening to the Radio
- Presetting Stations Manually
- Presetting Stations Automatically
- Tuning to Preset Stations
- Forced Analog Mode
- Receiving a Multicast (HD Radio mode only)
- PTY (Program Type) Tuning (Analog Broadcasts only)
- Displaying Radio Text
- Storing the tag information (HD Radio mode only)
- About the Feature Logos
- CD/MP3/WMA/AAC
- DVD
- Playing a Disc
- Stopping Playback (PRE STOP)
- Stopping Playback
- Fast-forwarding/Fast-reversing
- Finding the Beginnings of Chapters/Tracks/Files
- Playing Still Frames (Pausing)
- Forward frame-by-frame Playback
- Slow Motion Playback
- Selecting Folders
- Repeat Playback
- Searching by Title Number
- Searching Directly by Chapter Number
- Searching for a Desired Video File
- Switching the Angle
- Switching the Audio Tracks
- Switching the Subtitles (Subtitle Language)
- About DivX®
- Setup
- Setup Operation
- General Setup
- Sound Setup
- Sound Setup Operation
- Setting the Balance/Fader/Subwoofer
- Setting the MX (Media Xpander)
- Equalizer Presets
- Adjusting the Parametric Equalizer Curve (Parametric EQ)
- Adjusting the Time Correction (Time Correction)
- Adjusting the Crossover Settings (X-Over)
- Setting Defeat
- Volume Setting
- Setting the Volume for Each Source
- About Time Correction
- About the Crossover
- Source Setup
- Bluetooth Setup
- Bluetooth Setup Operation
- Setting Hands-free Connection of iDataLink
- Bluetooth Setting
- Displaying Bluetooth Information
- Registering the Bluetooth Device
- Automatic Connection setting
- Setting the Passcode
- Changing the Character Code of the Phone Book
- Selecting the Output Speaker
- Adjusting the Caller Volume
- Adjusting the Microphone Level
- Adjusting the Ring Tone Volume
- Deleting All the Histories
- Camera Setup
- Bluetooth Operation
- Setup Before Using
- Hands-Free Phone Control
- Bluetooth Audio
- Playing the iDataLink-Bluetooth Audio
- Auxiliary Device (Optional)
- Camera Operation (Optional)
- SiriusXM Satellite Radio Operation (Optional)
- Receiving Channels with the SiriusXM Tuner
- Tuning Channels by Category
- Changing the Display
- Checking the SiriusXM Radio ID Number
- Storing Channel Presets
- Tuning Channels using Presets
- Tune Start Function
- Tune Scan Function
- Search Function
- Selecting the Channel directly
- Storing the desired Song/Artist
- Receiving and Tuning to an Alert
- Replay Function
- Parental Lock Function
- Using Jump Memory and Jump Recall function
- Storing the Tag information
- Playing the iDataLink SiriusXM
- Flash Memory (Optional)
- iPod/iPhone (Optional)
- HDMI Device (Optional)
- Pandora internet radio (optional)
- Information
- Troubleshooting
- Messages
- Specs
- Installation and Connections
- Navigation Quick Reference Guide
- Navigation User Manual
- Scan of CD-ROM
- Warranty

29
3.1.1.5 Entering an address with a postal code
All of the above address searching possibilities can be performed with entering the postal
code instead of the city/town name. Find below an example with a full address:
1. In the Navigation menu, tap the following buttons: , .
2. If necessary, modify the country as described earlier (page 23).
3. Enter a new city/town using its postal code:
a. Tap .
b. Start entering the postal code.
c. Find the city/town you need:
• The most likely postal code is always shown in the input field. To accept
it, tap .
• If the desired number does not show up, open the list of results by
tapping . Select the postal code from the list.
4. Enter the street name:
a. Tap .
b. Start entering the street name on the keyboard.
c. Find the street you need:
• The most likely street name is always shown in the input field. To accept
it, tap .
• If the desired name does not show up, the names that match the string
appear in a list after entering a couple of characters (to open the list of