
Owner's Manual


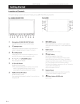

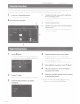


Table Of Contents
- Quick Reference Guide
- Table of Contents
- Warnings
- Parts & Controls
- Power On / Off
- Switching the Source
- Favorite Function
- Registering Items
- Adroid Auto (Optional)
- Apple CarPlay Operation (Optional)
- Alpine ConnectApp (Optional)
- HD Radio / RBDS Operation
- USB Flash Drive Operation (Optional)
- Pandora Internet Radio Operation (Optional)
- SiriusXM Satellite Radio Operation (Optional)
- HDMI Device (DVD Player) Operation
- iPod / iPhone Operation (Optional)
- Hands-Free Phone Control
- Map Functions
- Navigation Menu
- Setting a Destination
- Note on Using HDMI Connection Cables
- Specs
- Owners Manual
- Reset
- Table of Contents
- Features
- Getting Started
- Location of Controls
- Turning Power On or Off
- Turning the System On
- Initial System Start-Up
- Adjusting the Volume
- Lowering Volume Quickly
- Touch Screen Operation
- Switching Sources
- Operating the Function Button on the Audio/Video Main Screen
- About Basic Operation for List Screen
- About the Shortcut Setup Screen
- About the Menu Screen
- About the Indicator Display
- Opening screen Customization
- How to Input Characters and Numbers (Keypad)
- Favorite Function
- Applying Alpine TuneIt App
- Setup
- Setup Operation
- Wireless (Bluetooth) Setup
- General Setup
- Sound Setup
- Setting the Balance/Fader/Rear Speaker/Subwoofer
- Setting the Media Xpander (MX HD)
- Equalizer Presets
- Adjusting the Parametric Equalizer Curve (Dual HD EQ)
- Adjusting the Crossover Settings (X-Over)
- Adjusting the Time Correction (TCR)
- Setting Defeat
- Setting the Volume for Each Source
- Adjusting the Caller Level
- Adjusting the Microphone Level
- Adjusting the Ring Tone Level
- Volume Setting
- Setting Audio Mute On/Off while Backing up
- Setting the Microphone Effect
- Default Sound Settings
- About the Crossover
- About Time Correction
- Picture Quality Setup
- Display/Key Setup
- General Setup
- Vehicle Setup
- Sound Setup
- Source Setup
- System Setup
- Apple CarPlay (Optional)
- Android Auto (Optional)
- Alpine Connect App (Optional)
- Radio/HD Radio/RBDS
- Radio Basic Operation
- Listening to the Radio
- Presetting Stations Manually
- Presetting Stations Automatically
- Tuning to Preset Stations
- Inputting Frequency Directly and Receiving the Radio Station
- Receiving a Multicast (HD Radio™ Mode only)
- Selecting the Receivable Program Type (RBDS FM Radio mode only)
- Forced Analog Mode
- Displaying Radio Text (RBDS FM Radio mode only)
- Using Ballgame Mode (HD Radio™ Mode only)
- About the Feature Logos
- Radio Basic Operation
- USB Flash drive (Optional)
- iPod/iPhone (Optional)
- Pandora internet radio (optional)
- SiriusXM Satellite Radio Operation (Optional)
- Receiving Channels with the SiriusXM Tuner
- Tuning Channels by Category
- Changing the Display
- Checking the SiriusXM Radio ID Number
- Storing Channel Presets
- Tuning Channels using Presets
- SmartFavorites Functions
- Search Function
- Selecting the Channel Directly
- Storing the desired Song/Artist
- Receiving and Tuning to an Alert
- Replay Function
- Parental Lock Function
- Using Jump Memory and Jump Recall function
- HDMI Device
- About HDMI selector (Optional)
- DVD Player Operation
- CD/MP3/WMA/AAC/WAV
- DVD
- Playing a Disc
- Playing Still Frames (Pausing)
- Stopping Playback
- Fast-forwarding/Fast-reversing
- Finding the Beginnings of Chapters/Tracks/Files
- Forward/Reverse frame-by-frame Playback
- Repeat Playback
- Searching by Title Number
- Searching Directly by Chapter Number
- Switching the Angle
- Switching the Audio Tracks
- Switching the Subtitles (Subtitle Language)
- Info Mode Function
- Switching Display Modes
- HDMI Operation
- Bluetooth Operation
- Auxiliary Device (Optional)
- Camera Operation (Optional)
- iDataLink Operation
- About Remote Control Operation (X209D only)
- Information
- Troubleshooting
- Specs
- Installation Manual
- Vehicle Applications
- Tools Required
- Supplied Accessories
- Programming the iDatalink Maestro Module
- Component Locations
- GPS Antenna Installation
- Factory Unit Disassembly Process
- Installation Instructions
- Connecting the uConnect USB Port
- Connecting a SiriusXM Module
- Mounting Brackets
- Exploded-View Diagram
- Bezel Wiring Diagram
- X209-WRA-OR Wiring Diagram
- X209-WRA-OR with Optional HDMI Interface Wiring Diagram
- Steering Wheel Configuration
- Set Up Guide
- Troubleshooting Guide
- Navigation System User Manual
- Warranty Note
- Warranty

Ow
ner
's
m
an
u
al
Location of
Co
nt
ro
ls.
Turning
Po
we
r On
or
Off
Getting Started
Location
of
Controls
The
sc
r
ee
n d
es
ign u
sed
in
the Owner
's
Manual
may differ
f
ro
m the
ac
tu al
sc
r
een.
For X208U/INE-W977HD
For
X209D
--
-
--
--
---------
~-
I
CD
Microphone
(X208U/INE-W977HD only)
0
~/~button
Us
ed for Hands-free
or
Vo
ice C
ontro
l modes.
Press
to
seek
down/up
a station in radio
mo
de or
@
}'(AUDIO)
button
down/up
a track,
chapte
r, et
c.,
in
other
audio/visu
al
sou r
ces.
Displ
ays
th
e Audi
oN
isual screen. If the Aud io
/V
isu
al
®
screen is already displayed, changes
the
so
ur
ce.
RESET
switch
@
for
VOICE
button
Th
e system
of
this
unit
is
re
set.
De
pendin
g on
the
co
nnected
sm
artp
hone, pre
ss
to
®
@
(NAV) button
recall
Siri
function
or
voice
recognition
mode.
Recal
ls the navigation
map
screen.
@
+
1-
or
A
IV
(UP/DOWN) button
Pr
ess
aga in
to
swi
tch
to
Navigati
on
menu
scree
n.
Pr
ess
and ho ld
th
is b
utt
on for at least 2 seconds
to
Pr
ess
to ad
ju
st
th
e
vo
lume.
cha n
ge
to
Go H
ome
r
ou
te screen.
(If
H
ome
is
not
se
t
®
*
(Favorite) button
ye
t,
it
will change
to
the
H
ome
setting screen.)
Recalls
the
Favorite screen.
For
details
of
navi
gat
ion operations, refer
to
"Navigation
•
Pr
ess
and
hold
this
butto
n for at
lea
st 2 seconds to
Sy
stem OM" in
the
we
bsite at
switch
to
the i
Da
ta
lin
k m
ode
screen.
(When
http://www.alpine
-usa.com.
connected to
th
e
op
tional iD
atal
in k module.)
@
Remote Sensor
®
MENU/ (Power
Off)
button
Po
int
the
remote
control transmi
tte
r
towa
rds the
Re
calls
th
e
Menu
scree
n.
rem
ot
e sensor
within
a range
of
2 meters.
Press
and hold th is bu
tt
on for at least 5 seconds
to
turn
@
~(Eject)
button
(X209D only)
the
po
wer
off.
Ejects a disc.
4 -EN