
Operation Manual
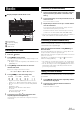
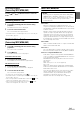
Table Of Contents
- Operating Instructions
- PRECAUTIONS
- WARNING
- Features
- Getting Started
- Accessory List
- Location of Controls
- Turning Power On or Off
- Turning the System On
- Initial System Start-Up
- Inserting/Ejecting a Disc
- Adjusting the Screen Viewing Angle
- Detaching and Attaching the Screen (INE-W987D Only)
- Adjusting the Volume
- Lowering Volume Quickly
- Common Operations
- Using My Favourites
- User Registration
- Setting My Favourites
- Easy Sound Setup mode/BASS ENGINE SQ mode
- Settings When Switching Users
- How to Input Characters and Numbers (Keypad)
- Top banner and Bottom banner Fade Out Setting
- Switching Sources
- Rear Entertainment Function
- Switching the Dual Screen Display
- Touch operation
- Selecting an Item in a List
- About the Indicator Display
- Parking Assist Interrupt Function
- Access to Climate Mode
- Applying TuneIt
- Radio
- RDS
- DAB/DAB+/DMB
- CD/MP3/WMA/AAC
- DVD
- Playing a Disc
- Stopping Playback (PRE STOP)
- Stopping Playback
- Fast-forwarding/Fast-reversing
- Finding the Beginnings of Chapters/ Tracks/Files
- Playing Still Frames (Pausing)
- Forward frame-by-frame Playback
- Slow Motion Playback
- Selecting Folders
- Repeat Playback
- Searching by Title Number
- Searching Directly by Chapter Number
- Searching for a Desired Video File
- Switching the Angle
- Switching the Audio Tracks
- Switching the Subtitles (Subtitle Language)
- About DivX®
- Setup
- Setup Operation
- General Setup
- General Setup Operation
- Language Setting
- Remote Sensor Setting
- Opening/Closing Screen Automatically
- Setting the Remove Screen Angle
- Security Code Setting
- Setting Top banner and Bottom banner Display
- Screen/LED Customize
- Visual Setting
- About X800D-U/INE-W987D
- Installation Setup
- Setting the Parking Assist Interrupt On/Off
- Setting the Climate Interrupt On/Off
- Setting the External Audio Processor On/Off
- Setting the Digital Output
- Sound Setup
- Sound Setup Operation
- Setting the Balance/Fader/Subwoofer
- Setting the MX (Media Xpander)
- Equalizer Presets
- Adjusting the Parametric Equalizer Curve (Parametric EQ)
- Adjusting the Time Correction (Time Correction)
- Adjusting the Crossover Settings (X-OVER)
- Setting Defeat
- Volume Setting
- Setting the Volume for Each Source
- About Time Correction
- About the Crossover
- Source Setup
- BLUETOOTH Setup
- BLUETOOTH Setup Operation
- BLUETOOTH Setting
- Displaying BLUETOOTH Information
- Registering the BLUETOOTH Device
- Automatic Connection setting
- Setting the Passcode
- Changing the Character Code of the Phone Book
- Selecting the Output Speaker
- Adjusting the Caller Volume
- Adjusting the Microphone Level
- Adjusting the Ring Tone Volume
- Deleting All the Histories
- Camera Setup
- BLUETOOTH Operation
- Auxiliary Device (Optional)
- Camera Operation (Optional)
- USB Memory (Optional)
- iPod/iPhone (Optional)
- HDMI Device (Optional)
- MirrorLink™ Operation (Optional)
- Information
- Installation and Connections

34-EN
Display example for RDS Information
Displays the Radio text (When a Radio station that
transmits text messages)
RDS indicator
Turning AF (Alternative Frequencies) On
or Off
The RDS (Radio Data System) is a radio information system using the
57 kHz subcarrier of regular FM broadcasts. The RDS allows you to
receive a variety of information such as traffic information, station
names, and to automatically re-tune to a stronger transmitter that is
broadcasting the same programme.
1
Press the button.
2
Touch [Radio] of Top banner.
The radio mode is activated and the display changes to the
Radio mode screen.
• The display content varies depending on the last band selected.
(eg. [RadioFM1], etc.)
3
Touch [AF] of Bottom banner to select the AF
(Alternative Frequency) ON or OFF mode.
In AF ON mode, the “AF” Indicator lights up.
If [AF] is not displayed, touch [ ] in the bottom banner to
display [AF].
• RDS mode is not be displayed for the MW or LW band.
• When the AF ON mode is selected, the unit automatically tunes to a
strong signal station in the AF list.
• Use the AF OFF mode when automatic re-tuning is not required.
Tips
• If the unit receives the PTY31 (Emergency Broadcast) signal, the unit
will show “Alarm” in the display only when PTY31 is set to On. For
operation, refer to “Setting PTY31 (Emergency Broadcast)
Reception” (page 62).
• The RDS digital data includes the following:
• Refer to page 62 about “PI SEEK Setting”, “Receiving RDS
Regional (Local) Stations”, “Switching the Display Language of
PTY (Programme Type)” and “Setting PTY31 (Emergency
Broadcast) Reception”.
Receiving Traffic Information
Touch [TA] of Bottom banner to turn on the Traffic
Information mode.
The TA indicator lights up.
When the traffic information station is tuned in, the TP indicator
lights up.
Traffic information is heard only when it is being broadcast. If
traffic information is not being broadcast, the unit is set in the
standby mode.
When a traffic information broadcast begins, the unit
automatically receives it and the display shows “T.Info”.
When the traffic information broadcast is over, the unit will
automatically be set to the standby mode.
• If the traffic information broadcast signal falls below a certain level,
the unit remains in the receiving mode for 1 minute. If the signal
remains below a certain level for over 70 seconds, “TA” will blink in
the display.
• If you do not want to listen to traffic information being received,
touch [TA] to skip that traffic information message.
The T. Info mode will remain in the ON position to receive the next
traffic information message.
• If the volume level is changed while receiving traffic information, the
changed volume level will be memorised. When traffic information is
received next time, the volume level will be automatically adjusted to
the level memorised.
• If the Traffic Information mode is activated, the unit automatically
switches to radio source (even if you select another source except
navigation) and receives the traffic information broadcast. When the
traffic information is finished, the unit returns to the previous source.
RDS
Touch [ ], [ ]
PI Programme Identification
PS Programme Service Name
AF List of Alternative Frequencies
TP Traffic Programme
TA Traffic Announcement
PTY Programme Type
EON Enhanced Other Networks