Measure what you see.
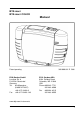
BYK-mac i BYK-mac i COLOR Manual Patent pending BYK-Gardner GmbH Lausitzer Str. 8 D-82538 Geretsried Germany Tel. 0-800-gardner (0-800-4273637) +49-8171-3493-0 Fax +49-8171-3493-140 300 000 891 E 1306 BYK - Gardner USA 9104 Guilford Road Columbia, MD 21046 USA Phone 800-343-7721 301-483-6500 Fax 800-394-8215 301-483-6555 www.byk.
Dear customer, thank you for having decided for a BYK-Gardner product. BYK-Gardner is committed to providing you with quality products and services. We offer complete system solutions to solve your problems in areas of color, appearance and physical properties. As the basis of our worldwide business, we strongly believe in total customer satisfaction.
Table of contents Table of contents 1. Safety instructions ............................................................................. 5 2. System description and Delivery notes ........................................... 10 3. Power supply .................................................................................... 12 4. Controls ............................................................................................. 15 5. Getting started ...........................................
12. Interface ............................................................................................ 49 13. Standards .......................................................................................... 50 14. Technical Data .................................................................................. 51 15. Errors and Warning Messages ......................................................... 53 16. Cleaning and Maintenance ..............................................................
Safety instructions 1. Safety instructions • Before operating the instrument the first time, please read the operating instructions and take particular notice of the safety instructions. • If you use the unit and accessories properly, there are no hazards to fear. • This product is equipped with safety features. Nevertheless, read the safety warnings carefully and use the product only as described in these instructions to avoid accidental injury or damage.
Safety instructions The following symbols and terms are used. This symbol warns of the danger of injury. This symbol warns of the danger of injury caused by electricity. This sign points out additional information. DANGER The term DANGER warns of possible severe injuries and danger to life. WARNING The term WARNING warns of injuries and severe material damage. CAUTION The term CAUTION warns of slight injuries or damage.
Safety instructions DANGER injuries possible • Defects and extraordinary loads If safe operation can no longer be presumed, shut down the device and secure it against unintended operation. The device must be presumed unsafe to operate: • if visible damage is evident • if the instrument is no longer working • if it has been stored for long periods under adverse conditions • after harsh treatment during shipping.
Safety instructions b) by disconnecting the power supply unit plug from the socket The power supply unit can be disconnect from the power supply by disconnecting the power connection line plug from the socket. Make certain that the power supply unit plug is easily accessible. Use only the power supply connection line included with delivery. • When working with the batteries and the rechargeable battery pack, make certain there is no short circuit on the contacts (e.g. due to damaged insulation).
Safety instructions • • • • • Align the protection cap when the instrument is not in use. Avoid prolonged high relative humidity and do not allow condensation water. Do not use any acetone for cleaning the unit! The unit housing is resistant to many solvents. For cleaning you should use a soft, moist cloth. Excessive dirt and dust can be removed with ethanol or cleaning alcohol. In case you intend not to use the instrument for a longer period of time, take out the rechargeable batteries.
System description and Delivery notes 2. System description and Delivery notes BYK-mac i COLOR measures color traditionally at five aspecular angles (15°/25°/45°/75°/110°) with a 45° illumination. Additional color measurement ”behind” the gloss for color travel of interference pigments is implemented at -15°. Besides color, the BYK-mac i uses additional illuminations to simulate sparkle under 15° /45° and 75°. Diffused illumination for graininess evaluation is created by two white coated hemispheres.
System description and Delivery notes BYK - mac i COLOR* BYK - mac i COLOR Sensor 7032 7033 Comes complete with: Multi-angle spectrophotometer, black calibration standard, white calibration standard with certificate, cyan checking reference, protective cap, cleaning set for bottom plate, two light protection covers, seal replacement kit, *BYKWARE smart-chart software, docking station with USB cable for memory transfer, instrument interface cable for online data transfer, 2 rechargeable Li-ion battery pack
Power supply 3. Power supply Before operating the instrument for the first time, please read the operating manual and take particular notice of the Safety Instructions. Rechargeable battery pack Battery compartment Powering the instrument The measurement unit can be operated either with a rechargeable battery pack or with AA (LR6) alkaline batteries. Battery: To operate the instrument using batteries, the battery compartment must be fitted with four 1.
Power supply Rechargeable battery pack To operate the instrument with the rechargeable battery pack, make sure it is inserted until it locks in place. When inserting the rechargeable battery pack, ensure that its contacts are aligned with those of the instrument. See adjacent figure. The capacity of the rechargeable battery pack included with delivery is sufficient for about 1000 measurements.
Power supply Charging the rechargeable battery pack The rechargeable battery pack is charged in the docking station. Charging time is approx. 2 hours. 1. Battery pack in the instrument: The lithium ion rechargeable battery will begin charging immediately upon insertion of the instrument into the docking station. To do this, power must be supplied to the docking station through the corresponding power supply unit. Insert the measurement unit into the docking station as shown in the illustration. 2.
Controls 4.
Getting started 5. Getting started Turning on the unit To turn on the unit, press the mode scroll wheel or the operate button. The main menu appears. For the first steps select ”Absolute” from the ”Measure” menu. Place the instrument on the sample and press ”operate”. While the reading is in progress, the light diodes are green and ”Measuring” is displayed. Keep the instrument stable as long as the green lights are on.
Getting started The following error messages might appear during measurement. A warning signal is heard and the light diodes flash red. At the same time, a message appears in the display indicating the type of error. ”Pins not pressed” Not all of the pins have been pressed thoroughly on the sample surface (e.g. curvature too high, instrument has been moved during measurement). Confirm the message by pressing the scroll wheel or the operate button and repeat the reading.
Calibrate 6. Calibrate Calibration Information Protection Measurement Standards The instrument comes with 2 calibration standards. The black trap is used to perform the zero reflectance calibration (black calibration). Always store the black trap with the protection cover in place when not in use. Black trap The white standard is fixed in a case that has a hinged cover. It is used to perform the 100% reflectance calibration and to calibrate the camera.
Calibrate Calibration Notes • • • • • Dirt or dust in the optics area will cause an inaccurate calibration reading. Therefore, always use the protective cap, if no readings are taken. The standards and black trap should be cleaned periodically. For cleaning procedure see section "Cleaning and Maintenance“. Please make sure that the standards are not scratched. The cyan tile is to some extend temperature dependent.
Calibrate 6.1 Cyan Check Choose "Cyan Check" from the "Calibrate" menu. Open the cover of the cyan checking standard and position the instrument on the standard. The instrument snaps into the indentation of the standard and can only be positioned in one direction. Choose "OK" with the scroll wheel. When the cyan check is completed, an affirmation is shown in the display. Confirm by pressing the operate button or the wheel to return to the main menu.
Calibrate 6.2 Calibrate Turn the unit on by pressing either the menu scroll wheel or the operate button. Choose the menu item Calibrate from the Calibrate menu. Remove the protective cap. Place the instrument on the black trap. Make sure that the instrument fits into the indentation of the black trap. Choose OK with the wheel and press the operate button to perform the black trap reading. The reading process is indicated on the display.
Calibrate When black trap calibration is completed, the instrument must be placed on the white standard. Position the instrument as thoroughly on the white standard as it is described for the black trap and press the operate button. The reading process is indicated on the display. When calibration is complete, an affirmation is shown in the display. Confirm by pressing the Operate button or the wheel to proceed to the Cyan check. Choose "OK" with the scroll wheel.
Calibrate 6.3 Effect Check Choose "Absolute" from the "Measure" menu. The basic configuration is the average of three measurements. Open the cover of the effect checking standard and position the instrument on the standard. The instrument snaps into the indentation of the standard and can only be positioned in one direction. Perform three measurements. Compare the average of the measurements with the range indicated on the lid.
Measurement techniques 7. Measurement techniques In order to obtain accurate and repeatable measurements, the bottom of the instrument must be aligned flat on the sample surface. Do not move the instrument while measuring. To perform a measurement, press the operate key or set-up the instrument to automatically perform a measurement when the four pins are pressed down (see chapter ”Setup/Instrument”).
Measure 8. Measure Select the menu item Measure by pressing the operate button/scroll wheel. A selection menu appears. ”Continue last series”: To continue the last test series. If no series is stored, it will be created. ”Absolute”: To measure absolute data. ”Difference”: To measure differences. Select an existing standard, create a new one or use the function „Auto Standard“. ”car_01”: To take readings according to a predefined measurement sequence (organizer). 8.
Measure 8.2 Absolute You are asked if you like to continue the test series. Confirm by pressing the scroll wheel leads you to the last test series. You can continue to take readings by pressing ”operate”. Choosing ”No” opens a new test series, starting with Sample 001. Press operate to continue. 8.3 Difference Choosing ”Difference” leads you to a selection menu. You can choose an existing standard, create a new standard or use the function „Auto Standard“.
Measure New Standard You are asked to input a name. You can accept the predefined suggestion or change the character by turning the scroll wheel. When you press the wheel, the highlighted position moves to the next character. If you did a wrong input, you can move backward with the esc button. After inputting the name, you can input the number of readings by using the scroll wheel. Then measure the standard by pressing ”operate”. After the readings you are asked to copy settings.
Measure Existing standard Choose the appropriate standard from the list. You are asked to continue the last series. If you choose ”Yes”, you can directly continue the series by pressing the ”operate” button. In case you choose ”No”, a new series is started.
Measure Auto standard The function „Auto Standard“ is displayed if at least one standard is stored in the memory. When choosing this function the closest standard compared to the sample is automatically recalled. Choose „Auto Standard“ from the menu and press operate to start the sample reading. If only one standard is close to the sample, this standard is automatically selected and the initial sample reading is compared to this standard.
Measure 8.4 Organizer An organizer file defines a measurement sequence for user guidance, e. g. measuring a car body with several checkzones. These files can be generated with the smart-process software and transferred to the instrument. Once an Organizer is selected, a menu appears for Parameter 2 (Color). After you have selected the appropriate color, a selection menu appears for Parameter 3 (e.g.automotive paint line).
Measure After the standard has been measured, or when it is already stored in the instrument, the name of the checkzone to be measured first, appears on the left side of the display. The number of performed and predefined measurements (0 of 2) appears in the upper right corner. Press the operate button to start the reading. Once the number of measurements for the checkzone is reached, a double audio signal is heard.
Measure During the measurement you have access to additional functions by pressing the mode wheel. In case you took a false reading, you can delete the last measurement or a complete checkzone. ”Interrupt statistic” must be activated when the organizer is created. If not, you will get an information on the display that it is not allowed.
Delete 9. Delete Select the menu item Delete by pressing the operate button/scroll wheel. A selection menu appears. ”Last Measurement”: To delete the last measurement of a checkzone. ”Checkzone: To delete the whole checkzone. ”Test series”: To delete a test series. ”Standard”: To delete a standard. 9.1 Last Measurement In case you took a false reading you can delete measurements. Select the menu item ”Last Measurement” by pressing the scroll wheel or the operate button.
Delete 9.2 Checkzone To delete a whole checkzone, choose the menu item ”Delete checkzone” and press the mode wheel. . The instrument is now ready again to measure the checkzone. 9.3 Test series When you choose ”Test series” from the menu, a submenu opens. You can delete all test series or individual test series taken in absolute, difference or organizer mode. To delete the test series in absolute mode, choose ”Absolute” from the menu. A list of the stored test series is displayed.
Delete To delete test series in difference mode, you have to choose the appropriate standard first and then the test series to be deleted. Test series in Organizer mode can be deleted accordingly. The organizer itself can only be deleted with smart-process. 9.4 Standard With this function you can delete standards. Choose the appropriate standard from the list and press the mode wheel or the operate button. To confirm, choose ”Delete” with the mode wheel and press the wheel or the operate button.
Data View 10. Data View You can use this function to display the readings of measurements stored in the instrument. 10.1 Test series Absolute To view the data of readings taken in absolute mode, choose ”Absolute” from the menu. A list of all test series taken in absolute mode is displayed. Choose the appropriate test series and press the operate button or the mode wheel. The data of the first reading is displayed. Use the operate button to switch to the next reading.
Data View Organizer To view the data of an organizer, choose the appropriate organizer from the list. Then select parameter 2 (color) and the appropriate test series by pressing the operate button or the mode wheel. The data of the first checkzone is displayed. You can move through the different displays with the scroll wheel to see all measurement data. The small black rectangle in the lower left corner indicates the number of pages. With the operate button you can move to the next checkzone.
Data View 10.2 Standard To view the data of a standard, choose the appropriate standard from the menu. The data of the standard is displayed.
Setup 11. Setup In the Setup menu you find functions to adjust general settings for: Measurement parameters Instrument Calibrate 11.1 Measurement parameters Measurement parameters can be adjusted for absolute mode or any individual standard. Select the standard you want to change and a submenu opens: Statistic Color Effect (only with BYK-mac i) Fluorescence Limit Sample Temp. Alarm 11.1.
Setup 11.1.1.2 SMC - Statistical Measurement Control Highlight the function with the scroll wheel. Pressing the wheel activates or deactivates the function. If SMC is activated a checkmark appears. For SMC mode you must preset a minimum number of measurements ( n > 3 ). To keep the required number of measurements as low as possible, a default standard error is stored in the instrument. In case of uniform surfaces, the standard error is often reached after the minimum number of measurements.
Setup 11.1.2.1 Angles You can choose individual angles or ”All”. 11.1.2.2 Scales Here you can decide according to which color scale results are calculated and how they are displayed.
Setup 11.1.2.3 Illuminant/Observer You can choose among the illuminants/observers shown on the left side. 11.1.3 Effect (only available with BYK-mac i) This function lets you choose the effect parameters to be displayed. You can choose individual effect parameters or ”All”. 11.1.4 Fluorescence Limit This function allows setting a limit for the instrument to give an audio/video signal when fluorescent light is detected. If the function is activated, a checkmark appears.
Setup To change the character, turn the scroll wheel. When you press the wheel, the highlighted position moves to the next character. Pressing operate completes the process and the instrument returns to the selection menu. If you entered a wrong input, you can move backward with the esc button. 11.1.5 Sample Temp Alarm The device has a built in temperature sensor. If the alarm is activated, a checkmark appears. You can set minimum and maximum values.
Setup 11.2 Instrument In the Setup menu you find functions to adjust general settings of the instrument: 11.2.1 Sample curvature You can adapt the sensitivity of the pins dependent on the sample curvature. Flat: 4 pins < 0.1mm Low: 3 pins < 0.1mm, 1 pin < 0.3mm Medium: 3 pins < 0.3mm, 1 pin < 0.9mm High: 3 pins < 0.6mm, 1 pin off Off: pins are deactivated, but it is ensured that no ambient light will enter the aperture. 11.2.
Setup 11.2.3 Beeper This menu option turns the beeper on or off. Use the scroll wheel to move the cursor to Beeper and press the wheel. When the beeper is activated, a checkmark appears. 11.2.4 Language You can use this menu to select the display language. If a foreign language is activated accidently, you can find the language settings by following the * symbol in the menus. Use the scroll wheel to move the cursor to the desired language and press the wheel. 11.2.
Setup 11.2.6 Date/Time The unit contains an integrated clock. This makes date and time of the measurement available for data transfer to a PC. Date and time are not lost even when the battery is changed. If necessary, adjust the data by using the scroll wheel. 11.2.7 Display Time To save energy, the unit automatically turns off after a certain amount of time. This time period can be set between 15 and 99 seconds. If you entered a wrong input, you can move backward with the esc button. 11.2.
Setup 11.2.9 Advanced You can use this menu item to activate: • Interrupt statistic • Input Parameter 3 • Input Comment • Input ID • Input Checkzone 11.2.9.1 Interrupt statistic If interrupt statistic is activated you can interrupt a checkzone (sample) before reaching the preset number of measurements. 11.2.9.2,3 Input Parameter 3 and Comment When active, these parameters allow to assign individual names for identification of a new test series. 11.2.9.
Setup 11.3 Calibrate You can perform a cyan check and a complete calibration. Please refer to the chapter ”Calibration”.
Interface 12. Interface Transfer of data stored in the memory of the instrument takes place through the docking station. It contains the USB interface connecting the instrument with a PC. To transfer data, the connection cable must be connected to a USB port on the computer. For the position and assignment of the socket, please refer to your computer manual. The connection point for the USB cable is located at the back of the docking station. Plug in the cable included with delivery.
Standards 13. Standards DIN 5033 Colorimetry; basic concepts. DIN 5036 Radiometric and photometric properties of materials; definitions characteristic. DIN 6174 Colorimetric evaluation of colour differences of surface colours according to the CIELAB formula.
Technical Data 14. Technical Data General technical data: Temperature range Rel. humidity 10 °C to 42 °C (50 °F to 110 °F) for operation 0 °C to +60 °C (32 °F to 140 °F ) for storage Up to 85% non-condensing/35°C (95 °F) Measurement unit: Color Measuring Geometry Measuring Area Spectral Range Measurement Range Measuring time BYK-mac i BYK-mac i COLOR Repeatability Illumination 45°, -15°,15°, 25°, 45°, 75°, 110° aspecular viewing Ø23mm (0.91 in.) or 12mm (0.47 in.
Technical Data Display Power supply Dimensions (LxWxH) Weight Interface 2.7 in. TFT color LCD display Rechargeable battery pack or 4 mignon AA batteries (Alkaline or rechargeable) 218 x 81 x 147mm (8.6 x 3.2 x 5.8 in.) approx. 1300g/2.86 lbs. USB-B External power supply: External power supply Input Output 52 Docking station 90 - 264 VAC, 50 - 60 Hz max.
Errors and Warning Messages 15. Errors and Warning Messages Info Warning The surface temperature is under ..°C The sample temperature is lower than the sample temperature alarm. Warning The surface temperature is over ..°C The sample temperature is higher than the sample temperature alarm. Single measurements can no longer be deleted. You can delete measurements only within the active checkzone.
Errors and Warning Messages Error Instrument temperature out of range Temperature is outside the operating temperature range. Ambient light Appears when there is too much ambient light during measurement or when measuring bright colors (white and light silver) in direct sunlight. Please refer to chapter 5 “Getting started/Ambient light“ Please clean Cyan Tile Appears when check on cyan tile failed. Please make sure that temperature and humidity are within specification.
Cleaning and Maintenance 16. Cleaning and Maintenance • Do not insert any objects into the measurement aperture for cleaning. The instrument could get damaged. • Do not use any acetone for cleaning the unit! The instrument housing is resistant to a number of solvents, but cannot be guaranteed to withstand all chemicals. You should therefore use a soft, moist cloth for cleaning. For cleaning excessive dirt, use ethanol or cleaning alcohol.
Cleaning and Maintenance Cleaning the Black Trap From time to time the black trap should be cleaned with clean, dry air to remove any dust or contamination. The black trap is taken apart by compressing the lower part on both sides of the case with your fingers, and then separating the two sections. Exact calibration is not possible unless the standard is in perfect condition.
Service and Certification 17. Service and Certification Service Besides the repair of your instrument we offer the following additional services: First diagnosis on the telephone or by e-mail Call us or send us an e-mail and we will try to solve your problem. If this is not successful, please send us the instrument for repair. Preventive maintenance, calibration, and recertification For precautionary reasons we recommend regular preventive maintenance.
Service and Certification Service Centers for BYK-Gardner products Germany BYK-Gardner GmbH Lausitzer Strasse 8 82538 Geretsried Germany Phone:+49-8171-3493-0 Fax: +49-8171-3493-166 USA BYK-Gardner USA 9104 Guilford Road Columbia, MD 21046 USA Phone:+1-301-483-6500 Fax: +1-301-483-6555 China BYK-Gardner China Instruments Service BYK (Tongling) Co., Ltd. Shanghai Branch 3/F, Bldg A, No8, Lane 1305 Huajing Road, Xuhui District Shanghai 200231 P.R. China Tel.
Copyright 18. Copyright This instruction manual is an important part of this instrument. It contains essential information about setting up, placing in service and use. If you pass the device on to another user, please ensure that the instruction manual is included with the instrument. The manual must be studied carefully before working with the equipment. Please contact your regional service office if you have any questions or require additional information about the device.
300 000 891 E 1306