ENGLISH English French German P rS nte se re lP ita ig D TE TA O XA D 50 P-9 D G M T/I TX ZO AF M O ZE E E FR IRIS LA M INT/ P EXT AW C T1 X E EXT2 Italian USER'S MANUAL SDP-950DXA/STA Before attempting to operate this product, Please read the instructions carefully. www.samsungpresenter.
SDP-950 Special features Thank you for purchasing this product. This product is a high resolution digital presenter that can project all kinds of data on a PC monitor, a TV or a large screen with simple operations. 12X optical zoom lens and 3X digital zoom By adopting 12X super optic angle zoom lens, it is possible to shoot all materials from the size of a 35mm film to A4 size.
English Features French German Various image control Digital features on your Digital Presenter provide useful and various image controls including: - Negative/Positive image conversion - Brightness and R/B color control - Image rotation - Image save/recall - Image freeze - Image divide Input source selection You can quickly switch between your computer presentation and your document presentation with the INT/EXT button on the control panel or on the remote controller.
SDP-950 Contents Product features and structure Safety precautions..................................................................5 Uses of digital presenter ........................................................6 Supplied accessories .............................................................7 Name and function of each part ............................................8 Front side............................................................................8 Main control panel .........................
French 10. Never push objects of any kind through cabinet slots. Never spill liquid of any kind into the presenter. 11. Except as specifically explained in this User's Manual, do not attempt to service this product yourself. Refer all servicing to qualified service personnel. Opening or removing covers may expose you to dangerous voltages and other hazards. 12. Unplug the presenter during lightning storms or when it will not be used for extended periods. 13.
SDP-950 Uses of digital presenter Conference Detailed information in a report, form, table, etc. as well as a three dimensional object, such as a model, can be projected on a screen clearly that all the participants can focus on the same topic during a conference. Thus it is very helpful for an effective progress of a conference.
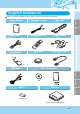
English Supplied accessories When you unpack your Digital Presenter, make sure that you have all these components.
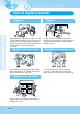
SDP-950 Name and function of each part Front side 1 2 3 4 5 TE TA O P XA D 50 P-9 D rS nte se re lP ita ig D G M T/I TX M O ZO AF IRIS FR E E ZE LA INT/ EXT P M 6 AW C T1 X E 7 EXT2 8 1 Lens Can rotate to the front and back.
3 Main lock button French Main support English 2 German Press to move the main support.
SDP-950 Name and function of each part Main control panel The buttons on the main control panel can be found in the remote controller. These buttons perform the same functions. 1 2 4 ROTATE 5 6 7 AF IRIS INT/EXT EXT1 EXT2 TXT/IMG ZOOM 8 SDP-950DXA FREEZE 9 AWC LAMP 10 11 3 INT/EXT IRIS AF NEGA/POSI EXT1 EXT2 TXT/IMG ZOOM FREEZE LAMP AWC SDP-950STA POWER APERTURE Use this to turn the power on or off. Use this to control the sharpness of the output image.
English Name and function of each part Terminals at the back 3 4 5 7 8 9 10 German 2 French 1 6 THE KENSINGTON SECURITY SLOT DVI OUTPUT Connect Kensington Slim MicroSaver security cable to this slot to attach the presenter to an immovable object. Connect this to the monitor or projector by supplied DVI cable. VGA VIDEO INPUT 1,2 MOUSE Use this to connect PS/2 Mouse. (See page 17.
SDP-950 Name and function of each part On the remote controller POW ER 1 INT 3 /EX 2 T TXT /IMG FOC US LAM P F 5 1 + N 7 Neg T+ BR IT NTS 16 ROT ATE IGH E IGH C/PA TEL T- 9 10 11 EZE BR WID EX 6 3X3 FRE 15 - 8 si 6 + 3 5 7 a/Po 12 E AW C 8 BLU 2 4 AF 4 RED E 14 13 L PR ES SAV E RE CA ET 17 SAV LL E DIV IDE AC T IVE SH IFT DIG ITA LP RE Page 12 SE NT ER 18
English ROTATE (For the SDP-950DXA ONLY) Turns power on or off. Use this to rotate the image by 90˚, 180˚, 270˚, 0˚. French POWER Allows to choose the signal inputs to be displayed. TXT/IMG Controls the sharpness of the output image. Switches for TEXT mode or IMAGE mode. German INT/EXT WIDE/TELE • Reduces the image size. • Enlarges the image size. BRIGHT + / BRIGHT • Increases the brightness. • Decreases the brightness. LAMP Turns the upper lamps and/or lightbox on or off.
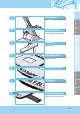
SDP-950 Set preparation 1 Press the main lock button and raise the main support Digital Presen ter SDP -950DX Raise the lamp unit until it is convenient for use, and set it to the center of the document plate. 2 A 2 D ig ita l Pr es en 1 te P- TE TA O P r SD 95 0D XA G T/IM TX D ig ita l Pr es 3 Adjust the angle of the lamps properly. 4 Turn the lens area to face downward. 5 Remove the lens cap. 6 Plug the power cord in.
English Connecting to output device PC Monitor, Projector or DVI supporting devices French German Connect a TV, PC monitor, Projector and DVI supporting devices(Monitor or Projector)to this presenter to display the projected images using the appropriate cable.
SDP-950 Connecting to output device Connecting Computer ital Dig Connect a desktop PC and the presenter using USB cable and install the supplied program. You can see the projected image on the PC monitor and control the image using the program. RS-232C connection is available for advanced user. If you connect a PC with RS-232C cable, you should set up your PC and make your own program to control the projected image on PC. Ask your dealer for further details.
English Connecting to output device French German If you connect a computer through VGA IN port, you can receive video signal from the computer. ital Dig E DXA -950 SDP TAT PO ter sen Pre TXT /IM G ZO AF OM FR IRIS EE ZE P LAM INT/EX T AW C 1 EXT EXT2 Connection Connect the cable to the VGA input terminal PC monitor, projector, etc. Digital Presenter Connect to VGA IN terminal using the VGA cable from the computer. VGA IN terminal is available.
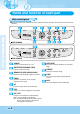
SDP-950 Using the presenter To show the image received from external devices 1 Set up your digital presenter properly. (See page 15.) Dig ital Pre sen SD E TAT PO ter P-9 50D XA TX T/I MG OM ZO AF ZE EE FR IRIS MP LA INT/E XT C AW T1 EX EXT2 2 3 Connect the input device from which you want to receive the image and the output device in which you want to show the image. (See pages 15 through 17.) Turn the power of the input and output device on, and the digital presenter on.
French 4 English Using the presenter Choose the video source with the INT/EXT button of the presenter. German INT/EXT IRIS EXT1 POW ER EXT2 INT /EX T TXT /IMG FOC US LAM P F LAMP AWC RED 1 + N AF BLU E 2 4 + - 3 5 7 AW - • Each time you press the button, the display shows EXT1 OUT, EXT2 OUT, INT OUT. • EXT1 OUT, EXT2 OUT View the image from an external VGA output device through a PC monitor or a projector connected to the digital presenter.
SDP-950 Using the presenter To project an object on the digital presenter 1 Set up your digital presenter properly. (See page 15.) Dig ital Pre sen SD E TAT PO ter P-9 50D XA G T/IM TX OM ZO AF ZE EE FR IRIS MP LA INT/E XT AW C 1 EXT 1 3 EXT 2 EXT2 Connect the presenter to a PC monitor or projector to display the image. (See page 15.) Turn the power of the output device and the digital presenter on.
5 English Using the presenter INT/E IRIS AF French Select a proper lighting source with the LAMP button of the presenter. Each time you press the button, upper lamps on, lightbox on, then all lightings off. POW German INT ER /EX T TXT LAMP FREEZE /IMG FOC AWC US LAM P F RED 1 + N AF BLU E 2 4 + - 3 5 7 AW - Upper lamps. Use the upper lamps to project paper documents and other materials, and use lightbox lamp to project transparencies. Lightbox.
SDP-950 Using the presenter 7 Focus on the object. • Auto focus control: Press AF button. • Manual focus control: press [Focus F] or [Focus N] to adjust manually.
English Adjusting your image Use the control buttons on the remote controller or on the control panel of the presenter to adjust the projected image. Some of the main features are described below: French Adjusting image size You can also use ZOOM or ZOOM button of the presenter to achieve the same result. Neg AF ROTATE German Press WIDE or TELE button on the remote controller to change the image size displayed on the screen.
SDP-950 Adjusting your image Adjusting image color For automatic color adjustment, press AWC button. If you want fine level adjustment, press BLUE + / - or RED + / - button on the remote controller to increase or decrease blue or red color factor manually.
English Adjusting your image Image rotate control (SDP-950DXA Only) F 5 7 AW C Neg RO TA TE - 90 ˚ 6 8 German ROTATE French For image rotation, press ROTATE button. To rotate the image by 90˚, 180˚, 270˚, 0˚, press ROTATE button. 3X3 a/Po si FRE EZE IGH E T+ BR NTS IGH C/PA ZOOM TXT/IMG ROT ATE BR WID T- TEL The rotate image status will be displayed.
SDP-950 Adjusting your image Screen 2 divide and image shift (SDP-950DXA Only) You can see both the image of an object currently projected and the image saved in memory simultaneously on one screen. MG Press DIVIDE button and press the memory location FOC US LAM RED 1 + N E + - 3 5 7 AW C Neg BLU 2 4 AF number within 4 seconds to recall the image you want to see. To cancel this mode and return to normal mode, press EXIT button.
English Adjusting your image Saving custom user setting /IMG FOC US LAM P F RED 1 + N + - 3 5 7 AW C Neg E 2 4 AF BLU - To save the current value, press SAVE button and specify the memory location within 4 seconds using the number keys from 1 through 4. To recall your custom setting, press the ACTIVE button and press the memory location number within 4 seconds. German TXT French After you adjust feature value, you can save the value for next time use.
SDP-950 Adjusting your image with GUI The SDP-950 supports GUI menu system to control various function of digital presenter with mouse operation. To use GUI menu system, first of all, mouse device (PS/2 type) must be connected to mouse control terminal, if it is connected with success, mouse pointer will be appeared on the screen. And then, click the right mouse button, GUI main menu is appeared on the screen, and GUI menu system is activated.
English Adjusting your image with GUI Focus French Allow to focus an object in the far / near distance, or automatically. When holding down [Far]/[Near] menu with the left mouse button, focus is activated. Click [Auto] menu to work auto focus function. German Zoom Allow to change the image size. When holding down [Tele]/[Wide] menu with the left mouse button, zoom is activated. Italian Bright Allow to change IRIS to increase or decrease the brightness.
SDP-950 Adjusting your image with GUI Red / Blue Allow to adjust image color through the red/blue gain control When holding down [Up]/[Down] menu with the left mouse button, red/blue gain control is activated. AWC Allow to adjust image color automatically through automatic white balance control When you click [AWC] menu with the left mouse button, AWC function is executed once.
2 English Adjusting your image with GUI Digital section French Digital menu deals with various digital image processing functions. German Freeze Allow to keep the current image on the screen. Click[Freeze] menu with the left mouse button, freeze mode is activated and [Freeze] menu turns checked state. To release freeze mode, click [freeze] menu again or click [Cancel] menu with the left mouse button (and then [Freeze] menu turns unchecked state).
SDP-950 Adjusting your image with GUI Save / Recall (For the SDP-950DXA Only) Allow to save the projected image into the memory of digital presenter or recall the image from the memory. To save / recall the image with the proper save number, Click [numbers] menu with the left mouse button, current image is saved into or recalled from memory.
English Adjusting your image with GUI Divide (For the SDP-950DXA Only) French Allow to divide the screen to show both of the current image and the image recalled from the memory simultaneously on one screen. Click [numbers] menu with the left mouse button, screen is divided and selected number of the image is recalled from memory. German Shift (For the SDP-950DXA Only) Allow to shift the recalled image shown in the divided screen to show the hidden portion of the image.
SDP-950 Adjusting your image with GUI 3x3 Multi (For the SDP-950DXA Only) Allow to see all the images in the memory (up to 8 frames) on one screen. Click [3x3 Multi] menu with the left mouse button, 9 divide mode is activated and GUI menu disappeared. If you click the image number on screen, selected image will be expanded to full screen and GUI menu is appeared on the screen. To Release 3x3 Multi mode, click the center image.
Miscellaneous section French 3 English Adjusting your image with GUI Misc menu deals with miscellaneous function of digital presenter. German Preset Save / Exe Allow to save the customized user setting values or to activate the preset user setting. Click [numbers] menu with the left mouse button, current setting value is saved to flash ROM or load setting value from flash ROM.
SDP-950 Adjusting your image with GUI NEGA Effect Allow to switch for negative / positive image (default : positive). Click [NEGA Effect] menu with the left mouse button, current image turns negative image and menu turns checked state. To return positive image, click [NEGA Effect] menu again (and then menu turns unchecked state). Aperture Allow to control the sharpness of the output image (default : On). Click [Aperture] menu with the left mouse button to turn on/off aperture mode.
English Adjusting your image with GUI Lamp French Allow to turn the upper lamps or lightbox on or off. Click [All off/Upper/Lower] menu with the left mouse button, lamp mode is switched to current value. German 4 Exit section GUI main menu disappears and only the mouse pointer remains displayed. Tips : Drag and Drop Function Italian GUI main menu can take any position of screen using Drag and Drop.
SDP-950 Changing your image with Draw SDP-950 series support to GUI Drawing system to draw straight lines, freehand lines, rectangular on the screen with mouse operation. To use GUI Drawing system, first of all, GUI menu system and [Freeze] or [Recall] function must be activated. Then Draw menu is now being activated. (See page 28) When [Draw] menu is clicked, GUI Draw toolbar is appeared on the screen and GUI main menu disappeared.
1 Exit Button French Use the Exit button ( full screen. ) to exit GUI Drawing system to normal mode, or clear all the user’s images on the German 2 English Changing your image with Draw Tool Selection Use the Line Width Selection to set the line width to between 1 and 4 pixels. Drawing the single line To draw a single line, Click the single line icon and then, 1) Position the cursor on the screen where you want the line to start. 2) Press and hold the left/right mouse button. 3) Drag the mouse.
SDP-950 Changing your image with Draw 3 Foreground / Background Color Panel There are two active colors in GUI Drawing System, the foreground (left mouse click) and background(right mouse click) colors. You can change the brush colors by selecting new foreground and background solid colors using the Color Palette. 4 Foreground / Background Color Palette Use the Color Palette to select the colors that you want to draw the line. Move the cursor over the available colors panel.
Turn the power off and unplug the power cord. French 1 English Storage Attach the lens cap. 4 Fold the middle of the head backward. While you pull the main lock button toward the front of the presenter, fold the head completely. German 2 D ig ita lP re se nte D P-9 50 D TE TA O P rS XA G M T/I TX M O ZO AF FR IRIS E E ZE LA M INT/ EXT P AW C EXT1 EXT2 3 Turn the head upside down.
SDP-950 G IM P M C AW LA P INT /EX T EXT EXT2 1 IRIS ZE E E FR M INT /EX T LA C AW TE TA O P XA 0D 95 Pr SD te en es l Pr ta gi Di G IM T/ TX TE TA O P XA 0D 95 Pr SD te en es l Pr ta gi Di M O ZO AF G IM T/ TX ZE E E FR M O ZO `¶ ‚ INT /EX T IRIS C AW ZE E E FR T1 EX EXT 2 LA M P INT /EX T AF M O ZO ZE E E FR IRIS IRIS AF T/ TX M O ZO AF TE TA O P G IM T/ TX XA 0D 95 Pr SD te en es l Pr ta gi Di TE TA O P XA 0D 95 Pr SD te en es l Pr ta gi Di C AW 42 Page Fol
English Trouble shooting No image appears French German - Check if the resolution of the output device corresponds to that of the digital presenter. (For example, when the maximum resolution of a projector is SVGA and if the digital presenter is set to XGA, then no image appears.) - Check if the input selection of the output device is appropriate. - Check if the iris control is adequate. - Check if the VGA cable is connected to the VGA output terminal correctly. - Check if the lens cap is removed.
SDP-950 Battery replacement Open the battery compartment lid at the back of the remote controller. Insert new batteries. • Battery type:AAA type 1.5V Close the lid. Caution Page 44 Random replacement of built-in battery by other types of batteries may cause explosion. Thus, the battery shall be replaced by the same battery. And the used batteries shall be disposed carefully because they can cause environment pollutions.
English Specifications Note: Specifications are subject to change without notice. Video White Balance Negative / Positive Freeze Input terminals Output terminals General Dimensions(mm) Weight Accessories 20 frame/sec Internal sync. 1024 x 768(XGA) RGB color C-Video VBS 1.0Vp-p / 75Ω (unbalance) S-Video Y: 1.0Vp-p / 75Ω (unbalance) C: 0.