TWIN TUNER HIGH DEFINITION DIGITAL RECORDER PVR 6690 – 500 GB
CONTENTS CONTENTS ................................................................................................... 2 SAFETY INSTRUCTION ............................................................................. 3 FRONT PANEL ............................................................................................. 4 REAR PANEL ............................................................................................... 4 REMOTE .....................................................................
SAFETY INSTRUCTION IMPORTANT SAFETY INSTRUCTIONS 1. Read these instructions. 2. Keep these instructions. 3. Heed all warnings. 4. Follow all instructions. 5. Do not use this apparatus near water. 6. Clean only with dry cloth. 7. Do not block any ventilation openings. Install in accordance with the manufacturer’s instructions. 8. Do not install near any heat sources such as radiators, heat registers, stoves, or other apparatus (including amplifiers) that produce heat. 9.
FRONT PANEL 1. Standby button 2. Status indicator/ displaying board 3. Remote sensor 4. 5. Volume adjustment 6. 8. Channel up or down/ cursor movement 7. Interface, USB. Used to insert an external USB device. We do recommend adopting a memory device that supports interface 2.0 (size limit applies) 9. The POINT to push the mini-door to open/ close the lid 10. OK. Operation confirmation 11. MENU. Menu entry 12. EXIT. Exit operation REAR PANEL 1. Terminal, ANTENNA IN connection with antenna signal 2.
6. Terminal, COAXIAL. Digital coaxial audio signal output 7. Terminal, video signal output 8. Terminals, audio signal output. Link with the corresponding terminals on a TV set 9. Terminals, audio signal output. Link with the corresponding terminals on a TV set 10. Terminals, (YPbPr )component video outputs REMOTE PRECAUTIONS ABOUT BATTERIES Improper use of batteries may cause corrosion or fluid leakage. Please observe the following instructions for the safe use of batteries. 1.
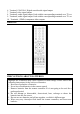
MUTE. Mutes the audio STANDBY. Enters Standby mode FAV. Displays Your Favorites List TV/RAD. To switch program mode between TV and radio LEFT/RIGHT. Menu mode: select or adjust settings ( Also controls volume up/down in viewing/playback mode ) UP/DOWN. Menu mode: move the cursor upwards/ downwards ( Also controls channel up/down in viewing mode ) EXIT. Return to the previous menu MENU. Displays the Main Menu 0-9.
T-SHIFT. Get into time shift mode in 3 seconds 16:9/4:3. Alternate video output format between 16:9, 4:3 pan&scan and 4:3 letter box CC. closed caption on/ off C.Play. Access currently recording programs ( Chase Play ) P.List. lists recorded programs from hard drive T.Rec. Access recording list PVR.
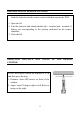
PREPARATION OF REMOTE CONTROL Load the batteries into the remote control and then operate the PVR. 1. Open the lid. 2. Load the batteries and attend whether the + terminal and - terminal of battery are corresponding to the polarity indicated on the remote controller. 3. Close the lid. OPERATION DISTANCE AND ANGLE OF THE REMOTE CONTROL POINT the control toward the window of PVR and then press the keys 1. Distance: about SIX meters in front of the window. 2. Angle: about 30 degree right or left.
RECORDING TIPS AND KEY FEATURES The PVR6690 allows you to record 2 channels simultaneously while watching a third from within a recording channel. i.e record SBS and ABC and watch ABC2. The PVR6690 can also allow you to record 2 channels and watch a prerecorded program from the hard drive. Other keys point 1.
memory) and playback after sometime. Here you can FAST FORWORD and catch up to live TV. 5. Manual recording – By pressing REC ( one touch recording ) while watching live you record TV. Here the preset is 1 hour but can be adjusted in the PVR section of the main menu. 6. INFO button – The most important button on the remote as it provides feedback on what function the PVR is performing i.e Live TV, Playback, Recording etc etc 7.
12. It is important you set your time according to your time Zone and also set daylight off/on. This is accessible in the setting menu ( Pg 19 ) SYSTEM CONNECTION 1. SET UP- YPbPr For this Set Up use an YPbPr lead (Red, Blue and Green coloured) for the video connection and either the red and white connectors of the RCA leads that came with this Set Top Box or an optical cable for the audio connection. All of video output modes are active simultaneously. 1.
a) Connect the red and white connectors of the RCA lead to the corresponding colored audio output connectors on the rear of the Set Top Box. b) Connect the other end of the cable to the corresponding colored connectors on your television monitor. c) Connect the SPDIF/COAXIAL for a better audio quality 1.3. Connect the antenna Connect the antenna lead to the “ANTENNA IN” connection on the rear of the Set Top Box. 1.4. Connect the power a) Plug the connector of the power line of the receiver into the socket.
Ensure that the power leads to both the TV monitor and the Set Top Box are unplugged before you commence the set up procedure. 2.2. Connecting Video and Audio Connect the HDMI cable from the HDMI interface output of the Set Top Box to the HDMI interface input of the TV monitor. 2.3. Connect the antenna Connect the antenna lead to the “ANTENNA IN” connection on the rear of the Set Top Box. 2.4. Connect the power a) Plug the connector of the power line of the receiver into the socket.
3.1. Prepare your equipment Make sure that your monitor has CVBS (VIDEO, AUDIO R, AUDIO L) input. Ensure that the power leads to both the TV monitor and the Set Top Box are unplugged before you commence the set up procedure. 3.2. Connecting Video and Audio Video Connect the yellow RCA cable from the VIDEO output of the Set Top Box to the VIDEO input of the TV monitor.
4. SET UP- Amplifier For this Set Up, use your preferred video connection, the example below shows video connection via YPbPr (component), you can use other methods from the previous examples. You will also need an Optical cable for the audio set up. 4.1 Prepare your equipment Make sure that your television monitor has a component input; it may be labeled “YPbPr”, COMPONENT VIDEO. In any case it will be characterized by the red, green and blue connectors and grouped together.
4.3 Connect the antenna Connect the antenna lead to the ANTENNA IN connection on the rear of the Set Top Box. 4.4 Connect the power a) Plug the connector of the power line of the receiver into the socket. b) Connect the power to your monitor and turn it on, you are now ready to get started. c) Connect the power to your monitor and amplifier and turn them on, you are now ready to get started. POWER ON 1. Connect the PVR6690 to your mains power point 2.
SCANNING CHANNELS Press UP/DOWN the key to highlight the instruction [Scan], press [OK] to enter. Auto: highlight [Search Mode], press the key LEFT/RIGHT to switch type between Auto and Manual. Highlight [Start], press [OK] to commence scanning. Image of scanning process, right side. Manual: highlight [Search Mode], press the key LEFT/RIGHT to switch type between Auto and Manual. Highlight [Frequency (KHz)], press the [digit keys] to input value; press the LEFT key to remove digits.
SETTINGS (INSTALLATION SET UP) Press the key MENU to display [MAIN MENU]. Press the UP/DOWN key to highlight the [Settings], press [OK] then input code ( 0000) to enter. TV display aspect can be set up here ( also available on Hot Key ( 16:9/4:3 ). Three modes are available 16:9, 4:3 full and 4:3 letterbox Make your setting selection and press confirm to accept these settings.
If you have an old CRT or Flat panel you may only be able use component video ( red,blue and green ) by setting output to 576p. In [Output Mode], press the LEFT/RIGHT key to alternate output mode [1080I@50], [720P@50], [576P@50], and select 576p and confirm to activate. SYSTEM SETTING: to highlight the instruction [SystemSetting], press [OK] to enter.
SOFTWARE UPGRADE PLEASE NOTE ALTECH UEC WILL CONTINUE TO ENHANCE PERFORMANCE OF THIS PRODUCT AND PROVIDE SOFTWARE UPDATES. PLEASE VISIT WWW.UEC.COM.AU FOR MORE INFORMATION. Software upgrade function is under the setting menu. Copy updating file directly onto a USB device and insert into front USB port of PVR. Select software upgrade function from the menu and press [ok] to enter.
FACTORY RESET: After updating the new software , the PVR will need to be reset to factory defaults. This function is available under the settings menu and can be accessed by entering pin code 0000 Select [Factory Reset], press [OK] to enter, Press the red key to activate. Please note all channel information will be lost and the unit will need a rescan. STORED PROGRAMS ON THE HARD DRIVE WILL NOT BE ERASED. The factory reset function can also be used to unlock the PVR.
PVR FUNCTIONALLITY This HD PVR has 3 modes of recording, manual, timer and via EPG and all these are explained below. 1. Manual – while watching a program you can start recording by pressing the record button ( one touch recording ). Here the preset recording time is 1 hr but can be varied in 1 hr steps up to 10 hrs or have no limit. This setting can be changed by accessing the PVR menu and is under the RECORD SETTINGS option. The info bar on the right shows recording remaining time and record status 2.
Pressing the EPG button will show screen on the right. If the unit has been switched off for sometime the EPG will take a few second to populate so please be patient. Select channel that you want to schedule a recording for and press OK on the remote. The program name is now highlighted. Here the coloured buttons on the remote is used to book recordings. If you want to record to record program once press the RED button on the remote control.
4. Operation about [PVR] instruction. Under [Main Menu], select [PVR], press the [OK] key to get into. Here this menu can also be launched by pressing the PVR hot key on the remote 5. Chase Play. Used to pursue the recording item. Pressing the [C.Play] hotkey can provide access to this section as well. Here you can select to play a recording while still in record mode. You can select either of the 2 programs to play from the beginning. 6. Recorded list Access your recorded program by pressing the P.
7. Edited Program list – Here all your edited files are stored and these are steps to follow to edit a file. How to Edit Play a file that you want to edit. Mark points by pressing OK on the points in the file that you want to remove. Press exit and the PVR will prompt you select yes/no to save edited file. 8. Timer Record – Shows list of recordings that have been scheduled. Can be active via a hot key on remote. ( T.Rec ) 9. Record Settings Here you can increase or decrease your manual recording duration.
11. Skip Setting. Used to set skip time for forward/ backward movement during playback. FILE PLAYBACK During recorded program playback pressing the INFO button will pop a bar on the bottom of your screen. Here the functions during file playback is shown. This includes FFW, REW, Skip backward, Skip forward and seek play. During playback of a file the yellow button is used to skip backwards and the blue button is used to skip forward. These buttons are on the remote control.
MEDIA SERVICE The PVR6690 allows the following functions via the USB port. 1. Software upgrade 2. Record to external hard drive ( Max size 320 GB ) 3. Playback MP3 On [Main Menu], select [Media Service]; press the [OK] key to get into its submenu. Here you can access your internal or external hard drive. The PVR will ask you to select hard drive source. Once you have accessed the external hard drive you can select to play your MP3 music. 3.
This function is available in under SETTINGS menu and sub menu USB Auto Partition You can record programs directly to external hard drive ( max 320 GB ) or copy files into external hard drive from the internal hard drive. 5. Below are 2 information screens you need to be aware of if you have an external hard drive inserted. TV/ RADIO CHANNEL Press the [OK]or[LIST] key to list channel Press the UP/DOWN key to highlight [TV/Radio Channel], press the key [OK] to change.
channel. 6. Audio Control When watching a program, press the [AUDIO] key to display a dialog box [Audio CTL]. Here you can select to mix stereo audio to mono so you can connect your audio output to one RCA connnector MULTI AUDIO, While watching a program you can select between MPEG2 and (AC3) audio, press the key [OK] to confirm.
SPECIFICATION Input impedance Video Profile level Video Output System Video Output Terminal Video Output Level Audio Decoding Audio Sampling Frequency Audio Freq response Audio Output Level Audio Output Terminal Power supply voltage Power consumption Temperature Weight 75 ohm MPEG-II /H.264 MP@HL PAL CVBS, YPbPr, HDMI, S-VIDEO 1VP-P (75ohm) MPEG-II layer I&II 32/44.1/48KHz 20Hz-20KHz Adjustable RCA(R/L), SPDIF, COAXIAL 220-240V~ 50/60Hz 25W 0-50℃ About 2.
WARRANTY CERTIFICATE WARRANTY CERTIFICATE FOR PVR 6690 Complete the details on this form and retain in the event of warranty service being required (purchase receipt attached) PURCHASER’S NAME: ___________________________________ ADDRESS: CITY STATE DATE OF PURCHASE POST CODE INVOICE/SALES DOCKET NO__________ TERMS OF WARRANTY Altech UEC provides 12 month manufacturer’s warranty for FAULTY MATERIAL or WORKMANSHIP for the PVR6690 from the original date of purchase.
support@uec.com.