
User guide


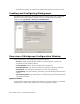
Table Of Contents
- About This Manual
- Overview
- Technology Enhancements in Release 5.1
- SIP Implementation
- Multi-Site Enterprise Management - AltiEnterprise Manager
- Multi-Chassis Gateway Support (ACM only)
- Capacity Improvements
- Voice Processing New Features and Enhancements
- PBX New Features and Enhancements
- Call Center New Features and Enhancements
- Client Application New Features and Enhancements
- IP Phone New Features and Enhancements (IP600, IP710, IP705)
- Key System Features
- Technology Enhancements in Release 5.1
- Software Installation & License Registration
- Getting Around AltiWare Administrator 5.1
- System Configuration
- Setting General Parameters
- Setting a System Number Plan
- Setting Business Hours
- Routing Calls on Holidays
- Configuring System Speed Dialing
- Defining System Call Restrictions
- Creating Account Codes
- Setting up Call Reports
- Country-Relevant Settings
- Audio Peripheral Configuration
- Activity
- Feature Profiles
- CT-Bus Configurations
- Voice Mail Configuration
- Auto Attendant Configuration
- Board Configuration
- Using the Triton Resource Board
- Using the Triton MeetMe Conference Board
- Configuring the Quantum Board
- Configuring the Triton Analog Station Board
- Configuring the Triton Analog Trunk LS/GS and LS Boards
- Configuring the Triton VoIP Board
- Configuring the Triton T1/E1 Board
- Configuring Virtual Boards SIPSP and H323SP
- Configuring the MAX Board
- Configuring the Virtual MobileExt Board
- Trunk Configuration
- Trunks Out of Service
- Channel Identification
- Opening the Trunk Configuration Window
- Selecting Trunks to Set Attributes
- Configuring One or Multiple Trunks
- Setting General Trunk Attributes
- H323 Tie Trunk Properties
- SIP Tie Trunk Properties
- SIP Trunk Properties
- Triton T1/E1 Trunk Properties
- Triton Analog Trunk GS/LS Properties
- Quantum Trunk Properties
- Incoming Call Routing
- Outgoing Call Blocking
- In Call Routing Configuration
- Out Call Routing Configuration
- Extension Configuration
- Setting Up IP Extensions
- AltiGen IP Phone Configuration
- Mobile Extension Configuration
- Hunt Group Configuration
- Paging Group Configuration
- Line Park Configuration
- Workgroup Configuration
- Managing and Using MeetMe Conference
- Network Configuration Guidelines for VoIP
- Enterprise VoIP Network Management
- Understanding VoIP Bandwidth Requirements
- Opening AltiEnterprise Manager
- Setting VoIP Codec Profiles
- Assigning Codec Profiles to IP Addresses
- Defining IP Networks
- Defining the IP Dialing Table
- The Multi-site VoIP Domain
- Working with Servers in the VoIP Domain
- Managing VoIP Domain Users
- Configuring Global Least Cost Routing
- When Information May Be Out of Sync
- System Report Management
- Tools and Applications
- E1-R2 and E1 ISDN PRI Installations
- Required Service Parameters
- Network Ports
- Technical Support & Product Repair Services
- Troubleshooting
- Index
Chapter 11: Workgroup Configuration
AltiWare ACC 5.1 Administration Manual 185
Activity Logging and Reporting
• Workgroup and agent activity logging
• Detail and summary data table
• Basic WG report using CDR Search
• Support external logger (ACM)
• Support advanced reporting application - AltiReport (ACM)
When an agent extension is configured to a workgroup, the following agent states are
tracked and reported:
• Unstaff – The agent’s extension becomes a virtual extension. Basically, this agent
does not have a phone associated with the extension.
• Logout – The agent’s extension is a physical extension but is not logged in to any
workgroup.
After an agent logs into a workgroup, the following states are tracked:
• Idle – The agent’s phone is not in use.
• Busy – The agent is connected to a call.
• Wrap-up – The agent enters wrap-up or inter-call delay period. Even if the phone is
not in use, the system will mark the agent in wrap-up state.
• Not Ready – The agent changes state to Not Ready.
• DND/FWD – The agent turned on DND or enabled extension forwarding while logged
in to a workgroup.
• Error – The agent’s phone is off hook for too long, causing the phone to enter an
error state.
The priority queuing feature in the ACM edition of AltiWare has the following capabilities:
• Tag priority (1-9) to a call entering system. “1” is the highest priority and “9” is the
lowest priority.
• Call priority can be set at DNIS Routing, Caller ID Routing, IVR, Advanced Call
Router, and SDK.
• If no priority is tagged to a call, the default priority 5 will be assigned to the call
before entering a workgroup.
• When a call is in a WG queue, two queue times will be generated. Total queue time
will be calculated from the moment the call enters the queue. Priority queue time
will be calculated based on the time a call is in queue at a specific priority level. If a
priority promotion rule is not enabled, the total queue time will be equal to the
priority queue time. If there are multiple calls with the same priority, the call with
the longest priority queue time will be served first.
• To prevent calls with lower priority staying in queue forever, causing a high abandon
rate, or lowering service level, you can set priority promotion to enhance the caller’s
position in queue.
• AltiSupervisor can change a call’s priority level if the WG’s supervisor queue control
option is enabled. (Allow Call Redirect/Priority Change)
• When a call’s priority is changed, its priority queue time will be reset to 0 and starts
accumulating again. For example, caller A with priority 3 has been waiting in the
queue for 15 minutes and caller B with priority 2 waiting for 10 minutes. When caller
A is promoted to 2, the Priority Queue Time for the caller A is set to 0 and the caller
B will be answered first.