
Operation Manual


8
4. CONTROL ELEMENTS
SPOTLIGHT
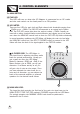
A CLOSER LOOK: The LED Meter is
your best friend in adjusting the Mixer audio
levels for optimal performance. Usually you
get a good mix when the LED Meter
flashes in between -20dB and +6dB. If the
Meter flashes a lot at PEAK, you will get
distortion. If no Meter activity at all, you
will get a lot of noise at the output. Once
you have adjusted the mixer levels for no
noise and no distortion, you can adjust the
levels of the external amplifier or powered
speakers for the desired overall volume.
The MAIN SECTION
There are four LEDs for each Left and Right channel with thresholds ranging from
20dBu up to +18dBu. The 0dB LED corresponds to an output level of about
0dB. The CLIP LED comes alive when the output is about +18dBu. Actually we
have built a safety threshold before actual distortion and clipping occur but please
turn down the MAIN MIC control knob so that the CLIP LED only blinks occasionally.
In normal operating conditions the LED Meter will display the main mix level after
the MAIN MIX control but if the 2TK TO PHONES switch is pressed in the LED
Meter will show the level of the signal applied to the TAPE IN sockets.
This LED will turn on when the AC Adaptor is connected to an AC outlet
and the main switch on the back panel is on ON position
12 PWR LED
13 LED METER
This large blue knob controls the final level of the main mix signal sent to the
MAIN OUTPUT, TAPE OUT (RCA sockets), PHONES output and the LED Meter.
For optimal operation the MAINMIX LEVEL knob should be positioned in
between(0) and 3 o'clock.
14 MAIN MIX LEVEL
+15
-
8
0
+5
-20
PWR
CLIP
R
L
OUTPUT LEVEL
MAIN MIX LEVEL
13
14
12