
Service manual

Stacking Mounting Instructions
#8311 O&C MANUAL• TH/III FAMILY
PG. 3
SECTION 1 INSTALLATION SECTION 1
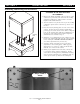
Depth
Width
Stacking
Plate
Steps 3 and 4
above
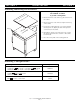
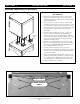
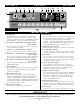
STACKING PLATE INSTALLATION
Kit #5000811
1. Measure the length and width of the top surface of the
cabinet to be positioned at the bottom of the stacking
equipment combination. Add 1/8-inch to both the
length and the width dimension.
2. Turn the cabinet to be placed at the top of the stacking
combination upside down so that the top surface is on
the floor.
3. Place the four (4) stacking plates at each corner of the
cabinet. Position the plates with the upright flange
pointing up and to the outside of the cabinet. Align the
holes in the stacking plates with the predrilled holes in
the bottom of the cabinet using both the length and
width dimensions obtained in step 1.
4. When the correct alignment has been achieved, loosely
fasten each stacking plate with four (4) screws provided
in the stacking kit. DO NOT TIGHTEN SECURELY
since minor adjustments may be necessary.
5. Stack the cabinets and make any necessary minor
adjustments to the stacking plates. When properly
aligned, the door on the top cabinet should be flush
with the door on the bottom cabinet.
6. When proper alignment has been made, remove the
top cabinet from the stacking combination. Firmly
secure all four stacking plates by individually removing
each screw and reattaching it in combination with one
of the square washers provided in the stacking kit.