
Service manual
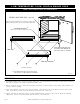


#834 LOW TEMPERATURE COOK & HOLD SMOKER OVEN Pg. 9.
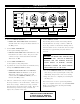
THERMOSTAT & INDICATOR
LIGHT SEQUENCE
Whenever the start-up procedure has been
completed, the indicator light will indicate the
power ON/OFF condition of the heating cable
and consequently, the cycling of the oven as it
maintains the dialed cavity temperature. If the
indicator light does not indicate after normal
start-up, the main power source and/or the
main power breaker, and/or the oven’s control
circuitry must be checked. If a oven
compartment does not hold the temperature as
dialed, calibration of the thermostat must be
checked. (See the paragraph on thermostat
calibration.) If a cooking compartment fails to
heat or heats continuously with the thermostat
off, the thermostat must be initially checked for
proper operation. If all is in order, a continuity
and resistance check of the heating cable should
be made. (See the circuit diagram.)
THERMOSTAT CALIBRATION
The thermostat is precision calibrated at the factory. Normally,
no adjustment or recalibration is necessary unless the thermostat has
been mishandled in transit or changed or abused while in service.
A thermostat with a sensing bulb operates on hydraulic pressure.
Consequently, any bending of the bulb results in a change in its
volume and displaces the accuracy of the thermostat calibration.
A thermostat should be checked or recalibrated by placing a
quality temperature indicator at the center of an empty oven cavity.
DO NOT CALIBRATE WITH FOOD PRODUCT IN THE OVEN.
The temperature must be allowed to stabilize at one particular setting
for at least two hours. The center of the thermal swing of the cavity
temperature should approximately coincide with the thermostat
setting. The calibration screw of the thermostat is located in the dial
shaft. With the shaft held stationary, a minute clockwise motion of
the calibration screw appreciably lowers the thermostat setting while
a reverse motion results in the opposite condition. After achieving
the desired cycling of the thermostat, the calibration screw must be
sealed in place with a few drops of sealant. (
RED NAIL POLISH OR
EQUIVALENT IS ACCEPTABLE
.)
TROUBLESHOOTING CHECK LIST
TROUBLE POSSIBLE CAUSE REMEDY
Unit does not operate. Insufficient electric power unit. Check power source.
Defective plug or cord. Check and repair if necessary.
Power switch defective. Replace.
Cooking temperature not correct. Cook thermostat out of calibration. Calibrate.
Holding temperature not correct. Hold thermostat out of calibration. Calibrate.
Timer runs down, but oven will not Timer not de-energizing cook circuit. Replace timer.
go into HOLD.
Cook thermostat erratic — will not Cook thermostat. Replace thermostat.
hold calibration.
Hold thermostat erratic — will not Hold thermostat. Replace thermostat.
hold calibration.
Oven goes from cooking temperature Hold thermostat. Replace hold thermostat.
to cold.
Oven will not go into cook cycle when Timer or contactor. With timer turned ON, line
timer and cook thermostat are ON. voltage should appear across
term. 2 and 3 of timer. If not,
replace timer.
If line voltage does appear
across term. 2 and 3 of timer, it
should also appear across
holding coil of contactor.
If line voltage does appear
across holding coil, and it
won’t close its contacts,
replace contactor.
It takes too long to cook Heating element open, resulting in Replace element.
(temperature O.K.). low wattage.
Cannot control temperature but Heating element grounded. Replace element.
thermostats check O.K.
SERVICE SECTION