LOW TEMPERATURE COOKING AND HOLDING GUIDELINES Electronically Operated Ovens
LOW TEMPERATURE COOKING AND HOLDING OVENS GEN ERA L IN DEX SECTION 1 • Low Temperature Cooking Introduction Alto-Shaam Halo Heat . . . . . . . . . . . . . . . . . . . . 1 Low Temperature Cooking Facts Meat and Nutrition . . . . . . . . . . . . . . . . . . . . . 2 Shrinkage Control and Cooking Time . . . . . . . 3 Preventing Bacteria Growth . . . . . . . . . . . . . . 3 Labor and Equipment Cost Reduction . . . . . . 4 Options and Accessories . . . . . . . . . . . . . . .
LOW TEMPERATURE COOKING INTRODUCTION Welcome to the cost saving convenience of Low Temperature Cooking. In 1968, Alto-Shaam invented the first automatic, commercial cook and hold oven (aging) action for more tender, flavorful meat; and preserves natural juices along featuring the principle of Halo Heat. The with nutritional values in all foods.
L OW TE M P ER AT U R E C O OKI NG IN T RODU CT I ON LOW TE MP E RAT UR E CO OKING FACTS MEAT AND NUTRITION Meat plays a significant role in the diet; therefore, one of the primary goals in food preparation is proper nutrition. Meat is one of the best sources of protein; is a rich source of B vitamins such as thiamine, riboflavin, and niacin; and includes fats, carbohydrates, minerals, pigments, enzymes, and water.
L O W T E M P ERAT U RE C OOKI NG IN T RODU CTION L OW T E MP ER AT U R E CO OKING FACTS SHRINKAGE CONTROL AND COOKING TIME THERE ARE FOUR MAJOR FACTORS INVOLVED IN DETERMINING COOKING TIMES FOR MEAT: THERE ARE TWO MAJOR FACTORS CONTROLLING MEAT SHRINKAGE OR COOKING LOSSES. 1. The degree of aging on the meat: Aged meat will cook faster, shrink more, and has a much shorter holding life than fresh meat. 1. Temperature at which meat is cooked: The higher the temperature at which meat is cooked 2.
L OW TE M P ER AT U R E C O OKI NG IN T RODU CT I ON LABOR AND EQUIPMENT COST REDUCTION Halo Heat ovens are easy to operate and maintain. After the raw product is placed in the oven and the controls are set, there is no need to check, stir, or adjust the time or the temperature. Minimal time is spent attending the product during cooking. This advantage, combined with the automatic conversion to the hold cycle, frees key personnel to concentrate on other tasks including final product and presentation.
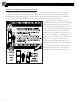
L O W T E M P ERAT U RE C OOKI NG IN T RODU CTION C OOK A N D HO L D OV EN S COMPACT COOK & HOLD Single compartment oven with electronic controls and probe. All stainless steel construction. Stackable design. MODEL PRODUCT CAPACITY POUNDS NUMBER AS-250 25 SHELVES 1 OVERALL DIMENSIONS 12" X 20" 18" X 26" 1 H xW x D — 18-1/4" x 33-9/16" x 16-3/4" SINGLE COMPARTMENT Single compartment oven with 3-1/2" (89mm) casters, electronic controls and probe. All stainless steel construction.
L OW TE M P ER AT U R E C O OKI NG IN T RODU CT I ON DOOR LOCK with KEY EACH HANDLE DESCRIPTION 1200-TH/III 1000-TH/III 5005103 BUMPER, FULL PERIMETER RUBBER CARVING HOLDER CASTER PACKAGE 2 RIGID , 2 5" (127mm) 3-1/2" (89mm) 2-1/2" (64mm) SWIVEL W / BRAKE DOOR LOCK with KEY DRIP PAN STANDARD WITH DRAIN , 1-7/16" 1-11/16" STANDARD WITH DRAIN , 1-7/8" EXTRA DEEP, 2-7/16" STANDARD WITH DRAIN , LEGS, 6" ( ONE SET OF PAN GRID, WIRE 4) 18" X SHELF, STAINLESS STEEL 26" — HL-2635 4459 HL-2635
L O W T E M P ERAT U RE C OOKI NG IN T RODU CTION OVEN C HA R A CT E R I S TI C S The cabinet is equipped with a special, low-heatdensity, heating cable. Through the Halo Heat ® concept, the heating cable is mounted against the walls of the cooking and holding compartment to provide an evenly applied heat source, controlled by an oven sensor. The design and operational characteristics of the unit eliminate the need for a moisture pan or a heat circulating fan.
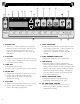
C O NT R O L ID E N T I FI C AT I ON & F U N CT I ON 1. ON/OFF KEY • The ON / OFF control system key operates the functions of the control panel. If there is any power loss during operation, the ON / OFF indicator light will flash. To clear, push key and release. 6. LOCK INDICATOR • When illuminated, this symbol indicates that the settings used in the cooking sequence are locked and cannot be changed. Lock function is controlled by preset key “I” — ITEM . 2.
C O NT R O L ID EN T I FI C AT I ON & F U N CT I ON 11. START KEY 15. HALO HEAT INDICATOR • Used to initiate a selected mode sequence when • When the oven is preheating, the Halo Heat indicator pressed and released. Any mode of operation can be will illuminate and remain steady until the oven stopped by pressing and holding the Start Key until reaches the set cooking temperature. When the the control produces an audible signal.
C O NT R O L ID E N T I FI C AT I ON & F U N CT I ON OPERAT IN G F E ATU R E S To turn the oven control panel ON and OFF: Press and hold the ON/OFF Key for three seconds. The oven will beep once. The ON / OFF indicator light will illuminate for oven ON condition and will go out for an OFF condition. To Stop an Operation: PRESS AND HOLD the Start Key for several seconds until the control beeps to indicate the operation has been cancelled. The oven will remain in a POWER-ON state.
C O NT R O L ID EN T I FI C AT I ON & F U N CT I ON LOCK °F / °C INDICATOR SELECTION BEEPER PRESET VOLUME LOCK Beeper Volume Selection With the control in the and hold the Down OFF m od e, press ▼ Arrow key . After 4 seconds, the display will indicate one of the four volume levels consisting of “0” for volume OFF to setting number “3” which is the highest volume available. Release the Down ▼ Arrow key after each change and repeat the process to select the next volume level.
C O NT ROL OPERAT I ON COOK B Y P RO B E : PRESS AND RELEASE O N / O F F KEY. • The green indicator light on the ON / OFF key will illuminate. • The oven will beep for one second and will begin operating in the hold mode. • The amber hold indicator will illuminate. • The previously set hold temperature will be displayed. PRESS COOK KEY TO PREHEAT • The green indicator light on the C OOK Key will illuminate. • Last set cooking temperature will be displayed.
C O NT ROL OPERAT I ON CO O K B Y T IM E : PRESS AND RELEASE O N / O F F KEY. • The green indicator light on the ON / OFF key will illuminate. • The oven will beep for one second and will begin operating in the hold mode. • The amber hold indicator will illuminate. • The previously set hold temperature will be displayed. PRESS COOK KEY TO PREHEAT • The green indicator light on the C OOK Key will illuminate. • Last set cooking temperature will be displayed.
C O NT ROL OPERAT I ON PROGR A M M IN G : PRESET MENU KEYS Alto-Shaam Cook and Hold ovens allow the operator to set up to eight cooking programs. Each cooking program can be preset in any program mode to cook by time or internal product temperature. Cooking programs are recalled and stored using the Preset Keys labeled "A through H." These keys, along with the key labeled "I" share additional functions described in the "User Options" section of this guide.
C O NT ROL OPERAT I ON PR O GR A M M IN G: THE OVEN PREHEAT INDICATOR WILL ILLUMINATE. The oven is now in the preheat mode and is automatically programmed to preheat to the cook temperature. Select a letter code for the product programmed by the previous steps. PRESS AND HOLD THE SELECTED PRESET KEY UNTIL YOU HEAR A BRIEF, FOUR SECOND BEEP. • The letter key program indicator light will illuminate. • The product programmed is now stored in memory for the specific letter key pressed.
C O NT ROL OPERAT I ON PROG R AM MIN G : COOKING WITH PRESET MENU KEYS: PRESS AND RELEASE ON/OFF • The green indicator light on the will illuminate. KEY. ON / OFF key • The oven will beep for one second and will begin operating in the hold mode. • The amber hold indicator will illuminate. • The previously set hold temperature will be displayed. • A green indicator on each prog rammed Preset Key will illuminate.
C O NT ROL OPERAT I ON GE N ER AL C OOK I N G GU I DELINES: 1. PREPARE OVEN FOR COOKING A. Insert and adjust the required number of shelves inside the cooking compartment. Place the curved edge of the shelf toward the back of the oven. B. Adjust the inside door vents as indicated in the individual cooking procedure selected. C. Insert drip pan directly on the bottom surface of the oven compartment. 2. PREHEAT OVEN A. Refer to control operation to cook by probe, time, or preset program menu keys. 3.
C O NT ROL OPERAT I ON C HE F O PER AT I N G T I P S 1. For cooking specific products, refer to individual cook and hold instructions. 2. When cooking at 250°F (121°C), it takes approximately one hour for the cooking temperature to decrease to the selected holding temperature. During this one hour time period, the product will continue to cook. 3. The cooking times in this guide are based on meat taken directly from a refrigerated temperature of 38° to 40°F (3.3° to 4.4°C), and placed in a preheated oven.
C L E ANI N G & MAI N T EN AN C E CLEANING AND PREVENTIVE MAINTENANCE PROTECTING STAINLESS STEEL SURFACES It is important to guard against corrosion in the care of stainless steel surfaces. Harsh, corrosive, or inappropriate chemicals can completely destroy the protective surface layer of stainless steel. Abrasive pads, steel wool, or metal implements will abrade surfaces causing damage to this protective coating and will eventually result in areas of corrosion.
C L E AN I N G & MAI N T EN AN C E The cleanliness and appearance of this equipment will contribute considerably to operating efficiency and savory, appetizing food. There is an important relationship between cleanliness and food flavor and aroma. Good equipment that is kept clean works better and lasts longer. Under normal circumstances, this oven should provide you with long and trouble-free service.
C O OK IN G PR OCEDURE GUIDELINE INDEX COOKING GUIDE BEEF Beef Brisket 23 Beef Short Ribs 25 Beef Striploin 24 Corned Beef 73 Smoked Fresh Hams 74 Smoked Duck, Whole 76 27 Prime Rib (#109) 28 Prime Rib, Special 29 Ribeye Roll 30 Beef Round Beef Round, Cafeteria or Steamship Tenderloin Veal Loin 31 32 33 34 LAMB Lamb, Leg 35 PORK Ham, Fresh 37 Pork Loin 39 Lamb Racks ( FRENCHED ) 36 Ham, Cured & Smoked 38 Pork Ribs Pork Chops, Pork Chops, Stuffed Pork Shoulder Sausage Smo
C O O KI N G N OT ES 22.
E L E C T R O N I C OV E N C O O K I N G G U I D E L I N E S BEEF BRISKET P R O D U C T S P E C I F I C AT I O N S a n d P R E PA R AT I O N Beef Br isket, Fr esh: 9 to 1 3 lb ( 4 to 6 kg ) Season brisket and wrap individually in clear plastic wrap for cooking. Place wrapped brisket directly on wire shelves.
E L E C T RO N I C OV E N C O O K I N G G U I D E L I N E S BEEF STRIPLOIN P R O D U C T S P E C I F I C AT I O N S a n d P R E PA R AT I O N Loin, Str ip Loin, Shor t- Cut, Boneless: 8 to 1 2 lb (4 to 5 kg) Season as desired. Place roasts directly on the wire shelves with fat side down. Place larger roasts toward the top of the oven compartment.
E L E C T R O N I C OV E N C O O K I N G G U I D E L I N E S BEEF SHORT RIBS P R O D U C T S P E C I F I C AT I O N S a n d P R E PA R AT I O N Shor t Ribs: 2 to 3 lb ( 1 to 1, 3 kg ) , 1 0 - 1 2 oz. por tions Season as desired. Place ribs side-by-side in pans. For an overnight cook and hold, cover pans loosely with clear plastic wrap to retain additional product moisture.
E L E C T RO N I C OV E N C O O K I N G G U I D E L I N E S CORNED BEEF P R O D U C T S P E C I F I C AT I O N S a n d P R E PA R AT I O N Cor ned Beef: 9 to 1 2 lb ( 4 to 5 kg ) Leave the corned beef in the original plastic bag and place the corned beef bag directly on the wire shelf.
E L E C T R O N I C OV E N C O O K I N G G U I D E L I N E S HAMBURGERS P R O D U C T S P E C I F I C AT I O N S a n d P R E PA R AT I O N Ground Beef (fresh, not frozen): 5 oz (142 grams) per patty (minimum) Ground Beef, frozen: 5 oz (142 grams) per patty ( MINIMUM) Place hamburger patties side-by-side directly on sheet pans. ADDITIONAL INFORMATION: Cooking time depends on the desired degree of doneness. Check internal product temperature before removing the product from the oven.
E L E C T RO N I C OV E N C O O K I N G G U I D E L I N E S PRIME RIB P R O D U C T S P E C I F I C AT I O N S a n d P R E PA R AT I O N Beef Rib, Roa st Read y, w ith F a t Ca p, # 10 9 : 2 0 lb (9 kg) Av er age Weight Season as desired. Place roasts directly on wire shelves with the larger roasts toward the top of the oven compartment.
E L E C T R O N I C OV E N C O O K I N G G U I D E L I N E S PRIME RIB SPECIAL P R O D U C T S P E C I F I C AT I O N S a n d P R E PA R AT I O N Beef Rib, Roast Ready Special, Tied: 14 to 18 lb (6 to 8 kg) Average Weight Season as desired. Place roasts directly on wire shelves with the larger roasts toward the top of the oven compartment.
E L E C T RO N I C OV E N C O O K I N G G U I D E L I N E S RIBEYE P R O D U C T S P E C I F I C AT I O N S a n d P R E PA R AT I O N Beef Ribey e Roll, L ip On, #11 2 A : 8 to 1 2 lb ( 3 to 5 kg) Season as desired. Place roasts directly on the wire shelves, fat side down. Place larger roasts toward the top of the oven compartment.
E L E C T R O N I C OV E N C O O K I N G G U I D E L I N E S BEEF ROUND P R O D U C T S P E C I F I C AT I O N S a n d P R E PA R AT I O N Beef Round , Top ( Insid e) , Untr immed : 1 4 to 23 lb (6 to 10 kg) Beef Round , Bottom ( Goosenec k) , U ntr immed: 14 to 23 lb (6 to 10 kg) Season as desired. Place roasts directly on wire shelves with fat side down. Place larger roasts toward the top of the oven compartment.
E L E C T RO N I C OV E N C O O K I N G G U I D E L I N E S BEEF ROUND, CAFETERIA or STEAMSHIP P R O D U C T S P E C I F I C AT I O N S a n d P R E PA R AT I O N Any one of a variety of beef round used for carving on a buffet line. May be bone-in or boneless and may have a handle on or off as required. WEIGHT RANGE: 40 to 50 lb (18 to 23 kg) 50 to 80 lb (23 to 36 kg) Meat should be at a refrigerated internal temperature of 38° to 40°F (3 to 4°C) when placing in a preheated oven.
E L E C T R O N I C OV E N C O O K I N G G U I D E L I N E S TENDERLOIN P R O D U C T S P E C I F I C AT I O N S a n d P R E PA R AT I O N Beef Loin, Full Tender loin, Sid e Musc le Off, Skinned: 4 to 6 lb (2 to 3 kg) Season as desired. Place tenderloin directly on wire shelves.
E L E C T RO N I C OV E N C O O K I N G G U I D E L I N E S VEAL LOIN P R O D U C T S P E C I F I C AT I O N S a n d P R E PA R AT I O N Veal Loin, Tr immed: 8 to 1 0 lb ( 4 to 5 kg ) Season as desired and place directly on wire shelves.
E L E C T R O N I C OV E N C O O K I N G G U I D E L I N E S LAMB, LEG P R O D U C T S P E C I F I C AT I O N S a n d P R E PA R AT I O N Lamb, Leg, Boneless, Tied: 8 to 11 lb (4 to 5 kg) Season as desired and place directly on wire shelves.
E L E C T RO N I C OV E N C O O K I N G G U I D E L I N E S L A M B R AC K S ( FRENCHED) P R O D U C T S P E C I F I C AT I O N S a n d P R E PA R AT I O N Rack, Roast Ready, Single, Frenched: 7-bone Season as desired. Place racks on sheet pans with icing racks inserted in pans.
E L E C T R O N I C OV E N C O O K I N G G U I D E L I N E S HAM, FRESH P R O D U C T S P E C I F I C AT I O N S a n d P R E PA R AT I O N Por k Fr esh Ham: 1 4 to 1 7 lb ( 6 to 8 kg ) Season as desired and place directly on wire shelves.
E L E C T RO N I C OV E N C O O K I N G G U I D E L I N E S HAM, CURED AND SMOKED P R O D U C T S P E C I F I C AT I O N S a n d P R E PA R AT I O N Ham, Boneless, Skinless, Cur ed a nd Smoked: 1 0 to 14 lb (4,5 to 6 kg) Place ham directly on wire shelves for cooking.
E L E C T R O N I C OV E N C O O K I N G G U I D E L I N E S PORK LOIN P R O D U C T S P E C I F I C AT I O N S a n d P R E PA R AT I O N Por k Loin, Boneless, Tied : 8 to 1 0 lb ( 4 to 5 kg) Season as desired and place roasts directly on wire shelves for cooking.
E L E C T RO N I C OV E N C O O K I N G G U I D E L I N E S PORK RIBS P R O D U C T S P E C I F I C AT I O N S a n d P R E PA R AT I O N Spar er ibs: 1 -1 / 2 d ow n ( 3 8 kg or less) Por k Loin, Ba c k Ribs ( ba by ba ck r ibs) : 1 - 1 / 2 d ow n (38 kg or less) Ribs can be cooked from frozen or thawed. Season as desired. Place ribs on sheet pans, slightly overlapping, and cover with clear plastic wrap only if cooking overnight.
E L E C T R O N I C OV E N C O O K I N G G U I D E L I N E S PORK CHOPS P R O D U C T S P E C I F I C AT I O N S a n d P R E PA R AT I O N Pork Loin Chops: 6 to 8 oz (170 to 227 grams) approximate weight range, 1-inch to 1-1/2-inches thick (25 to 38mm) or Pork Loin Rib Chops with Pocket (STUFFED): 6 to 8 oz (170 to 227 grams), 1-inch to 1-1/2-inches thick (25 to 38mm) Season as desired. Place chops side-by-side on sheet pans.
E L E C T RO N I C OV E N C O O K I N G G U I D E L I N E S PORK SHOULDER P R O D U C T S P E C I F I C AT I O N S a n d P R E PA R AT I O N Pork Shoulder, Boston Butt, Boneless: 8 to 10 lb (4 to 5 kg) Season as desired and place in pans.
E L E C T R O N I C OV E N C O O K I N G G U I D E L I N E S S AU S AG E P R O D U C T S P E C I F I C AT I O N S a n d P R E PA R AT I O N Sausage, Fresh: Any of a variety of processed meat product including bratwurst, Polish sausage, breakfast links, smoked sausage, hot dogs, etc. Place sausage side-by-side on sheet pans. Add a sufficient amount of hot water so that it just covers the bottom of each pan. Cover each pan with clear plastic wrap.
E L E C T RO N I C OV E N C O O K I N G G U I D E L I N E S CHICKEN BREASTS P R O D U C T S P E C I F I C AT I O N S a n d P R E PA R AT I O N Chicken Breasts, Boneless: 4 to 8 oz (113 to 227 grams) Place chicken breasts on sheet pans, side-by-side, not quite touching. Brush chicken with oil, butter, or margarine (OPTIONAL), and lightly sprinkle with salt, pepper, and paprika.
E L E C T R O N I C OV E N C O O K I N G G U I D E L I N E S C H I C K E N , P I E C E S a n d H A LV E S P R O D U C T S P E C I F I C AT I O N S a n d P R E PA R AT I O N Chic ken: 2 -1 / 2 lb to 2 - 3/ 4 lb ( 1, 1 kg to 1 ,2 kg) av er age w eight Clean chicken and remove excess fat. Brush chicken with oil, butter, or margarine ( OPTIONAL ). Season as desired and sprinkle with paprika. When holding longer than 30 minutes, cover chicken with clear plastic wrap.
E L E C T RO N I C OV E N C O O K I N G G U I D E L I N E S CHICKEN, WHOLE P R O D U C T S P E C I F I C AT I O N S a n d P R E PA R AT I O N Chicken, W hole: 2 - 1 / 4 lb to 2 - 3 / 4 lb ( 1 to 1 , 2 kg) Clean chicken and remove excess fat. Brush chicken with oil, butter, or margarine ( OPTIONAL ). Season as desired and sprinkle with paprika. For better whole bird appearance, fold chicken wings and tuck under the back of the bird.
ELECTRONIC OVEN COOKING GUIDELINES CORNISH HENS P R O D U C T S P E C I F I C AT I O N S a n d P R E PA R AT I O N Rock Cornish Hens: 12 oz (340 grams) each Clean hens and remove excess fat. Fold wings and tuck under the back of the bird. Make a slit in the skin of the hen ( LOWER END OF BIRD ), cross hen legs and insert both legs through the slit. Brush hens with oil, butter, or margarine ( OPTIONAL ). Season as desired and sprinkle with paprika. Space evenly on sheet pans.
ELECTRONIC OVEN COOKING GUIDELINES DUCK, WHOLE P R O D U C T S P E C I F I C AT I O N S a n d P R E PA R AT I O N Duck, W hole: 4 to 5 lb ( 2 kg ) Season as desired. Rub with oil and paprika and place directly on wire shelves.
ELECTRONIC OVEN COOKING GUIDELINES T U R K E Y, W H O L E P R O D U C T S P E C I F I C AT I O N S a n d P R E PA R AT I O N Tur key, W hole: up to 2 5 lb ( 11 kg ) Turkey must be fully thawed. Season as desired. Rub with oil, butter or margarine ( OPTIONAL ). Place directly on wire shelves.
ELECTRONIC OVEN COOKING GUIDELINES TURKEY BREAST P R O D U C T S P E C I F I C AT I O N S a n d P R E PA R AT I O N Tur key Br ea st: 1 0 to 1 5 lb ( 5 to 7 kg ) Turkey breast should be at a refrigerated temperature of 38°F to 40°F (3°C to 4°C) when placed in a preheated oven. Season as desired. Brush with oil, butter, or margarine ( OPTIONAL ), and sprinkle with paprika. Place breasts directly on wire shelves.
ELECTRONIC OVEN COOKING GUIDELINES TURKEY ROLL P R O D U C T S P E C I F I C AT I O N S a n d P R E PA R AT I O N Tur key Roll, Pr ecooked , F r oz en: 8 to 1 2 lb (4 to 5 kg) Place fully frozen turkey rolls directly on wire shelves to reheat.
ELECTRONIC OVEN COOKING GUIDELINES FISH, BAKED P R O D U C T S P E C I F I C AT I O N S a n d P R E PA R AT I O N Fish Fillets, Fresh or Frozen: 6 to 8 oz (170 to 227 grams) Spray or coat sheet pans with oil. Place fillets side-by-side on sheet pans. Season as desired.
ELECTRONIC OVEN COOKING GUIDELINES SALMON STEAKS P R O D U C T S P E C I F I C AT I O N S a n d P R E PA R AT I O N Sa lmon Stea ks: 6 to 8 oz ( 1 70 to 2 2 7 g r a ms), 1" (25mm) thick Spray or coat sheet pans with oil, butter or margarine. Place steaks side-by-side on sheet pans. Season as desired.
ELECTRONIC OVEN COOKING GUIDELINES TROUT P R O D U C T S P E C I F I C AT I O N S a n d P R E PA R AT I O N Trout, Whole: 1 lb (454 grams) dressed Spray or coat sheet pans with oil. Wipe trout with a damp towel and place side-by-side on sheet pans. Season as desired.
ELECTRONIC OVEN COOKING GUIDELINES P O TAT O E S P R O D U C T S P E C I F I C AT I O N S a n d P R E PA R AT I O N Potatoes, Baking: 80 to 90 count A lw a y s sto re p o ta to e s a t ro o m te m p e ra ture . Wash potatoes before placing in a preheated oven. Allow oven to preheat for a minimum of 30 minutes. Place potatoes directly on wire shelves.
ELECTRONIC OVEN COOKING GUIDELINES QUICHE P R O D U C T S P E C I F I C AT I O N S a n d P R E PA R AT I O N Prebake the shells in pie plates at 275°F (135°C) for approximately 40 minutes. Pour the quiche mixture into the prebaked shells and bake in a preheated oven. Quiche is done when product sets up.
ELECTRONIC OVEN COOKING GUIDELINES RICE P R O D U C T S P E C I F I C AT I O N S a n d P R E PA R AT I O N Use converted, long-grain rice only. Follow package directions for proportional amounts of rice to liquid. Heat liquid or water to 170°F (77°C) and add rice. Fill pans to half the pan depth and cover pans with foil.
ELECTRONIC OVEN COOKING GUIDELINES B A K E D E G G C U S TA R D P R O D U C T S P E C I F I C AT I O N S a n d P R E PA R AT I O N Use a favorite custard recipe. Pour custard mixture into cups to a depth of 2/3 the container height and place cups on a sheet pan. Product volume and cook time is predicated on cup size. NO WATER BATH IS REQUIRED. Bake in a preheated oven. Custard is done when product has set or when knife inserted in center of cup is clean when removed.
ELECTRONIC OVEN COOKING GUIDELINES SHEET CAKE P R O D U C T S P E C I F I C AT I O N S a n d P R E PA R AT I O N Use a favorite cake recipe or mix. Pour batter in pans to one-half the pan depth. Keep oven door closed during the cooking cycle. The cake is done when a toothpick inserted in the center of the cake is clean when removed.
ELECTRONIC OVEN COOKING GUIDELINES CHEESE CAKE P R O D U C T S P E C I F I C AT I O N S a n d P R E PA R AT I O N Use a favorite cheese cake recipe or mix. Pour batter into springform pans and bake in a preheated oven. The cheese cake is done when a toothpick inserted in the center is clean when removed. To prevent cracking, allow the cheese cake to remain in the oven until it reaches room temperature.
ELECTRONIC OVEN COOKING GUIDELINES PRECOOKED FROZEN FINGER FOODS CHICKEN NUGGETS: CORN DOGS: EGG ROLLS: MINI PIZZA: P R O D U C T S P E C I F I C AT I O N S a n d P R E PA R AT I O N Approximately Approximately Approximately Approximately 40 30 40 12 per full-size sheet pan. per full-size sheet pan. per full-size sheet pan. to 15 per full-size sheet pan. Line sheet pans with baking pan liners (OPTIONAL) and insert wire pan grid. Place items side-by-side on the wire pan grids.
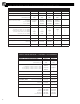
ELECTRONIC OVEN COOKING GUIDELINES F R O Z E N C O N V E N I E N C E E N T R ÉE PANS P R O D U C T S P E C I F I C AT I O N S a n d P R E PA R AT I O N PREHEAT THE OVEN. PRODUCT MUST BE FULLY FROZEN WHEN PLACED IN A PREHEATED OVEN. Leave product in the original container with foil cover in place. Pour 1/2 gallon (1 liter) of hot water into the drip pan located on the bottom surface of the oven compartment. Place containers directly on wire shelves according to the diagram shown.
ELECTRONIC OVEN COOKING GUIDELINES F R O Z E N C O N V E N I E N C E E N T R ÉE PANS P R O D U C T S P E C I F I C AT I O N S a n d P R E PA R AT I O N 750 QUANTITY HALF-PANS TIMER SETTING TOTAL HOURS 1 2 hours, 30 minutes 3 3 hours, 30 minutes 2 4 5 6 7 8 9 10 11 12 1000 SERIES QUANTITY HALF-PANS TOP VIEW 2 hours, 45 minutes 4 hours, 30 minutes 7 hours, 25 minutes 7 hours, 25 minutes 3 hours, 00 minutes 6 5 hours, 00 minutes 7 hours, 25 minutes 3 5 5 hours, 00 minutes 6 hours, 40 minu
ELECTRONIC OVEN COOKING GUIDELINES F R O Z E N C O N V E N I E N C E P O R T I O N E D E N T R ÉES P R O D U C T S P E C I F I C AT I O N S a n d P R E PA R AT I O N REHEAT THE OVEN. PRODUCT MUST BE FULLY FROZEN WHEN PLACED IN A PREHEATED OVEN. Leave product in the original container with foil cover in place. Pour 1/2 gallon (1 liter) of hot water into the drip pan located on the bottom surface of the oven compartment. Place containers directly on wire shelves according to the diagram shown.
ELECTRONIC OVEN COOKING GUIDELINES B R E A K FA S T S A N D W I C H E S P R O D U C T S P E C I F I C AT I O N S a n d P R E PA R AT I O N Thaw biscuits, croissants, or English muffins and slice horizontally. Place each ingredient on the lower half of the bread slice in the following order. 1. Sausage patty, ham slices, or precooked bacon, frozen or thawed. 2. Egg patty (OPTIONAL), frozen or thawed. 3. 1/2 oz (14 gm) slice of American processed cheese (OPTIONAL).
ELECTRONIC OVEN COOKING GUIDELINES COOKIES P R O D U C T S P E C I F I C AT I O N S a n d P R E PA R AT I O N Premixed frozen commercial cookie dough at room temperature. Premixed frozen commercial cookie dough pieces. Preheat oven at 325°F (163°C) for a minimum of one hour. Line full-size sheet pans with baking pan liners. Use a number 30 scoop to produce a 1 oz (28 gm) cookie. Evenly space portioned cookie dough on sheet pans and load all pans in the oven at one time.
ELECTRONIC OVEN COOKING GUIDELINES DOUGHNUTS P R O D U C T S P E C I F I C AT I O N S a n d P R E PA R AT I O N FROZEN PRECOOKED DOUGHNUTS Line sheet pans with baking pan liners and insert wire pan grid. Evenly space doughnuts on wire grids. Doughnuts can be heated from a thawed or fully frozen state. For more even heating, place pans with solid doughnuts toward the top of the oven compartment and doughnuts with holes toward the bottom of the compartment.
ELECTRONIC OVEN COOKING GUIDELINES DOUGH PROOFING P R O D U C T S P E C I F I C AT I O N S a n d P R E PA R AT I O N For use with dough in the form of loaves or rolls as required. Capacities shown are provided as a general guideline only and will depend on the size and shape of the selected items to be proofed. Additional wire shelves may be required for maximum capacities shown below.
PROCEDURE BLANK: E L E C T R O N I C OV E N C O O K I N G P R O D U C T S P E C I F I C AT I O N S a n d P R E PA R AT I O N MODEL OV E RN I G H T C O O K & H OL D : NUMBER OF SHELVES ITEMS PER SHELF DOOR VENTS: APPROXIMATE MAXIMUM CAPACITY F IN A L INTERNAL TEMPERATURE A F TE R OVE RRIDE PANS TO C O OK B Y P RO BE TO COOK BY TIME • Press and release control ON/OFF key. • Press and release control ON/OFF key. OV E R R I D E A L L O WA N C E : CLOSE THE OVEN DOOR .
SMOKER OP E R AT I O N C O O KI NG • SM O KI NG • HOLDING PROCEDURES 1. PREPARE UNIT FOR COOKING 2. PREHEAT OVEN A. Press power switch “ON.” A. Insert and adjust the required number of shelves inside the cooking cavity. Insert each shelf with curved edge of the shelf toward the back of the oven. B. Adjust the inside door vents as indicated in the individual cooking procedure selected. NOTE : B. Press and set “COOK” thermostat to required cooking temperature.
SMOKE R O P E RAT I O N C O OK IN G • SM OKING • HOLDING PROCEDURES HOT SM OKE 3. PREPARE PRODUCT FOR COOKING A. Refer to individual cooking instructions. 4. PREPARE WOOD CHIPS A. Take one container load of dry wood chips and soak the chips in water for 5 to 10 minutes. B. Shake excess water off wood chips. C. Remove Wood Chip Container from the interior back panel of the smoker. Place the moistened chips in the Wood Chip Container and replace the container in the oven. 5. LOAD PRODUCT ON SHELVES A.
SMOKER O P E R AT I O N COOKING • SMOKING • HOLDING PROCEDURES COLD SMOKE THE OVEN MUST BE AT ROOM TEMPERATURE BEFORE BEGINNING THE COLD SMOKE PROCEDURE. A. Press power switch “ON.” D. Insert sanitized PROBE into the product and allow temperature of probe to reach product temperature (approximately 10 seconds). E. Press PROBE KEY. B. Press HOLD KEY. • Press the up ▲ and down ▼ arrow keys to set HOLD temperature to 32°F (0°C). C.
E L E C T R O N I C S M O K I N G OV E N C O O K I N G G U I D E L I N E S SMOKED BEEF BRISKET P R O D U C T S P E C I F I C AT I O N S a n d P R E PA R AT I O N Beef Brisket, Fresh: 9 to 13 lb (4 to 6 kg) Season brisket as desired. Place brisket directly on wire shelves, fat side down. Briskets can also be wrapped in clear plastic wrap for the cooking, smoking, and holding function ( OPTIONAL ). NOTE: Due to the density of this cut of meat a smoking time of 1 hour will provide a medium smoke flavor.
E L E C T R O N I C S M O K I N G OV E N C O O K I N G G U I D E L I N E S SMOKED FRESH HAMS P R O D U C T S P E C I F I C AT I O N S a n d P R E PA R AT I O N Por k F r esh Ham: 14 to 1 7 l b ( 6 t o 8 k g ) OVERNIGHT COOK & HOLD: Op ti onal TO C OOK BY PROBE ON / OFF key. 12°F (7°C) • Insert the product probe. • Press the PROBE key. • Press the up and down arrows to set the probe temperature to148°F (64°C). • Press the HOLD key.
E L E C T R O N I C S M O K I N G OV E N C O O K I N G G U I D E L I N E S SMOKED PORK RIBS P R O D U C T S P E C I F I C AT I O N S a n d P R E PA R AT I O N Spareribs or Pork Loin, Back Ribs ( BABY 1 - 1/2 down (38 k g o r l es s ) BACK RIBS ): SHELVES PER Ribs can be cooked frozen or thawed. Season as desired. Place ribs on sheet pans, slightly overlapping, or use rib rack shelves for more even smoke penetration.
E L E C T R O N I C S M O K I N G OV E N C O O K I N G G U I D E L I N E S SMOKED DUCK, WHOLE P R O D U C T S P E C I F I C AT I O N S a n d P R E PA R AT I O N Duc k, Whole: 4 to 5 l b ( 2 k g ) MODEL 767-SK/III, 1767-SK/III 2 SHELVES Se as o n as desired. R u b w i th o i l a n d p a p r i k a. Pla c e d ucks directly on w ire s h e l v e s .
E L E C T R O N I C S M O K I N G OV E N C O O K I N G G U I D E L I N E S SMOKED TURKEY P R O D U C T S P E C I F I C AT I O N S a n d P R E PA R AT I O N Tur key Whole: 25 l b (11 k g ) Turkey must be f u l l y t h aw e d. S ea s o n a s desired. R ub with oil, b u tte r, or marg ar i n e ( O P T I O N A L ).
E L E C T R O N I C S M O K I N G OV E N C O O K I N G G U I D E L I N E S SMOKED COD P R O D U C T S P E C I F I C AT I O N S a n d P R E PA R AT I O N Ala ska n Str ip Cod * From th e to p o f th e o v e n , pan s lide po si ti on 1, 4 , a n d 7. none ITEMS PER SHELF 2 pans per shelf p os it ion 6 pans MAXIMUM WO FILL CONOD CHI TAIN P ER OVERNIGHT COOK & HOLD: No t Rec o mmended C lo sed PER COMPARTMENT CAPACITY * H ad d o ck may be sub s tit u te d.
E L E C T R O N I C S M O K I N G OV E N C O O K I N G G U I D E L I N E S SMOKED SALMON P R O D U C T S P E C I F I C AT I O N S a n d P R E PA R AT I O N Salmon, Whole: 8 t o 1 0 l b ( 4 t o 5 kg) Scale and wash fi s h th o ro u g h l y. I f d es ired, fish can be p laced in a salt b r in e a n d re f ri g er a t e d for 2 to 3 hours. P lace fish uprigh t o n s h e et pa n s . DO NOT L AY F I S H O N I TS SIDE.
E L E C T R O N I C S M O K I N G OV E N C O O K I N G G U I D E L I N E S SMOKED SHRIMP P R O D U C T S P E C I F I C AT I O N S a n d P R E PA R AT I O N Shr imp: 16 to 20 cou n t MODEL 4 SHELVES Shrimp may remain in the shell, or may be peeled and deveined. Season as desired. Place in a single layer on pan.
E L E C T R O N I C S M O K I N G OV E N C O O K I N G G U I D E L I N E S SMOKED BEANS P R O D U C T S P E C I F I C AT I O N S a n d P R E PA R AT I O N Use a favorite b e a n rec i pe . M i x i n g re dients and divide i n to six (6) full - s i ze p an s (G N 1 / 1 ). S t ir beans th oroughly before th e s e co n d s m o k e c y cle.
E L E C T R O N I C S M O K I N G OV E N C O O K I N G G U I D E L I N E S COLD SMOKED SALMON P R O D U C T S P E C I F I C AT I O N S a n d P R E PA R AT I O N Salmon Fillets, Fresh: 2-1/2 to 4 lb (1 to 2 kg) each ITEMS PER SHELF 9 fillets CAPACITY WO FILL CONOD CHI TAIN P ER n/a Closed TO S M OKE BY PROBE • Press and release control ON / OFF PAN USAGE 12" x 20" x 2-1 / 2" (GN 1/1: 530 x 325 x 65mm) FINAL INTERNAL TEMPERATURE: NOT TO EXCEED 77° F (25°C) AT END OF HOLDING PERIOD TO SMOKE BY T
E L E C T R O N I C S M O K I N G OV E N C O O K I N G G U I D E L I N E S COLD SMOKED SALMON P R O D U C T S P E C I F I C AT I O N S a n d P R E PA R AT I O N OVEN MUST BE AT ROOM TEMPERATURE BEFORE BEGINNING THE COLD SMOKE PROCEDURE. SA U M ON FU M E Fresh Salmon Fillets: 2-1/2 to 4 lb ( 1 to 2 kg) each Soak wood chips in water according to directions (5 to 10 minutes), fill wood chip container full and insert in chip holder located at the back of the oven.
F O O D H O L D I N G & S A N I TAT I O N FOOD HOLDING - FUNCTION & VALUE GENERAL HOLDING GUIDELINES In the previous sections, cooking procedures in the Halo Heat Low Temperature Cooking and Holding Oven have been emphasized. If practical to the individual food service operation, these ovens can also be used without the cooking function to hold foods at proper serving temperatures. Individual holding cabinets can also be used to accomplish this function.
F O O D H O L D I N G & S A N I TAT I O N GENERAL HOLDING CABINET OPERATION 1. PREHEAT THE HOLDING CABINET • 200°F (93°C) FOR 30 MINUTES When the thermostat is turned clockwise to an “ON” position, the red indicator light will illuminate and will remain lit as long as the unit is calling for heat. Allow a minimum of 30 minutes of preheating before loading the holding cabinet with food.
F O O D H O L D I N G & S A N I TAT I O N SANITATION and HANDLING Food flavor and aroma are usually so closely related it is difficult, if not impossible, to separate them. There is also an important, inseparable relationship between cleanliness and food flavor. Cleanliness, top operating efficiency, and appearance of equipment contribute considerably to savory, appetizing foods. Good equipment that is kept clean, works better and lasts longer.
F O O D H O L D I N G & S A N I TAT I O N FOOD SAFETY GUIDELINES Safe food handling practices to prevent foodborne illness is of critical importance to the health and safety of your customers. HACCP, an acronym for Hazard Analysis (at) Critical Control Points, is a quality control program of operating procedures to assure food integrity, quality, and safety. Taking steps necessary to augment food safety practices are both cost effective and relatively simple.
COOKING NOTES Alto-Shaam has established a twenty-four hour emergency service call center to offer immediate customer access to a local authorized service agency outside of standard business hours. The emergency s e r v i c e a c c e s s i s p rov i d e d ex cl u s i v e ly fo r Alto-Shaam equipment and is available throughout the United States through the use of Alto-Shaam's toll-free number. Emergency service access is available seven days a week including holidays. 88.
COOK/HOLD/SERVE SYSTEMS W 1 6 4 N 9 2 2 1 W a t e r S t r e e t ● P. O . B o x 4 5 0 ● M e n o m o n e e F a l l s , W i s c o n s i n 5 3 0 5 2 - 0 4 5 0 ● U . S . A . PHONE: (262)251-3800 (800)558-8744 U. S . A ./ CANADA ● FAX: (262)251-7067 (800)329-8744 U. S . A . ● www.alto-shaam.com PRINTED IN U.S.A. P R I C E : U. S . $ 1 5 .