
0 Owner manual

A D V A N C E D O P E R A T I O N
O P E R A T I O N
Q U I C K C H I LL E R • I N S TA L L AT I O N / O P E R AT I O N / S E R VI C E M A N U A L • 2 0 .
P R E S E T P R O G R A M O P E R AT I O N
1. Starting from the OFF position, press the power
key O
N
. The Alto-Shaam name will illuminate
and the SELECTION SCREEN will appear on
the display. The compressor will become
energized and will begin to operate if required
by the sensors.
2. At the SELECTION SCREEN press the
START/STOP key to access the presets.
The first five of the following preset menu
selections will appear in the display.
3. Press the up or down arrow keys to scroll
through the preset menu items.
4. When desired preset is highlighted, press
the START/STOP key.
The Quickchiller will show the values
previously programmed by the operator or
will begin chilling if the Presets are locked.
5. Press the START/STOP key again to
begin operation.
P R O G R A M M I N G P R E S E T S
1. Starting from the OFF position, press the power
key O
N
. The Alto-Shaam name will illuminate
and the SELECTION SCREEN will appear on
the display. The compressor will become
energized and will begin to operate if required
by the sensors.
2. At the SELECTION SCREEN press the
START/STOP key to access the presets.
3. Press the up or down arrow keys
until the arrow points to the preset menu
program desired.
4. Press the START/STOP key.
Press the desired mode key.
Press the up or down arrow keys to
adjust temperature. Skip to Step 6.
The display will give an
overview of the current set-
temperatures for the mode.
To change the settings for the desired
mode, press the PROGRAM key.
5. The Display will require the operator to select
between chilling by PROBE or by TIME.
Select the desired chill method (time or probe)
by pressing the right or left arrow keys.
a. If TIME was selected, use the right or
left arrow keys to highlight chill, hold, or
time, then press the up or down arrow
keys to change accordingly.
b. If PROBE was selected, select top, middle
and lower probe using right or left arrow
keys and then press the up or down arrow
keys to change accordingly.
NOTE: QC-3 and QC-20 will display only
one probe.
6. If settings are acceptable, press the
START/STOP key. The preset
settings will be saved and the operation
will begin.
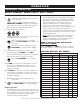
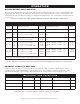
PRESET SELECTIONS
1.
Beans
11.
Pork
2.
Beef
12.
Potatoes
3.
Casserole
13.
Rice
4.
Chicken Breast
14.
Sauce
5.
Chicken Whole
15.
Sheet Cake
6.
Duck
16.
Soup
7.
Fish
17.
Stew
8.
Ground Meat
18.
Stuffing
9.
Lamb
19.
Turkey
10.
Lasagna
20.
Vegetables