User's Manual HPA6 6-Channel HEADPHONE AMPLIFIER R LTO www.altoproaudio.com Version 1.
SAFETY RELATED SYMBOLS wire or disconnect the wiring of protective grounding terminal. CAUTION Operating Conditions This apparatus shall not be exposed to dripping or splashing and that no objects filled with liquids, such as vases, shall be placed on this apparatus. To reduce the risk of fire or electric shock, do not expose this apparatus to rain or moisture. Do not use this apparatus near water. Install in accordance with the manufacturer's instructions.
Preface Dear Customer: Thanks for choosing LTO HPA6 6-Channel Headphone Amplifier and thanks for choosing the one of results of LTO AUDIO TEAM job and researches. For our LTO AUDIO TEAM, music and sound are more than a job...are first of all passion and let us say... our obsession! We have been designing professional audio products for a long time in cooperation with some of the major brands in the world in the audio field.
TABLE OF CONTENTS 1. Introduction ......................................................................................................................4 2. Feature List .......................................................................................................................4 3. Control Elements. .............................................................................................................4 3.1 The Front Panel 3.2 The Rear Panel 4. Installation & Connection .....................
1. Introduction Thank you very much for expressing your confidence in LTO products by purchasing our HPA6 6-Channel Headphone Amplifier. With the HPA6 you have acquired an extremely musical and flexible 6-Channel Headphone Amplifier. Featuring six stereo headphone amplifiers, The LTO HPA6 6-Channel Headphone Amplifier performs a number of necessary tasks, not all of which are headphone related.
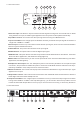
3.1 The F ront P anel INPUT LEVEL(dBu) 24 18 12 6 6 10 5 12 3 0 6 18 24 L 3 0 2 4 12 CLIP MUTE R 5 1 4 MAIN IN AUX BALANCED AUX IN R DIRECT IN 3 OUTPUT LEVEL(dBu) 12 2 LTO 11 5 1 6 0 OUTPUT GAIN HEADPHONE OUT MONO 6 0 STEREO INPUT GAIN MAIN SECTION 1 CHANNEL 1 8 2 7 4 9 1.Direct In Input: The Direct In Input is used to feed the signals coming from an external source.
13. Fuse holder / Voltage selector This is a dual voltage unit. Before you attempt to connect and operate the unit, please make sure that your local voltage matches the voltage on the fuse-holder cover. Caution: The fuse protecting the AC supplies circuits of this unit. The fuse can only be changed by a qualified technician, in the event of a fault or changing the supply voltage. If the fuse continues to blow after replacing, discontinue use of this unit before repaired.
4. Installation & C onnection 4.1 Mains Connection This is a dual voltage unit. Please ensure that the LTO HPA6 6-Channel Headphone Amplifier is set to the correct supply voltage before plugging the power cord into the wall outlet, use the same fuse as marked on the fuse holder at the AC power connection socket. Do not insert power cable into the unit until voltage has been correctly set. Do not plug the power cable into AC power until voltage has been correctly set.
Balanced TIP RING SLEEVE SLEEVE RING TIP Tip Ring Sleeve Tip Ring Sleeve 1 2 3 1 2 3 Tip Ring Sleeve 1 2 3 Tip Ring Sleeve 1 2 3 Tip 1 2 3 TIP RING SLEEVE Unbalanced TIP RING SLEEVE Sleeve TIP SLEEVE 1 2 3 Tip TIP SLEEVE TIP RING SLEEVE Centre Screen Tip Sleeve Sleeve Tip Ring Sleeve Tip Ring Sleeve Tip Centre Screen SLEEVE TIP SLEEVE RING TIP Sleeve TIP SLEEVE TIP RING SLEEVE Tip Ring Sleeve 1 2 3 Centre Screen 1 2 3 4.
In some typical fields, the Direct In Input is more preferable. For example, it is often necessary to replay a song for the performer in the stage, this can be easily and rapidly done via this Direct In jack even if in the rack installation condition.
This kind of application may be obsolete if you come with the LTO HPA6 6-Channel Headphone Amplifier. Insert the playback signal via the Main Inputs, and apply the preamplifiered vocal signal to Aux In. The Balanced Control is adjusted so that the vocalist can hear a pretty perfect mix of both backing tracks and vocals, with the Output Gain Control to determine the overall volume level.
POWER AMPLIFIER Max.output power Min.output impedance Max.
7. WARRANTY 1. WARRANTY REGISTRATION CARD To obtain Warranty Service, the buyer should first fill out and return the enclosed Warranty Registration Card within 10 days of the Purchase Date. All the information presented in this Warranty Registration Card gives the manufacturer a better understanding of the sales status, so as to purport a more effective and efficient after-sales warranty service.