
User`s manual

12 LOW
Turn this control up, all the frequencies
below 80 Hz will be boosted. You will give
more punch to bass drum and bass guitar
and make the vocalist more "macho". Turn
it down, the frequencies will be attenuated.
In this way, you can avoid low-frequency
vibrations and resonance thus preserving
the life of your woofers.
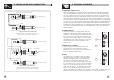
13 AUX SENDS Level Control
These four controls are used to adjust the
level of the respective signal sent to AUX
bus, AUX1 and AUX2 can be switched to
PRE/POST-FADER via the PRE/POST button,
so, generally, they can be used for monitor
application and effects & sound processors
input. AUX3 and AUX4 are configured as
POST-Faders. In this typical compact unit,
excluding sending out the signal directly
to the external effect or processor
equipment, AUX SEND4 can also be
assigned to the internal onboard effect
module.
14 PAN/BAL Control
Abbreviation of PANORAMA control for mono
channels, or the stereo channels, always
says, BALANCE control. Keep this control
in center position, then the signal will be
positioned in the middle of stage.
7
SPOTLIGHT
4. CONTROL ELEMENTS
Inside your LYNX-MIX244 mixer, the audio signal is monitored in several different
stages and then sent to the PEAK LED. When the LED is red illuminated, it warns
you that you are reaching signal saturation and possible distortion, then you
should reduce the input level for avoiding distortion.
15 PEAK LED
14
Ok, you have got to this point and you are now in the position to successfully
operate your LYNX-MIX244. However, we advise you to read the following
section carefully to be the real master of your own mix. Not paying enough
attention to the input signal level, the routing of the signal and the assignment
of the signal will result in unwanted distortion, a corrupted signal or no sound
at all. So you should follow this procedure for every single channel:
1. Turn down all Input and output gain controls.
2. Connect phantom powered microphones before switching on the +48 Volt
phantom power switch.
3. Set the output level of your LYNX-MIX244 mixer or the connected power
amplifier at no more than 75%.
5. Position EQ controls on middle position.
6. Position panoramic (PAN/BAL) control on center position.
8. Increase the input gain properly for maintaining the good headroom and ideal
dynamic range.
9. Depending on the actual application, turn slowly the input and output level
controls for obtaining the maximum gain before distortion.
10. Now repeat the same sequence for all input channels. The main LED meter
could move up into the red section. In this case you can adjust the overall
output level through the main mix control.
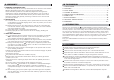
You can connect unbalanced equipment to balanced inputs and outputs. Simply
follow these schematics.
Audio Connections
5. INSTALLATION AND CONNECTION
4. Now, set the CONTROL ROOM/PHONES level at no more than 50%. In this way,
you will be able to hear later what you are doing connecting a pair of headphones
or a pair of powered studio monitor speakers.
7. With a pair of headphone or studio monitor speakers are connected, apply a Line
Level input signal so that the PEAK LED does not light up.
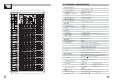
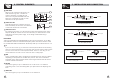
Strain Clamp
Sleeve
Tip
Ring
Sleeve=Ground/Screen
Ring=Right Signal
Tip=Left Signal
Use for Headphone
1/4" Stereo (TRS) Jack Plug
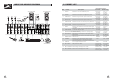
17
8
10
12
13
15
18
10
dB
-5
-10
-20
-25
-30
-40
-60
0
5
10
dB
-5
-10
-20
-25
-30
-40
-60
0
5
SUB 1-2SUB 1-2
SUB 3-4SUB 3-4
MAIN L-RMAIN L-R
SOLO
SOLO
16 17/18
FREQ
MID
-15 +15
PAN
RIGHT
LEFT
3
DFX1
(EXT)
-
+15
8
(INT)
DFX2
-
+15
8
4
-
+15
8
PRE
1
AUX
-
+15
8
2
POST
80Hz
LOW
-15 +15
800
100Hz
8KHz
EQ
HI
12kHz
-15 +15
-15 +15
BAL
RIGHT
LEFT
3
DFX1
(EXT)
-
+15
8
(INT)
DFX2
-
+15
8
4
-
+15
8
PRE
1
AUX
-
+15
8
2
POST
80Hz
LOW
-15 +15
EQ
HI
12kHz
-15 +15
HI-MID
3kHz
500Hz
MID-LOW
-15 +15
9
11
14
16
Each channel is equipped with a MUTE button. Pressing this button is equal
to turning the fader down, which can mute the corresponding channel output
except for the channel INSERT send and SOLO (in PFL mode). And the MUTE
LED will illuminate.
16 MUTE Button & LED