Contents 1 2 3 4 5 Introduction ................................................................................................................................5 1.1 Overview .............................................................................................................................5 1.2 Features ...............................................................................................................................6 1.3 Before you begin...........................................
5.1.5 Digital Mixer Outputs ................................................................................................41 5.1.6 Physical Outputs .......................................................................................................41 5.2 Sample Clock Generator................................................................................................42 5.2.1 Sample Clock Sources .............................................................................................42 5.2.
13 14 License Agreement ............................................................................................................ 80 Warranty Information .........................................................................................................
0BIntroduction 1 Introduction Thank you for choosing the Lynx AES16™ PCI audio interface. The AES16 has been designed to provide you with the highest quality professional audio performance available, offering unequalled AES/EBU channel capacity and routing flexibility. Even if you’re an experienced audio professional, please take a few moments to read through this users’ manual.
0BIntroduction 1.
0BIntroduction 1.4 In the box The following items are included in your AES16 carton: ¾ ¾ ¾ ¾ ¾ If any items are missing or damaged, please contact your dealer or Lynx at http://www.lynxstudio.com. AES16 PCI card in cushioned antistatic bag Two AES16 cables (CBL-AES1604 six-foot cable with 8 XLR connectors. Included with models AES-16XLR and AES16-SRC only.) Lynx Installation CD containing current drivers and this manual Warranty registration card Quick Start Guide 1.
1BInstallation Procedures 2 Installation Procedures The procedure for installing the AES16 requires that you physically install the AES16 card inside your computer before running the AES16 Setup Program. The Setup Program will install the required driver files and the Lynx mixer application, as well as configure your system to recognize the AES16. 2.1 AES16 Hardware Installation 1. Turn OFF the power to your computer system and disconnect the power cords. 2.
1BInstallation Procedures 2.2.2 Installing the Windows Version 2 Driver Package 1. When you start Windows after installing the AES16 into your computer, the New Hardware Wizard will appear. Select “Install from a list or specific location” and click “Next >” to proceed. (NOTE: In Windows 2000, click “Next>” on the New Hardware Wizard welcome screen, on the Install Hardware Device Driver dialog box, choose “Display a list of the known drivers for this device” and click “Next>”) 2.
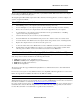
1BInstallation Procedures 2.2.3 Uninstalling the AES16 Windows Version 2 Driver Package 1. From the start menu, click on “Control Panel.” (NOTE: In Windows 2000 click on Settings> Control Panel.) 2. Click “System” to launch System Properties: 3.
1BInstallation Procedures 4. Expand the “Sound, video and game controllers” section of device manager be clicking its + sign: 5. Right click on “Lynx AES16” and choose “Uninstall” 6. Confirm device removal by clicking “OK”. (Note: In Windows 2000, click “Yes” when prompted to restart your computer.) 7.
1BInstallation Procedures 2.2.4 Updating an existing WDM driver: Navigate your web browser to: http://www.lynxstudio.com/download.html. Scroll to the WDM driver section and click on the appropriate file to download. 1. Double-click the downloaded file to decompress, and accept the default destination folder of C:\Lynx. 2. Click “Yes to All” when prompted to confirm the files to be replaced. 3. From the start menu, click on “Control Panel.” (NOTE: In Windows 2000 click on “Settings > Control Panel.
1BInstallation Procedures 4. Click “System” to launch System Properties. 5. Choose “Device Manager” from the “Hardware” tab. 6. Expand the “Sound, video and game controllers” section of device manager be clicking its + sign.
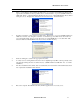
1BInstallation Procedures 7. Double click the “LynxAES16” entry to launch the LynxAES16 Properties dialog box. Click the “Driver” tab, then click “Update Driver…”. 8. When the Hardware Update Wizard box appears, choose “Install from a list or specific location (Advanced)” and click “Next>.” (NOTE: In Windows 2000 click “Next>” on the Hardware Upgrade Wizard welcome screen.) 9. From the next window, select "Don’t search, I will choose the driver to install”. Click "Next >" to proceed.
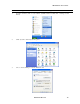
1BInstallation Procedures 11. Next, you’ll be asked to insert the manufacturer’s installation disk into the drive selected (the default is A:\) – type “C:\Lynx” in the text box, and click “OK”. 12. You will be prompted to select the device driver you are installing. “Lynx AES16” will be your only choice. Select it and click “Next>”. (NOTE: In Windows 2000, choose AES16 from the list, then click “Next>”. Click “Next>” on the subsequent confirmation window as well). 13.
1BInstallation Procedures 15. Next, we need to update the Lynx Mixer. From the Start Menu, choose “My Computer.” (NOTE: In Windows 2000 click the “My Computer” icon on the desktop.) 16. Double-click on the C: Hard Drive and look for the “Lynx” Folder. Double Click the folder to open it. 17. Right Click on the LynxApps file and click “Install” 18. The new Lynx Version 2 Driver Package is now ready to use.
1BInstallation Procedures 2.3 Macintosh OS X 2.3.1 OS X Installation Files The Lynx Installation CD contains all firmware and driver files mentioned in the subsequent installation steps, as well as the AES16 mixer, manual, driver release notes and test files. If you do not have a CDROM drive or need a more recent version, these files are available on our website at http://www.lynxstudio.com. 2.3.
1BInstallation Procedures 6. In a few moments, the “Lynx Two Firmware Update” dialog box should appear. Confirm that the correct Lynx Card model appears under “Model” (please note: pictured below is the SRC version), and also confirm that the Firmware Version and New Firmware Versions are NOT the same. While the number “14” is seen on both the Firmware Version and New Firmware Version, the “W”:is for Windows and the “M” is for Macintosh. 7.
1BInstallation Procedures 2.3.3 Install the AES16 Device Driver and Mixer 1. Locate the file LynxTWO_OSX.sit on the AES16 Installation CD and drag the file onto the computer desktop, or download the latest OS X driver file from http://www.lynxstudio.com/download.html to the computer desktop. 2. Double-click on the LynxTWO_OSX.sit file to launch the Stuffit Expander.
1BInstallation Procedures 7. Click “Install” on the next dialog box that appears. 8. Enter your password in the Authenticate dialog box and click OK. 9. Click “Continue Installation” in the next dialog box that appears. 10. When the install is complete, you will be prompted to restart the computer. NOTE: The OS X installation process installs both the Core Audio driver and the Lynx Mixer application. The Lynx Mixer application is installed in the “Applications” folder.
1BInstallation Procedures 2.3.4 Uninstalling the LynxTWO/L22/AES16 Device Driver and Mixer To uninstall the driver, you will have to use a third-party uninstaller like DesInstaller, which you can get from: http://www.macfixit.com/library/osxu.shtml. Follow the uninstaller’s instructions to remove the LynxTWO_OSX.pkg. 2.3.
1BInstallation Procedures 2.4 Macintosh OS 9 2.4.1 Insert AES16 Installation CD in CD ROM Drive and Start Computer The Installation CD contains all firmware and driver files mentioned in the subsequent installation steps, as well as the AES16 manual, driver release notes and test files. If you do not have a CDROM drive or need a more recent version, these files are available online at http://www.lynxstudio.com/download.html. 2.4.
1BInstallation Procedures 7. When the update is complete, you will be prompted to power off the computer. 8. After shutting down, wait for at least 10 seconds, and then power the computer back on. 2.4.3 Installing the OS9 ASIO Driver and Mixer 1. Locate the file LynxTWO_OS9.sit file on the AES16 Installation CD and drag the file onto the computer desktop, or download the latest OS9 driver file from http://www.lynxstudio.com/download.html to the computer desktop. 2.
2BHardware Connections 3 Hardware Connections 3.1 Overview The AES16 includes eight AES/EBU compatible inputs and outputs that provide sixteen channels of digital audio I/O. These signals are available on two bracket-mounted 26-pin high-density D connectors, labeled I/O Port A and I/O Port B as shown in Figure 1 below.
2BHardware Connections 3.2 AES/EBU Cable Connections To minimize cabling issues, a variety of breakout cables are available for the AES16. The CBL-AES1604 cable, which is included with the AES16-XLR and AES16-SRC products, provides standard XLR connectors. The CBLAES1603 and CBL-AES1605 are optional cables that provide 25-pin D-Sub connectors compatible with industry standard multi-channel digital equipment connectors. The following table describes these cables and their application.
2BHardware Connections 3.2.2 Connections to Equipment with 25-Pin AES/EBU D-Sub Connectors The CBL-AES1603 and CBL-AES1605 breakout cables are provide 25-pin D-sub connections for industry standard equipment. Refer to the table in Section 3.2 AES/EBU Cable Connections for equipment compatibility information. Connect the 26-pin high-density connecter on each cable to I/O Ports A and B. Connect the 25-pin D-sub connector on each cable to the external device.
2BHardware Connections 3.3.2 Internal Clocking and Multi-card Systems Clock connections to internal equipment are provided via the header CLOCK IN and CLOCK OUT connectors on the AES16 board. Refer to Figure 1 for the location of these connectors. The connectors support 75-ohm, TTL level signals. If you are connecting to another Lynx digital audio card, the Lynx Internal Clock Cable (CBL-ICC) or Universal Clock Cable (CBL-UCC) should be used.
2BHardware Connections 3.4 Common Studio Setups This section describes typical studio setups using the AES16. 3.4.1 External A/D and D/A with Word Clock The figure below illustrates the connection of an eight-channel A/D converter and an eight-channel D/A converter to I/O Port A of the AES16. This setup uses only half of the available I/O on the AES16. Additional converters can be connected to I/O Port B to provide up to 16 channels of A/D and D/A conversion.
2BHardware Connections 3.4.2 Digital Mixer The figure below illustrates the connection to a digital mixer that has 16 channels of AES/EBU digital I/O. The DSub ports on the mixer must be compatible with the Yamaha multi-channel digital I/O standard. Each of these ports provides eight channels of input and eight channels of output. In this setup, either the digital mixer or AES16 can act as the system clock master depending on the clock settings of each device.
2BHardware Connections 3.4.3 Combined Use of XLR and DB25 Cable sets The figure below illustrates a “mixed mode” configuration, where the AES16 is connected to an Apogee AD16X 16-channel Analog-to-Digital converter and to some other 8-channel Digital-to-Analog converter. This represents a unique situation, in that the AD16X will utilize all 16 available input channels while connected to a single I/O port of the AES16, while only 8 output channels will be available to the D/A converter.
2BHardware Connections Change the clock setting on the AD16X to word clock in. This will force the AD16X to slave to the word clock from the AES16. Change the clock setting on the D/A converter to select one of its AES/EBU inputs as the clock source. Alternatively, if a word clock is connected to the D/A, set the clock source appropriately. Additional Setups with Apogee Converters It is also possible for the AD16X to be the system clock master for the AES16 and D/A converter.
3BGetting Started 4 Getting Started With the AES16 and its drivers properly installed in your computer, you can begin to use its capabilities with most popular third party audio applications. In order for these applications to access the AES16 you must select one of the AES16 audio devices in the application’s audio device configuration menu. Refer to Section 8 Working with Third Party Applications for more information. The following sections provide instructions for testing your installation. 4.
3BGetting Started 7. Choose “Restore Defaults” from the Mixer menu. This will insure that the sample clock source is set to Internal, that the output levels are at maximum, and that no channels are muted. 8. Launch the Lynx Demo application by double-clicking the Demo32.exe file. The Lynx Demo program should appear in the upper left corner of your screen. Make certain that the Play Device is set to Lynx AES16 Play 1. 9. Click “File” and navigate to the computer’s Desktop, then select “SineWaveMinus16.
3BGetting Started 11. Check the Lynx Output mixer and confirm meter activity for Digital Out 1L and Digital Out 1R. If you have speakers or headphones connected to your destination device, you should hear audio as well as seeing meter activity. If the test did not operate as described or you received any errors, please refer to Section 10 Troubleshooting.
3BGetting Started 4.2 Macintosh OS X Quick Audio Test The installation of your AES16 can be tested using the LynxTWO Mixer and the Demo version of Bias Peak that was included on your AES16 Installation CD. This is a quick way of verifying that the AES16 card is installed correctly and is connected correctly to your external equipment. 1. Install the Bias Peak demo that is included on the AES16 installation CD, by clicking on the peakTrial.sit file and following the installation instructions. 2.
3BGetting Started 8. Click “Hardware Settings…” from the Audio menu. Verify that the AES16 appears as the Output device. Click “OK”. 9. Click “Play” from the Peak transport. You should see meter activity and the counter progressing. 10. Check the Lynx Output mixer and confirm meter activity for Digital Out 1L and Digital Out 1R. If you have speakers or headphones connected to your destination device, you should also hear audio and see meter activity.
3BGetting Started 4.3 Macintosh OS9 Quick Audio Test The installation of your AES16 can be tested using the Demo version of Bias Peak that was included on your AES16 Installation CD. This is a quick way of verifying that the AES16 card is installed correctly and is connected correctly to your external equipment. 1. Install the Bias Peak demo that is included on the AES16 installation CD, by clicking on the peakTrial.sit file and following the installation instructions. 2. Locate “SineWaveMinus16.
3BGetting Started 6. Click “Hardware Settings…” from the Audio menu. This should launch the LynxTWO ASIO Control Panel. Verify that the Sample Clock Source is set to “Internal”. Click “Close”. 7. Click the keyboard spacebar to begin playback of the “SineWaveMinus16.aif” audio file in Peak. You should see the cursor scroll from left to right. If you have speakers or headphones connected to your destination device, you should hear audio and see meter activity.
4BOperational Overview 5 Operational Overview 5.1 Signal Flow As shown in the signal flow diagram below, the AES16 with its on-board digital mixer provides extensive signal routing capabilities that can adapt to any studio requirement. The mixer is implemented using a proprietary digital signal processor (DSP) that is optimized to maintain low latency and high signal quality.
4BOperational Overview 5.1.1 Physical Inputs Starting from the digital inputs in the upper right portion of Figure 4, each AES-3 input signal is routed through a transformer for isolation before arriving at an AES-3 receiver. The receiver extracts a word clock, using a low jitter phaselocked loop, and signal data that is passed to the Input Bus of digital mixer.
4BOperational Overview 5.1.5 Digital Mixer Outputs The 16 output signals of the digital mixer are derived from 16 four-input submixers. The Record Bus and Play Bus feed the submixer inputs, which each have an associated selector (labeled Monitor Select in the diagram) and volume control. The submixers use 40-bit accumulators to maintain signal accuracy. The output of the submixers are dithered to 24-bits using triangular PDF dither and then measured for peak level metering in the Lynx Mixer application.
4BOperational Overview 5.2 Sample Clock Generator The AES16 utilizes a master sample clock generator to derive all clocks related to the digital audio sampling rate. As shown in Figure 5 below, the sample clock generator provides a selection of various clocks sources ands both a wide range and SynchroLock phase-lock loop (PLL).
4BOperational Overview 5.3 SynchroLock™ The AES16 incorporates SynchroLock clock synchronization technology to provide extreme tolerance to noisy external AES/EBU and word clock signals while generating an ultra-low jitter clock. This technology is especially useful for combating noise induced on cables in complex studio installations. SynchroLock provides clock synchronization while insuring bit-perfect digital transmission.
5BLynx Mixer Reference 6 Lynx Mixer Reference The Lynx Mixer, which is installed during setup, provides software control of the features of the AES16 and a visual indication of audio signal level during recording and playback. It can be 6.1.1 used dynamically to change operational settings of the AES16, but in most cases once the settings are configured for a particular studio installation they require no further adjustment.
Lynx Mixer Reference 6.2 Adapter Window q Sample Clock Section This section of the mixer provides control of the system sample clock generator. All AES16 audio devices on a single card MUST have identical sample rates since there is one on-board generator. Sample rates cannot be changed while AES16 is playing or recording.
Lynx Mixer Reference Rate Displays the current sample rate of the AES16. When the AES16 is being used for recording or playback by an application, the rate shown is the rate set by the application. Applications are always the “master” in terms of setting the sample clock rate of the card. The rate can also be adjusted manually using the adjacent pull down control. The rate will change only is the card is idle (not recording and playing).
Lynx Mixer Reference troubleshooting. Note: the measured rates of the AES/EBU inputs are available in the Digital Inputs section of the Adapter Window.
Lynx Mixer Reference Type This indicator represents the type of data stream being transmitted by the external device. The external device indicates type using specific bits in the channel status data. Typically PCM types are shown with green background and non-PCM types, such as Dolby AC3, have a yellow background.
Lynx Mixer Reference SRC Enable This checkbox will only appear when using an AES16-SRC. This checkbox controls the state of the sample rate converter for a specific digital input. When checked, the incoming signal is routed through the sample rate converter so the sample rate will match the currently selected sample rate of the AES16-SRC. For example, when the device connected to Digital In 5 is running at 48 kHz, the AES16-SRC is running at 44.
Lynx Mixer Reference 6.3 Record/Play Window t Input Source Select Buttons These buttons control the patching of physical inputs to record device channels of the digital mixer. Each device channel can derive its source from any one of the 32 available inputs, which include 16 from I/O Port A and B and 16 from the LStream port. The button on the left side of each record device panel corresponds to the left channel of the device.
Lynx Mixer Reference u Mute This button enables the mute function for the associated input. i Dither This button enables dithering for the associated input. The Record Dither Type control in the Settings menu determines the type of dither applied to the input. Dither is useful for improving signal fidelity when reducing the bit depth of incoming data from 24 bits to 20, 16, or 8 bits. o Depth This control sets the bit depth used for recording on each input.
Lynx Mixer Reference 1$ Play Sample Format This status indicator represents the sample format of a play device. The format, which is set by an application accessing the device, determines the format of the data sent from the host computer to the play device. The sample format indicates bit depth and mono or stereo mode. In the case of 32 bit formats, the lower eight bits are set to zero.
Lynx Mixer Reference 6.4 Outputs Window 1^ Output Monitor Source Buttons These buttons control the routing of record and playback sources that feed each of the 16 output channels. Since each output is derived from the sum of the four sources, each button controls the selection of one of the sources. When a button is clicked, a pop-up menu is launched that displays the available sources that can be selected.
Lynx Mixer Reference 1* Volume Faders Theses faders provide digital attenuation of the output signal prior to D/A conversion. With the volume fader at its maximum position, the vertical line within the fader turns black, to indicate zero attenuation. In this case the audio stream is unaltered. This is the recommended position for critical recording and mixdown sessions in which the highest signal quality is required.
Lynx Mixer Reference 6.5 Mixer Menu The Mixer menu, located at the top left of the screen, allows selection of global mixer functions. 2@ Restore Defaults This option restores all user-selectable parameters to factory default settings. This feature should be used as a first step when mixer settings issues are encountered. 2# Mixer Scene This feature provides the ability to save and recall all user-selectable parameters.
Lynx Mixer Reference 2$ About Lynx Mixer PLEASE NOTE: The About Lynx Mixer window will display different information than what is shown here. This option displays information about the Lynx Mixer, driver, and firmware as follows: Mixer/Driver Version: Displays the current driver version and build number. Build Date: Displays the date the driver and mixer were released. Adapter Name: Displays the name of the Lynx audio adapter installed. Up to four Lynx audio adapters may be shown.
Lynx Mixer Reference 6.6 Settings Menu The Settings Menu offers access to advanced settings and an alternative method of accessing commonly used functions that appear in the Adapter Window. 2^ Always on Top When this option is checked, the Lynx Mixer window stays on top of other active windows. 2& High Resolution Clock Rates When checked, this option enables the display of measured clock rates with 1-hertz resolution. Otherwise, rates are displayed with 100-hertz resolution.
Lynx Mixer Reference 3) Sample Clock Reference This menu selection replicates the Sample Clock Reference selection on the Adapter window (see Section 6.2 Adapter Window), for added convenience. In some situations it may be preferable to access this parameter via this menu. 3! Record Dither Type This option provides selection of the type of dither used on all record channels. The following options are available: None - Dither is disabled. Volume processing utilizes rounding prior to truncation.
6BUsing the AES16 7 Using the AES16 This section describes how to perform common tasks with AES16. Additional information is available in the Frequently Asked Questions (FAQ) section on the Lynx web site (http://www.lynxstudio.com). 7.1 Mixer Scene Storage and Recall Once you have configured the mixer’s routing and other parameters, you may save that configuration in memory as a mixer “Scene.” Saved scenes may be recalled to quickly reconfigure the mixer.
6BUsing the AES16 7.2.1 Monitoring Theory Low latency monitoring can be enabled using the AES16’s on-board digital mixer. This method avoids delays caused be monitoring through application software. The digital mixer can be setup manually using the Lynx Mixer application or within applications that support direct monitoring.
6BUsing the AES16 7.2.3 Using Direct Monitoring in an ASIO Application The Direct Monitoring (sometimes referred to as “hardware monitoring”) feature offered in many popular third party applications provides a means to enable low-latency monitoring supported by the AES16’s on-board digital mixer. Instead of using the Lynx Mixer to manually enable monitoring as discussed in the previous section, controls within the application provide convenient access to this functionality.
6BUsing the AES16 Click the speaker icon in the Cubase 2/Nuendo 2 Mixer window to enable Direct Monitoring. Click the speaker icon in Samplitude/Sequoia to enable Direct Monitoring. 7.3 Playback Routing and Mixing In addition to standard monitoring of inputs through physical outputs, the Lynx mixer is capable of sophisticated routing and mixing of playback and record sources.
6BUsing the AES16 Selecting Play 2 (P2L and P2R) in the next set of Monitor Source Buttons down, and unmuting this source, allows you to monitor audio from Play 1 and Play 2 out of Digital Out 1 at the same time. If one application or playback stream is assigned to Play 1, and another to Play 2, you would hear audio from both out of Digital Out 1. You can adjust the relative level of these two sources with the volume slider directly underneath each Monitor Source Button.
6BUsing the AES16 7.5 AES/EBU Dual-wire operation The AES16 supports dual-wire AES/EBU operation in which each physical input or output connection passes a single channel AES/EBU signal running at half the system sample rate. This capability provides compatibility with legacy devices that do not support single-wire AES running at sample rates greater than 50kHz.
6BUsing the AES16 7.7 Bus Mastering The AES16 hardware incorporates PCI Bus Mastering, which greatly improves bus transfer efficiency without utilizing CPU cycles. With this feature enabled, an application can typically run with smaller buffers, which translates to lower latency. This feature is enabled by default in the driver. It should only be disabled if absolutely necessary in order to accommodate PCI bus conflicts with other devices. 7.
Working with Third Party Applications 8 Working with Third Party Applications 8.1 Compatibility The drivers included with your AES16 provide compatibility with all standard third party digital audio applications that communicate with Windows Wave audio, DirectSound, Audio Units and ASIO devices. A list of applications that have been tested for compatibility is provided on the Lynx web site at http://www.lynxstudio.com/swlist.html. 8.
Working with Third Party Applications 8.3 Controlling Audio Bit Depth The creation of an audio file with a particular bit depth (or resolution) is controlled through an application’s recording settings. These settings are typically adjusted in an audio device configuration menu or in a recording setup window just prior to recording. When recording is initiated the AES16 will generate audio samples of the desired resolution. Bit depth control during playback of an audio file is also an application issue.
8BConfiguring Multiple AES16’s 9 Configuring Multiple AES16’s More than one AES16 card can be installed in a computer for additional audio channels. If required, all AES16’s in a computer can be configured to maintain sample accurate synchronization during digital audio recording and playback. Cards are synchronized in a master-slave arrangement. One card is selected as the master, which provides the word clock source for the other slave cards in the system.
8BConfiguring Multiple AES16’s 9.2 Adapter ID’s When multiple AES16 cards are installed in a computer they are automatically assigned unique adapter ID numbers. These adapter ID’s provide a means to identify and communicate with each AES16 when using the Lynx Mixer application and to select audio devices in third party applications. In the Lynx Mixer, the adapter that a user wishes to control is selected from the “Window” pulldown menu.
8BConfiguring Multiple AES16’s 9.4 Mixer settings With the clock connections in place, the sample clock settings of each AES16 must be adjusted using the Lynx Mixer. For each slave AES16: For the master AES16: ¾ ¾ ¾ ¾ Select the master AES16 Adapter window of the Lynx Mixer. Select a desired Sample Clock Source. Select a desired Sample Clock Reference. ¾ ¾ Select the master AES16 Adapter window of the Lynx Mixer.
9BTroubleshooting 10 Troubleshooting Clicking, popping or crackling noises in your audio: 1. Check clock master settings. In any digital audio configuration, there can be one, and only one master clock. All other digital audio devices must be configured as slaves to the designated master clock. Since the AES16’s SynchroLock™ technology provides an extremely stable and jitter-resistant clock, we recommend setting the AES16 as the master clock in your digital audio system. 2.
10BSupport 11 Support We are devoted to making your experience with AES16 trouble-free and productive. If you have questions or comments regarding the operation of your AES16 please check the “Troubleshooting” section of this manual and the FAQ and Troubleshooting topics on the Support section of the Lynx web site at: http://www.lynxstudio.com/support.html 11.1 Contact us If you are unable to find information about your problem please send us a support request by filling out the form at: http://www.
11BAppendices 12 Appendices 12.1 I/O Configuration Jumpers I/O Port A and I/O Port B can be configured to support two different I/O routing modes. The routing mode is selected by the position of two 8-position I/O Configuration Jumpers on headers JP5 and JP6. The mode selected must be compatible with the AES16 breakout cable being used.
11BAppendices For connections to equipment with D25 connectors supporting eight channels of input or eight channels of output, the I/O Configuration Jumpers should be set to the 8 CHNL position on JP5 and JP6 as shown below. In this position, I/O Port A provides eight AES/EBU inputs and I/O Port B provides eight AES/EBU outputs. This is the required position for CBL-AES1603.
11BAppendices 12.2 Specifications DIGITAL I/O Number / Type Channels Sample Rates Sample Rate Conversion ARCHITECTURE Core Audio Devices CLOCKING Sources SynchroLock Eight inputs and eight outputs, 24-bit AES/EBU format, transformer coupled 16 in/out in single-wire mode, 8 in/out in dual-wire mode All standard rates and variable rates up to 192 kHz in both single wire and dual-wire modes Eight channels available with support for conversion ratios up to 16:1. Dynamic range: 142 dB.
11BAppendices CABLES Included with AES16-XLR and AES16-SRC Optional cables for AES16 Standard Model CBL-AES1604 (qty 2): 26-pin high-density male D-sub to four female XLR’s (AES inputs), four male XLR’s (AES outputs), and two female BNC’s (word clock I/O). Six- foot, 110-ohm shielded twisted pair cabling. CBL-AES1603: 26-pin high-density male D-sub to 25-pin male D-sub. Supports either 8 channels of input or output. Compatible with Apogee AD16 and DA16. Twelve-foot, 110-ohm shielded twisted pair cabling.
11BAppendices 12.3 Updating From the AES16 Standard NT4 Driver If updating from the standard NT4 driver, you will need to uninstall the NT4 driver before you can load the WDM driver. • From the start menu, click on “Lynx Studio Technology”, and then click “Uninstall LynxTWO”. • Choose “Uninstall” from the next screen that appears. • Restart the machine when prompted. You can now install the Version 2/WDM driver per instructions in Section 2.
11BAppendices 12.4 Safety instructions This equipment has been tested and found to comply with the limits for a class B digital device, pursuant to part 15 of the FCC Rules. These limits are designed to provide reasonable protection against harmful interference in a residential installation. This equipment generates, uses and can radiate radio frequency energy and if not installed and used in accordance with the instructions, may cause harmful interference to radio communications.
11BAppendices 12.5 EMC Certifications 12.5.1 FCC DECLARATION OF CONFORMITY TRADE NAME: MODEL NUMBER: COMPLIANCE TEST REPORT NUMBER: COMPLIANCE TEST REPORT DATE: RESPONSIBLE PARTY (IN USA): ADDRESS: TELEPHONE: Computer Audio Card AES16 Covered by European Standards Report #B30915V1 November 2, 2003 Lynx Studio Technology, Inc.
12BLicense Agreement 13 License Agreement This legal document is an agreement between you and Lynx Studio Technology, Inc. By opening the sealed board package, or written materials, you are agreeing to become bound by the terms of the agreement, which includes this License and Limited Warranty (collectively the “Agreement”). This Agreement constitutes the complete agreement between you and Lynx Studio Technology, Inc.
13BWarranty Information 14 Warranty Information Lynx Studio Technology, Inc. (“Lynx”) warrants this product to be free of defects in material and workmanship for a period of one year from the date of original retail purchase. This warranty is enforceable only by the original retail purchaser. To be protected by this warranty, the purchaser must complete and return the enclosed warranty card within 14 days of purchase.