
User`s manual


USER’S MANUAL
Kaleido-ALTO/QUAD | 3
3 Getting Started with the Kaleido-Alto/Quad
3.1 Quick Tour of the System
Once the Kaleido-Alto/Quad is properly set up and powered, it provides immediately a multi-image output.
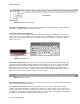
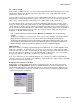
A default layout is used to monitor the incoming feeds. Figure 3.1 below shows the principal features of a
layout .
Figure 3.1 Kaleido-Alto layout
The first thing that you notice is the visual elements: there are several windows with UMD information
underneath, VU meters, clock, tallies, even countdown timers (not shown in this figure). All these
elements may be configured to suit your monitoring preferences, as explained in the following sections.
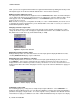
In addition, when the mouse is moved toward the bottom of the screen, a toolbar appears, with buttons
and icons. The layout buttons are used to quickly change the layout being displayed. The K-Alto or K-
Quad button gives access to different system-level parameters, and the icon buttons are tools to
customize the windows and layouts. When using a Kaleido-RCP, the buttons of the remote panel allow
much of the same control and flexibility as if you were accessing the task bar with a mouse.
3.2 The Toolbar
Just like a PC computer, moving the mouse toward the bottom of the screen calls up the toolbar. This bar
is composed of buttons, detailed in the image below.