
Specifications


IMPORTANT!
CARE AND MAINTENANCE
☞ Never expose the mixer to heat sources such as radiators or other
products that produce heat.
☞ Never expose the mixer to direct sunlight, excessive vibrations or
mechanical shocks.
☞ Avoid operating and storing the mixer in damp or dusty places:
this will avoid malfunctions, premature degrading of specications.
☞ Avoid using the mixer close to strong sources of electromagnetic
interferences (e.g. video monitors, high power electrical cabling).
This may lead to degradation of audio quality.
☞ Take care of the connectors cables, always coil them avoiding
knots and twists.
☞ Care should be taken so that objects do not fall and liquids are
not spilled into the mixer. In public event don't let people, musicians,
technicians or anyone put glasses, cups, ashtrays and cigarettes on
the mixer.
☞ Never apply excessive force to the controls (knobs, sliders,
pushbuttons).
☞ Use a soft brush or a jet of air to clean the panel.
Do not use alcohol, solvents or detergents.
☞ If service is needed, refer to qualied service personnel only or
to the Montarbo distributor in your country.
INSTALLATION AND USE
☛ When connecting the mixer to the mains supply: • check that
mains voltage corresponds to the voltage indicated on the panel;
• use the 3-wire power cord supplied; • always connect it to a
grounded outlet.
☛ Always use quality cables and connectors.
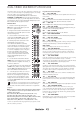
STEREO GRAPHIC EQUALIZER
Careful use of the graphic equalizer can help the overall system
sound more natural in less than perfect acoustic environments and
allows to reduce feedback. For a proper setting of the controls of
the graphic equalizer consider the following:
• Avoid settings with all sliders up or all sliders down. This would
involve a useless increase in noise or a reduction of dynamic range.
• Choose carefully the placement of loudspeakers and micropho-
nes to minimize feedback before using the equalizer, in order to
get the most volume before feedback is heard. Otherwise you risk
removing signicant amounts of your program material and altering
too much your sounds.
☛ Use shielded cables for your connections to the micro and
line inputs, to the send/return sockets, to the master and monitor
outputs, to the tape in/out and mono outputs.
☛ Before switching on or off the mixer, 'close' (set to minimum the
outputs faders) the master outputs. This will avoid switching noises
that may cause damages to loudspeakers.
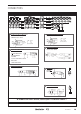
PRELIMINARY CONNECTIONS AND SETTINGS
❉ Connect the speaker enclosures, the microphones, the
instruments.
❉ Before turning on the mixer, set the channel volume faders and
the master volume faders to their lowest settings.
❉ Switch on the unit and turn the gain controls to their lowest
settings, the tone controls and panpots to the middle position, and
the auxiliary and effect sends anti-clockwise to their lowest settings.
☛ To optimize dynamics of each channel according to the
various signal sources, proceed as follows: • using a microphone
(connected to the XLR mic input) in conditions typical of the
intended use, set the GAIN control so as to cause the Peak LED to
illuminate; • now reduce the GAIN just enough until the peak LED
switches off and adjust the volume. ☛ The channel's peak LED is
affected only by the GAIN control and the TONE controls.
Note: Repeat the above procedure for all the channels, one at a time,
using the signal source assigned to that channel and simulating real
operating conditions as closely as possible.
❉ Set the volume faders of the L/R master outputs and of the
internal effects near to the "0" setting and the aux volume control
to the middle position, and now adjust the volume (8) of each
channel according to your requirements .
• With the graphic equalizer’s controls set to the zero mark
(centered) adjust the tone controls of each channel until you get
the tonal color you want for each microphone or instrument.
Once you have adjusted the tone controls of each channel, start
adjusting the controls of the graphic equalizer to compensate for
the acoustic environment and speaker placement.
This will allow you to compensate for different acoustic environ-
ments acting only on the equalizer’s setting with no need of
altering too much the tone controls settings of each channel.
16
ENGLISH